No-bake turtle bars are the kind of treat that makes people stop mid-conversation and ask, “Where did you get these?” They are gooey, rich, and packed with toasted pecans and buttery caramel — all sitting on a thick, crumbly base. No oven. No complicated steps. Just a handful of pantry staples and a little patience while they chill. Whether you are making them for a holiday tray, a bake sale, or simply because you want something ridiculously good on a Tuesday, these bars deliver every single time. Here are 24 ways to make them your own.
1. Start with a Buttery Graham Cracker Base
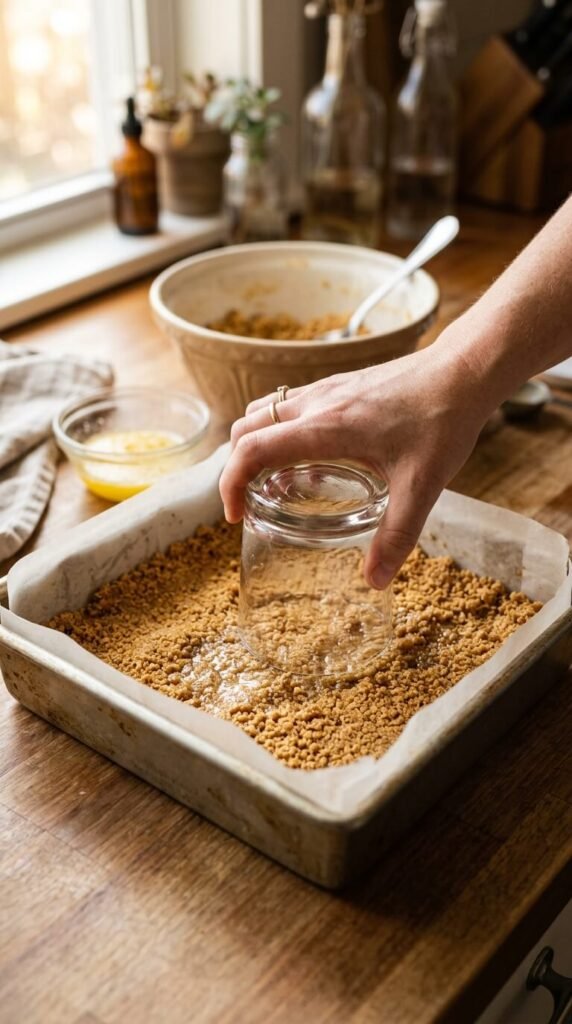
The base is everything. Crush about 2 cups of graham crackers and mix with 6 tablespoons of melted butter. Press it firmly into a lined 9×9 pan. The tighter you pack it, the cleaner your bars will slice. Use the flat bottom of a measuring cup to really compact the crust. This layer holds all that caramel and chocolate together. It should feel solid, not crumbly, before you add anything on top. A good base means bars that don’t fall apart when you pick them up.
2. Toast Your Pecans First — Always
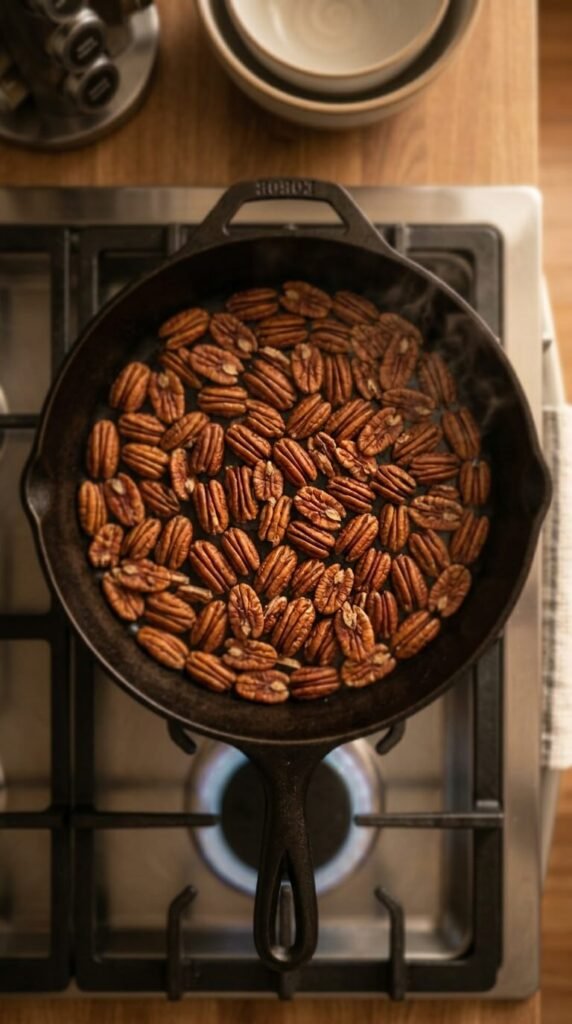
Toasted pecans taste completely different from raw ones. Toss them in a dry skillet over medium heat for 3 to 4 minutes. Stir constantly. You will smell a nutty, almost smoky aroma when they are ready. Pull them off heat immediately. Let them cool before adding them to your bars. This one small step takes your turtle bars from good to genuinely unforgettable. Do not skip it. A bag of raw pecans costs around $6, and toasting them costs nothing extra except two minutes of your time.
3. Use Store-Bought Caramel Sauce for Speed
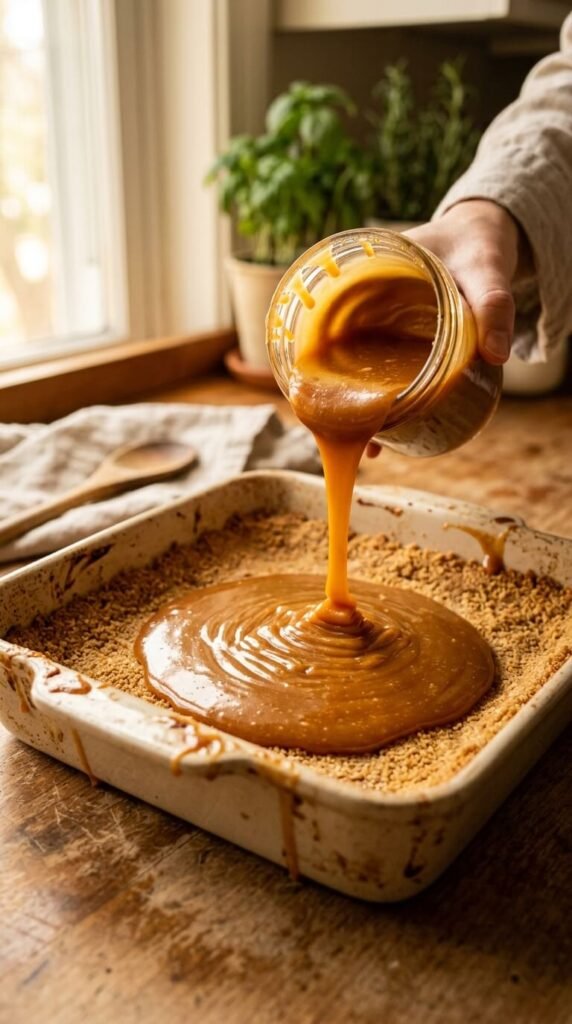
You do not need to make caramel from scratch. A good jar of store-bought caramel sauce works perfectly. Look for thick, scoopable caramel — not the thin ice cream topping kind. Brands like Trader Joe’s Fleur de Sel or Smucker’s Simple Delight are budget-friendly and taste amazing. Pour a generous layer over your chilled crust. Spread it all the way to the edges. About ¾ cup is the sweet spot. Too little and the bars feel dry. Just right, and every bite has that signature turtle pull.
4. Make Your Own 3-Ingredient Caramel in 10 Minutes
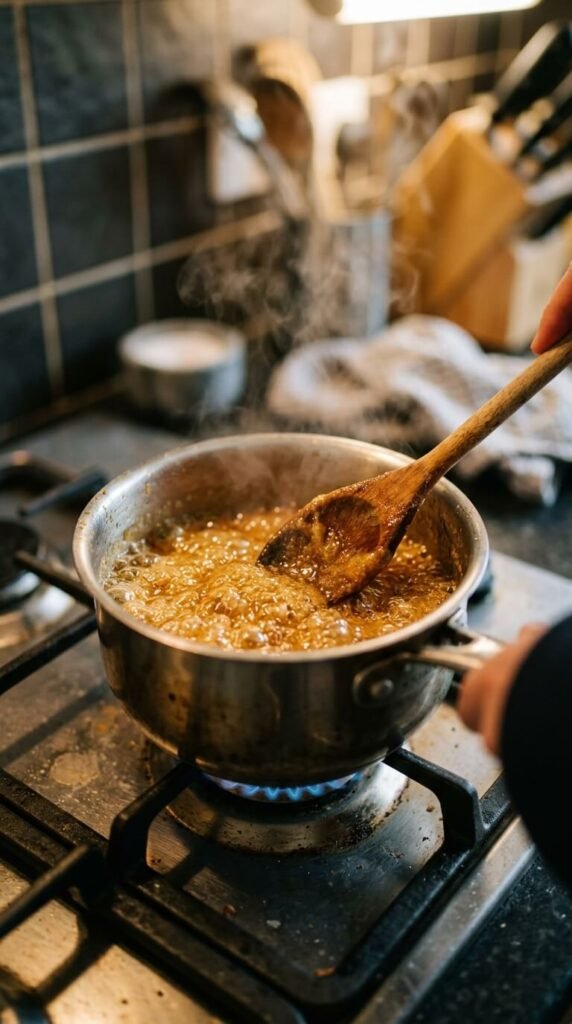
Homemade caramel is easier than you think. Combine 1 stick of butter, 1 cup of brown sugar, and half a can of sweetened condensed milk in a saucepan. Stir over medium heat for about 8 minutes until it thickens and turns golden. Pour it directly over your crust while warm. It sets up beautifully as it cools. This version is richer and stickier than store-bought — and it costs maybe $2 more. Perfect for when you want that extra wow factor without a complicated candy-making process.
5. Layer Pecans Directly Into the Caramel
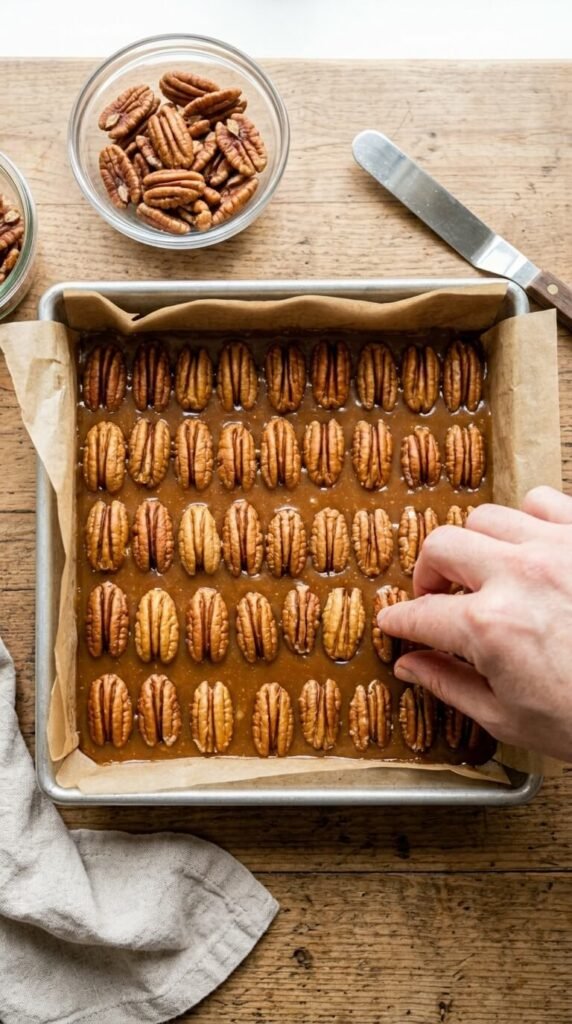
Press the pecans in while the caramel is still warm. This locks them in place so they don’t slide around when you pour chocolate over the top. Use halves for a prettier look, or roughly chop them for more coverage in every bite. Either way works. Aim for a generous, even layer — you want pecans in every single piece when you slice. Do not be shy. A packed pecan layer is what separates a real turtle bar from a basic chocolate square.
6. Choose the Right Chocolate for the Top
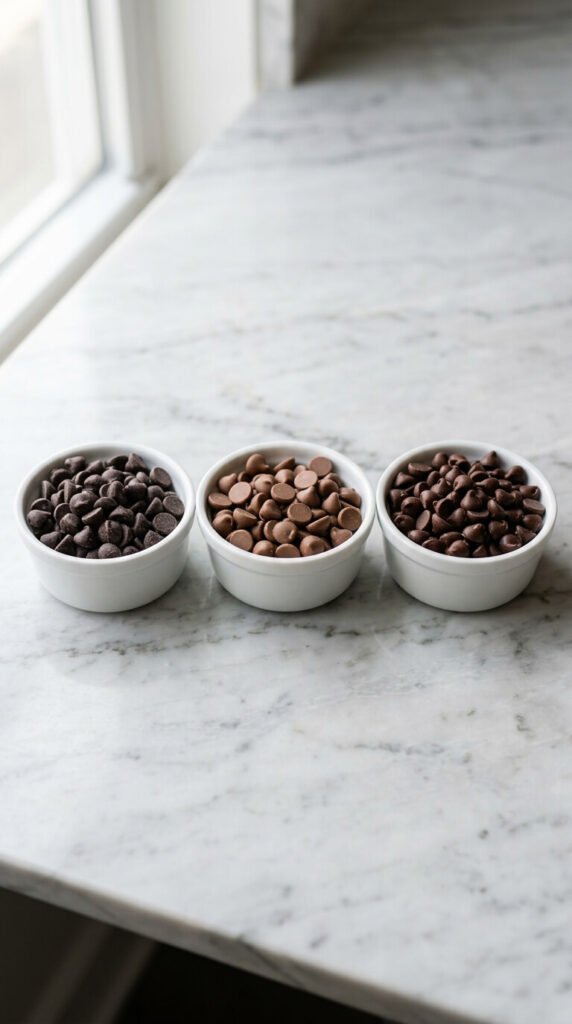
The chocolate layer makes or breaks the bar. Semi-sweet chocolate chips are the classic choice — they balance the sweetness of caramel perfectly. Dark chocolate (60% or higher) adds a slightly bitter contrast that feels more grown-up. Milk chocolate makes them sweeter and more crowd-pleasing for kids. Use about 1½ cups of chips. A 10-oz bag usually does the job and costs under $4. Pick what your crowd loves. There is no wrong answer — just personal preference and whoever you are trying to impress.
7. Melt Chocolate with Coconut Oil for a Glossy Finish
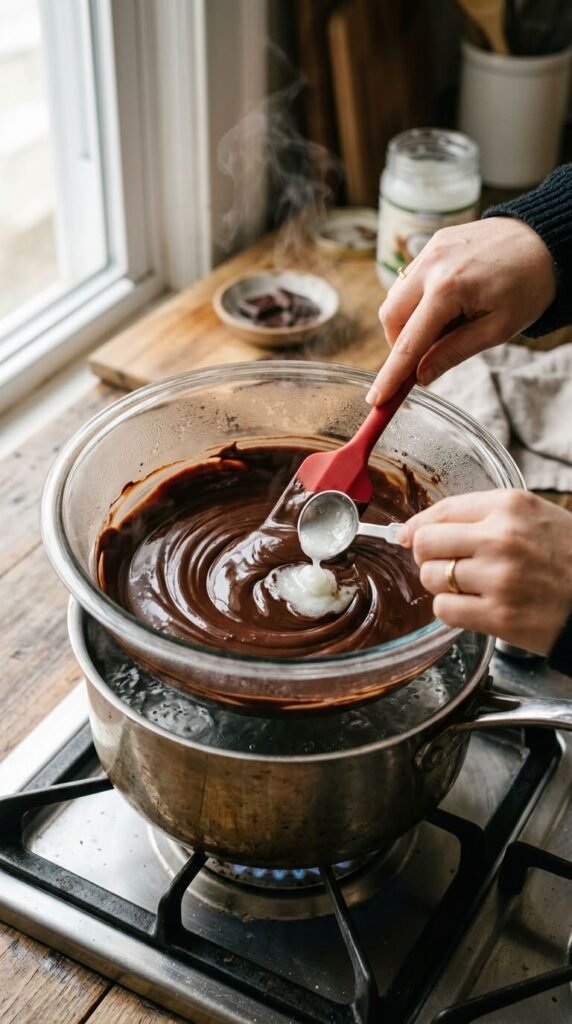
One teaspoon of coconut oil changes everything. Add it to your chocolate before melting. It makes the chocolate thinner, easier to spread, and gives it a professional glossy finish once it sets. The bars also slice much more cleanly because the chocolate layer doesn’t shatter. You can melt on the stovetop with a double boiler or in the microwave in 30-second bursts. Stir between each burst. Do not overheat. Burnt chocolate cannot be saved. Coconut oil is cheap and a little jar lasts for dozens of batches.
8. Spread Chocolate Evenly with an Offset Spatula
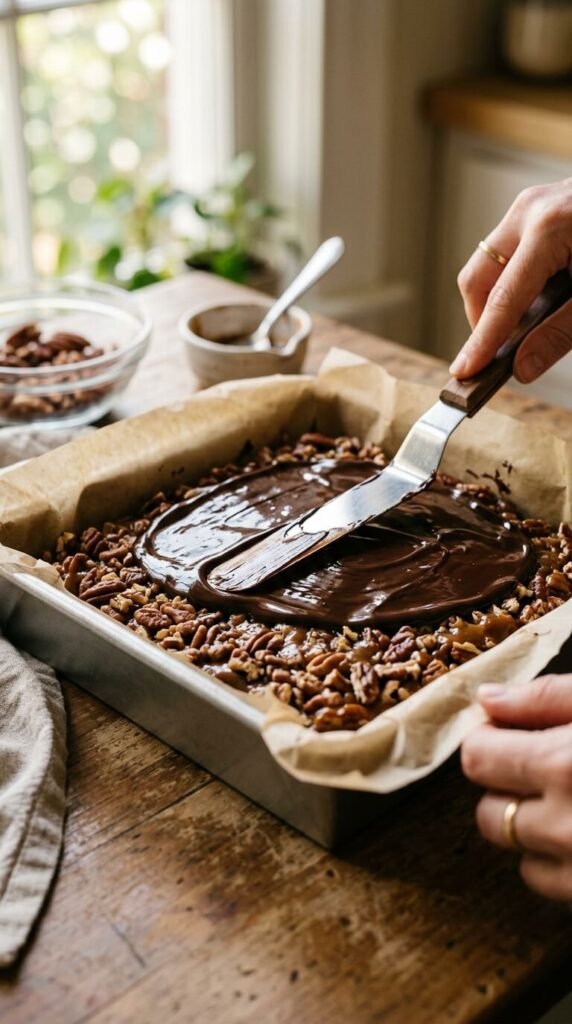
An offset spatula is a $6 tool that pays for itself immediately. It lets you spread melted chocolate into the corners and edges without disturbing the pecan layer underneath. A regular spoon drags and clumps. A silicone spatula works in a pinch but is harder to control. The goal is a smooth, even coat that completely covers the pecans. Work quickly before the chocolate starts to set. Once it looks even and glossy, stop. The refrigerator will do the rest of the work for you.
9. Add a Sprinkle of Flaky Sea Salt on Top
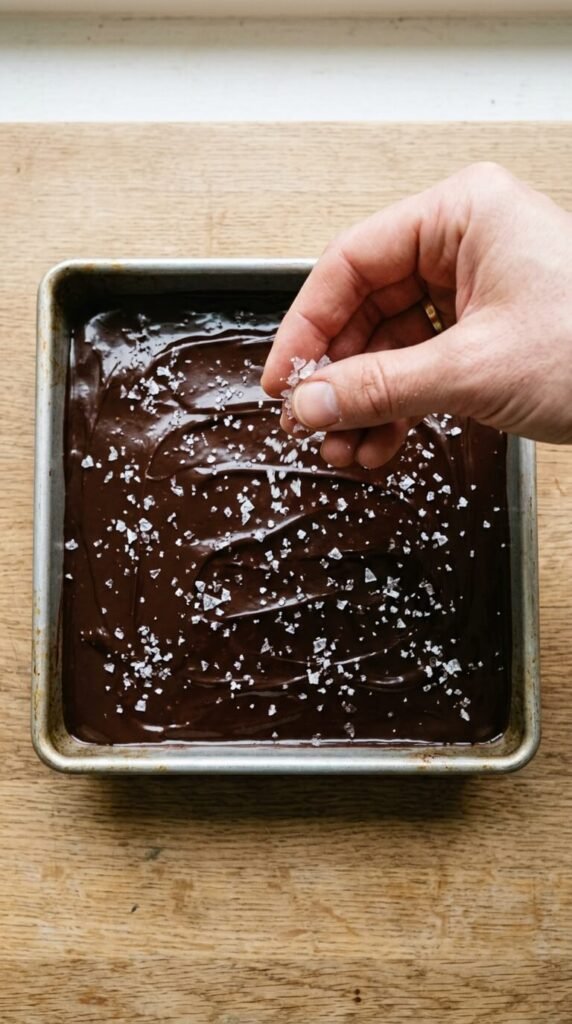
Salt makes sweet things taste more like themselves. A light sprinkle of flaky sea salt right after you pour the chocolate takes these bars from “really good” to “why can’t I stop eating these.” Maldon sea salt is the gold standard but costs around $8 for a box that lasts forever. Kosher salt in a pinch also works. Add it while the chocolate is still wet so the crystals stick. Do not overdo it. You want a hint, not a mouthful. A little goes a very long way here.
10. Use a Parchment Sling for Easy Removal
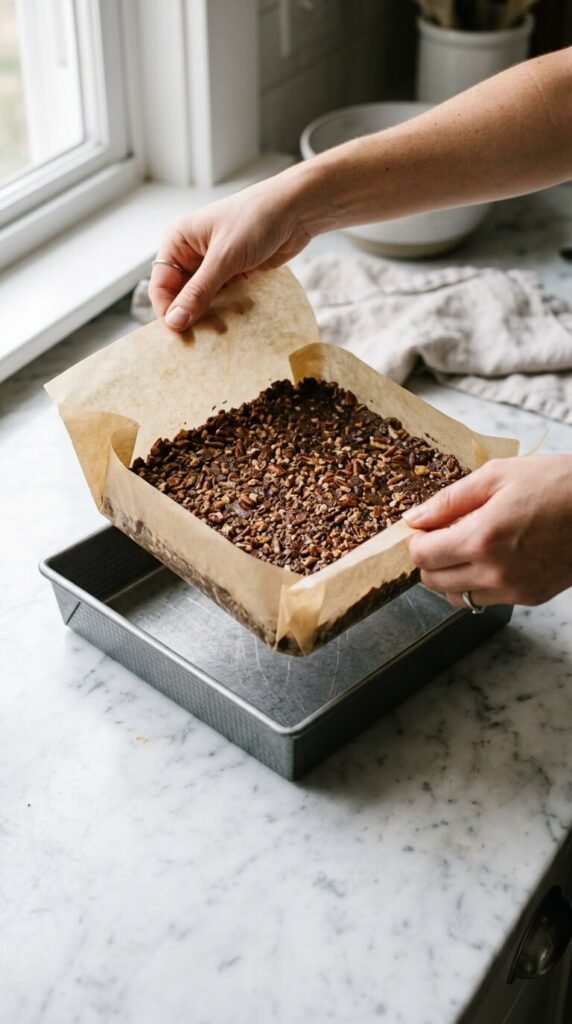
Line your pan with parchment before anything goes in. Let it hang over two opposite sides like handles. Once your bars are fully set, you just lift the whole slab out cleanly. No digging. No broken corners. No bars stuck to the bottom. This also means you can slice them on a cutting board instead of in the pan, which gives you much cleaner edges. Use an 8×8 or 9×9 pan. Either works. The 8×8 gives you thicker bars; the 9×9 gives you more pieces.
11. Chill for at Least 2 Hours Before Cutting
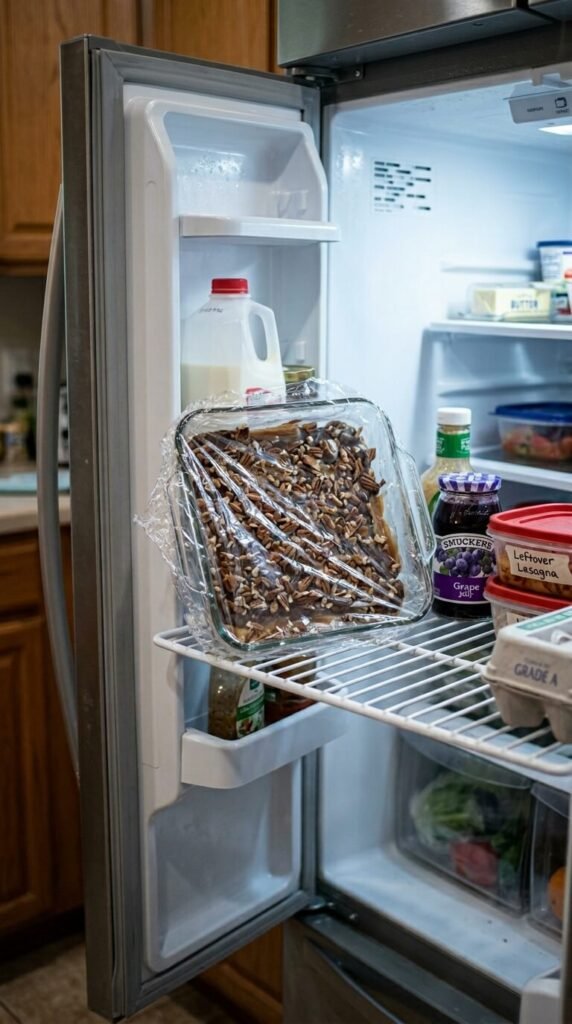
Patience here is not optional. The caramel needs time to firm up, the chocolate needs to fully set, and everything needs to bond together as one cohesive slab. Two hours minimum in the refrigerator. Overnight is even better. Cutting too soon means gooey caramel oozing out of the sides and chocolate that cracks and slides off. Set a timer and walk away. The bars will be waiting for you. And they will be worth it. Rushing this step is the number one reason bars fall apart.
12. Slice with a Warm Knife for Clean Cuts
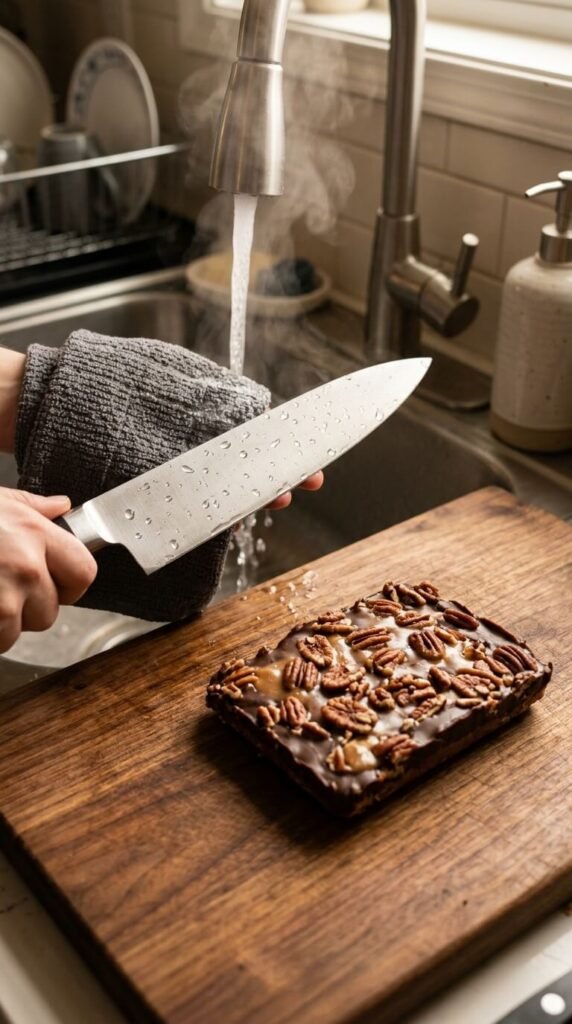
A warm knife cuts through chocolate and caramel without cracking. Run your knife under hot water, wipe it dry, then make one straight confident cut. Repeat — warm, wipe, cut — every single time. Do not saw back and forth. One downward press per cut. This gives you clean-edged bars that look like they came from a professional kitchen. Use a sharp chef’s knife, not a serrated one. Serrated edges tear rather than slice. For a 9×9 pan, cut into 16 squares or 12 larger bars.
13. Try a Pretzel Crust for a Salty Twist
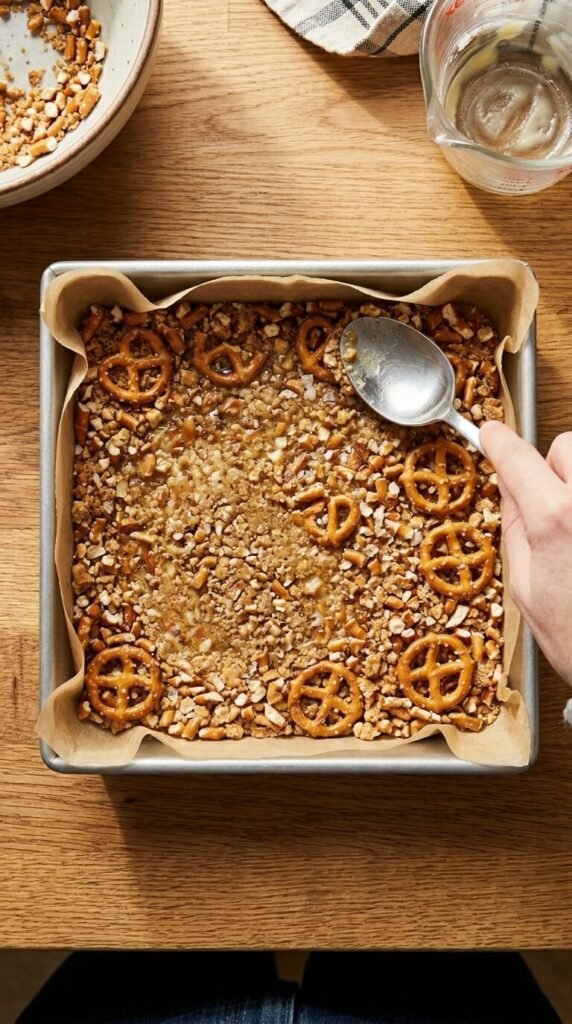
Swap half the graham crackers for crushed pretzels. The result is a salty, crunchy base that plays off the sweet caramel in a completely new way. Use a 1:1 ratio — 1 cup graham cracker crumbs and 1 cup pretzel crumbs. Mix with butter the same way. The pretzel flavor comes through clearly but does not overpower. This is a great move for adults who find regular turtle bars too sweet. A bag of pretzels costs under $3 and suddenly your bars have a whole new personality.
14. Add a Layer of Cream Cheese for Richness
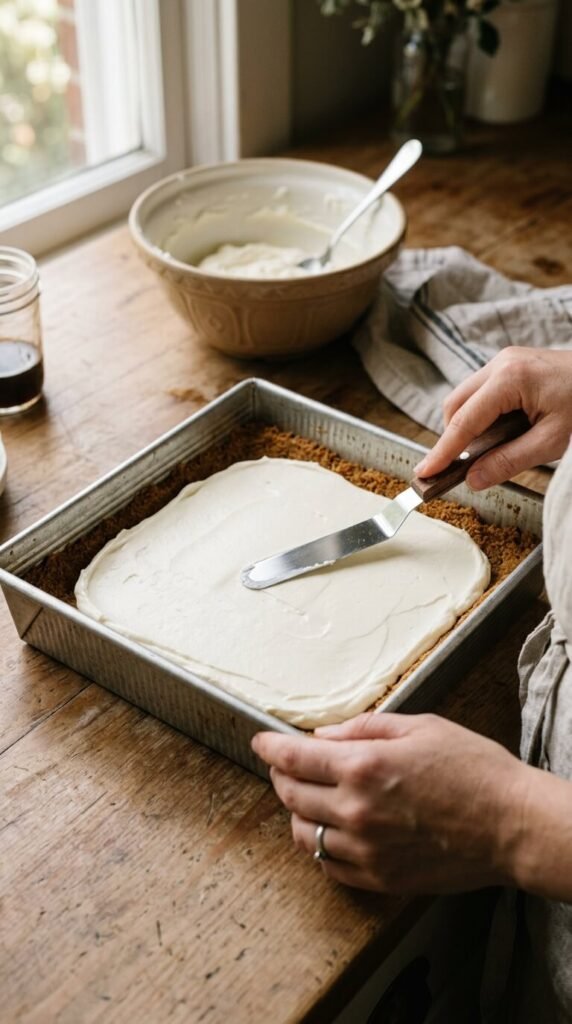
A thin layer of cream cheese between the crust and caramel adds a quiet richness. Beat 4 oz of softened cream cheese with 2 tablespoons of powdered sugar until smooth. Spread it over the cooled crust before adding caramel. It creates a cheesecake-like layer that makes the bars feel more substantial. It also helps the caramel stay in place. An 8 oz block of cream cheese costs about $3 and you only use half. Use the rest in a dip or frosting.
15. Drizzle White Chocolate for a Fancy Look
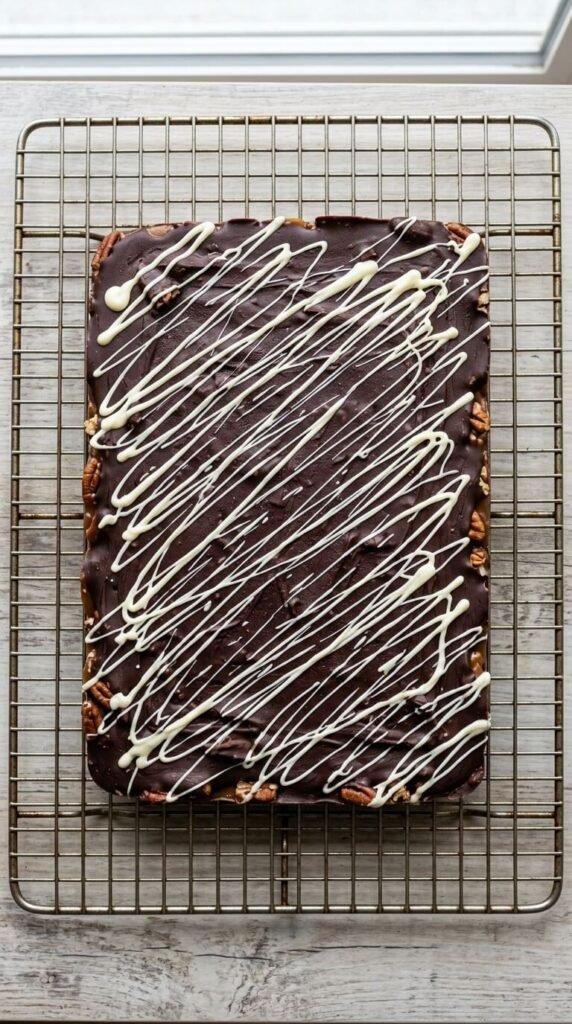
White chocolate drizzle makes these bars look bakery-level without extra effort. Melt about ¼ cup of white chocolate chips with a tiny drop of coconut oil. Dip a fork or use a small piping bag. Move quickly in zigzag lines across the dark chocolate surface. Let it set for 10 minutes. The contrast of dark and white looks dramatic and intentional. This is also a great way to use up the last of a bag of white chips sitting in your pantry. Takes 5 minutes and photographs beautifully.
16. Make Mini Bars in a Muffin Tin
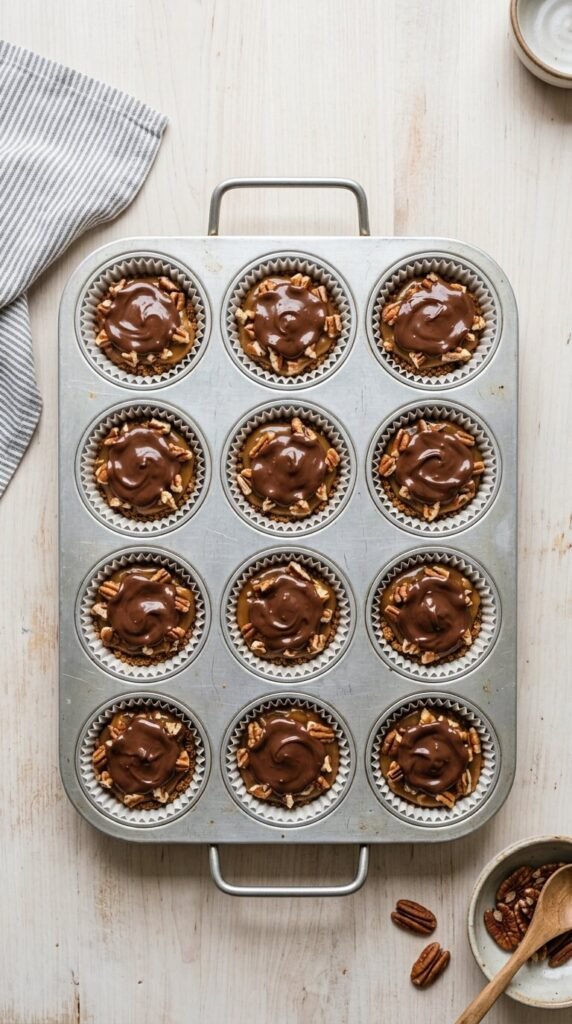
Individual portions are perfect for parties and gift boxes. Line a standard muffin tin with paper liners. Press crust into each cup, then layer caramel, pecans, and chocolate as usual. Refrigerate the same way. Each cup makes one perfect single-serving turtle bite. No slicing required. They pop right out of the liners and stack easily in a tin or box. A 12-cup muffin pan costs $10 and lasts forever. Use a 24-cup mini muffin tin for bite-sized versions that disappear even faster.
17. Use Medjool Dates to Make a Natural Caramel
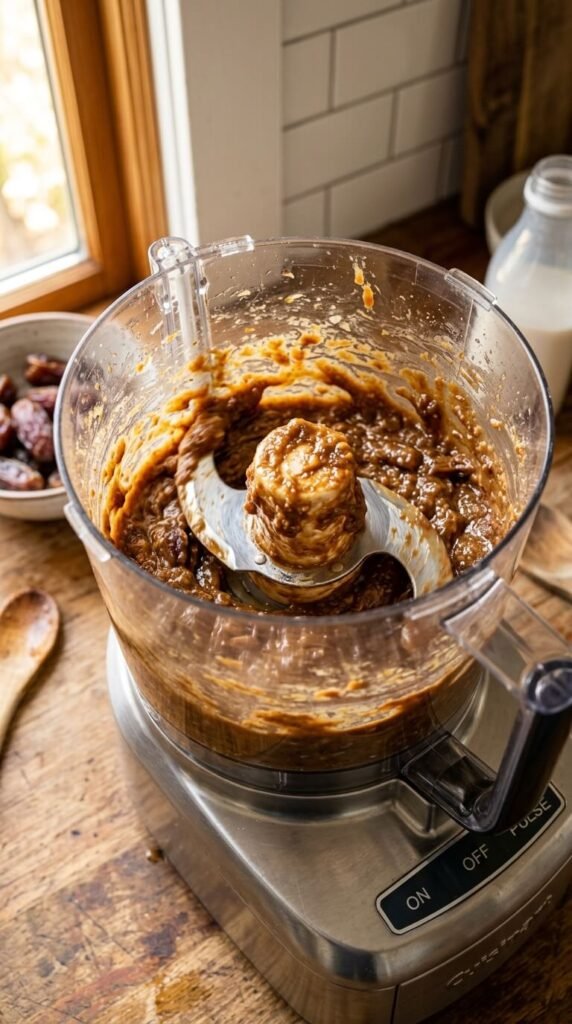
For a refined-sugar-free version, dates are the answer. Blend 1 cup of pitted Medjool dates with 2 tablespoons of almond milk and a pinch of salt until completely smooth. The result is a thick, sticky paste that tastes shockingly similar to caramel. Spread it over your crust just like regular caramel. It holds up well in the fridge and slices cleanly. Medjool dates cost about $5 to $7 for a bag. This swap makes turtle bars feel a little less guilty without losing the gooey texture everyone loves.
18. Add Espresso Powder to the Chocolate Layer
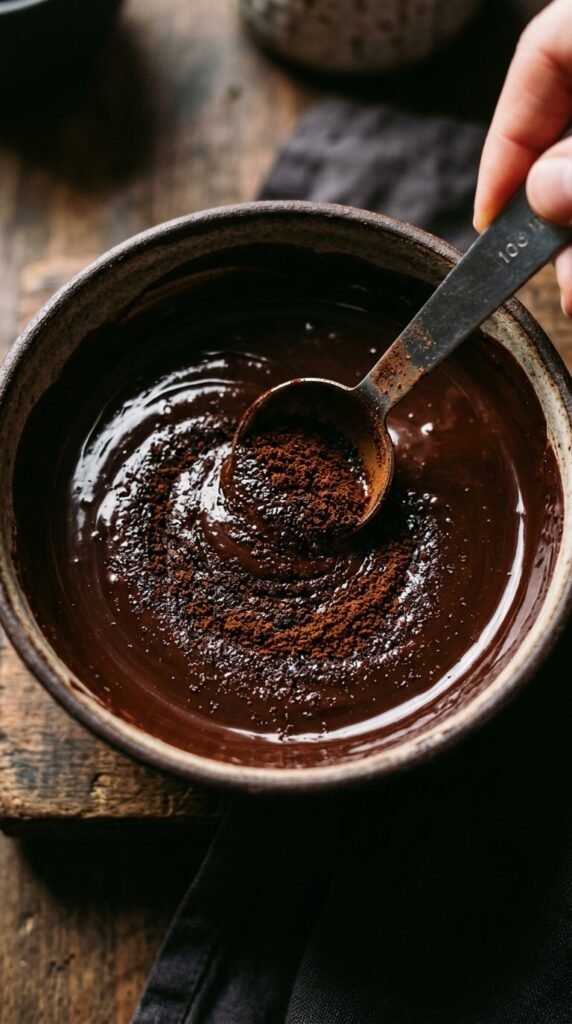
A small amount of espresso powder makes chocolate taste more like chocolate. Add just ¼ teaspoon to your melted chocolate and stir it in completely. You will not taste coffee in the final bar. You will just notice that the chocolate flavor is somehow deeper and more intense. This trick works with milk chocolate too, not just dark. A jar of espresso powder costs around $5 and lasts for months. Use it in brownies, cookies, and hot cocoa too. It is one of those pantry additions that quietly makes everything better.
19. Swap Pecans for Mixed Nuts on a Budget
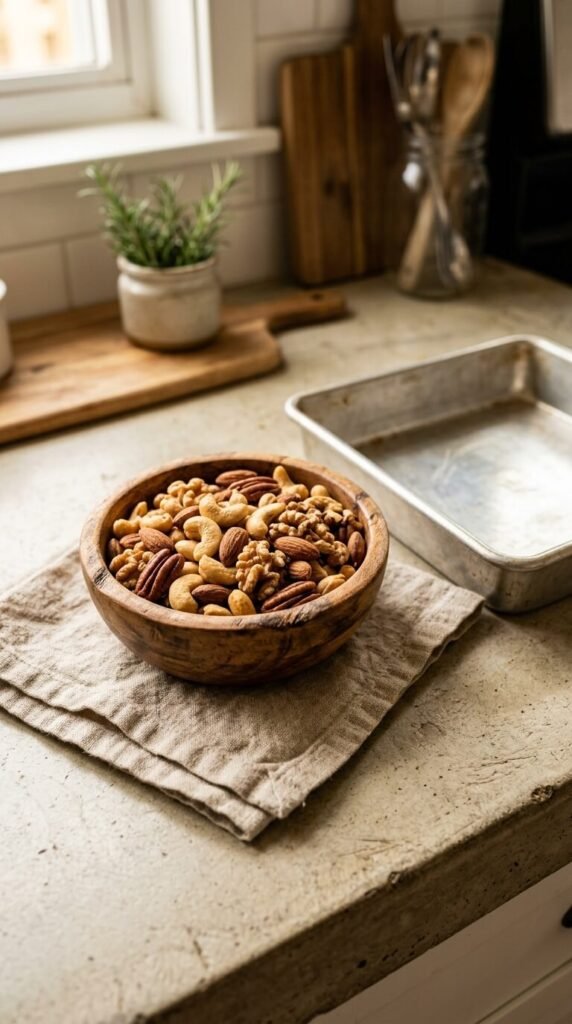
Pecans can get pricey, especially around the holidays. A bag of mixed nuts or even plain walnuts gives you a similar crunch at a lower cost. Walnuts are slightly more bitter than pecans but pair beautifully with dark chocolate. Cashews bring a buttery sweetness that works surprisingly well. A mixed nut blend often costs $4 to $6 less per pound than pecans. Toast any nut the same way — dry skillet, medium heat, constant stirring. The turtle bar concept is about texture and contrast, not one specific nut.
20. Pack Them as Gifts in a Lined Cookie Tin

Turtle bars are one of the best edible gifts you can make. Slice them small, layer them between sheets of parchment paper, and pack them into a cookie tin or a shallow bakery box. They travel well, stay fresh for up to a week in the fridge, and look completely homemade in the best way. A set of decorative tins costs around $8 for a pack of 4 at craft stores. Add a handwritten label with the flavor and a “keep refrigerated” note. People remember food gifts. These will not be forgotten.
21. Double the Batch for Freezing
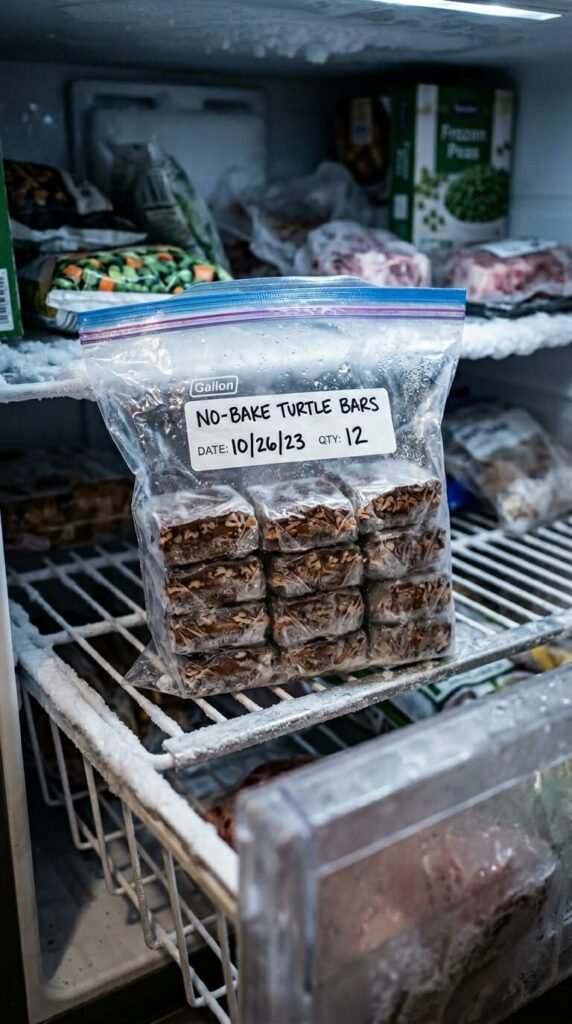
These bars freeze exceptionally well. Double the recipe, slice the bars, wrap each one individually in plastic wrap, and place them in a freezer-safe bag. They keep for up to 3 months. Pull one out and let it sit at room temperature for 15 minutes. It tastes exactly like the day you made it. This is the move if you want to always have something impressive on hand for unexpected guests. The time cost is minimal — you are already making a batch, so you might as well make two.
22. Make a Turtle Bar Skillet for Sharing
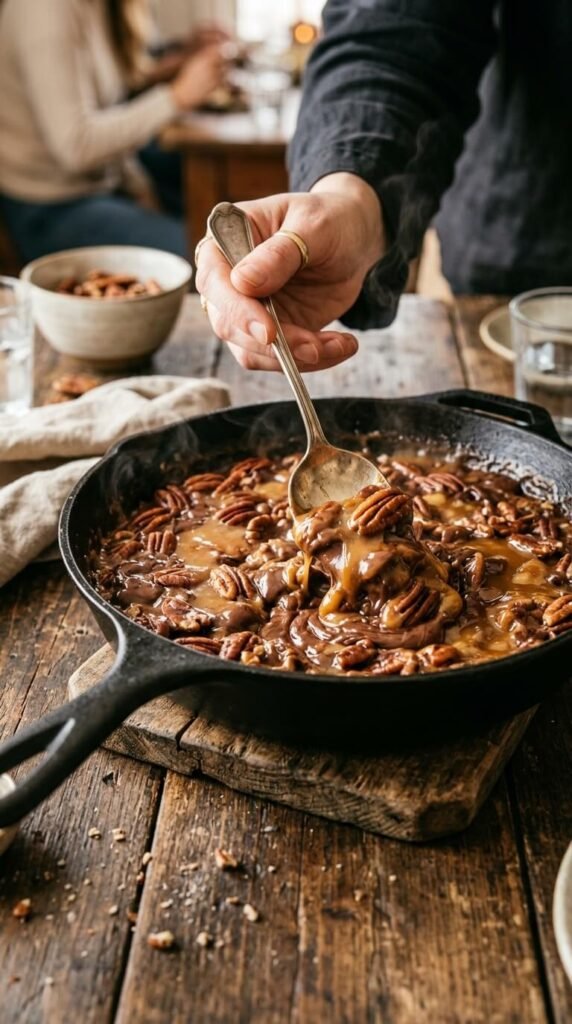
For a more casual presentation, skip the pan and go family-style. Press the crust into a cast-iron skillet. Layer caramel, pecans, and chocolate directly in the skillet. Refrigerate until set, then bring the whole skillet to the table with a spoon and let people scoop their own portion. It is messy and fun and completely unpretentious. Great for game nights or casual dinner parties. It also photographs incredibly well and the skillet keeps the bars cold longer on the table than a flat pan would.
23. Use Coconut Flakes for a Tropical Version
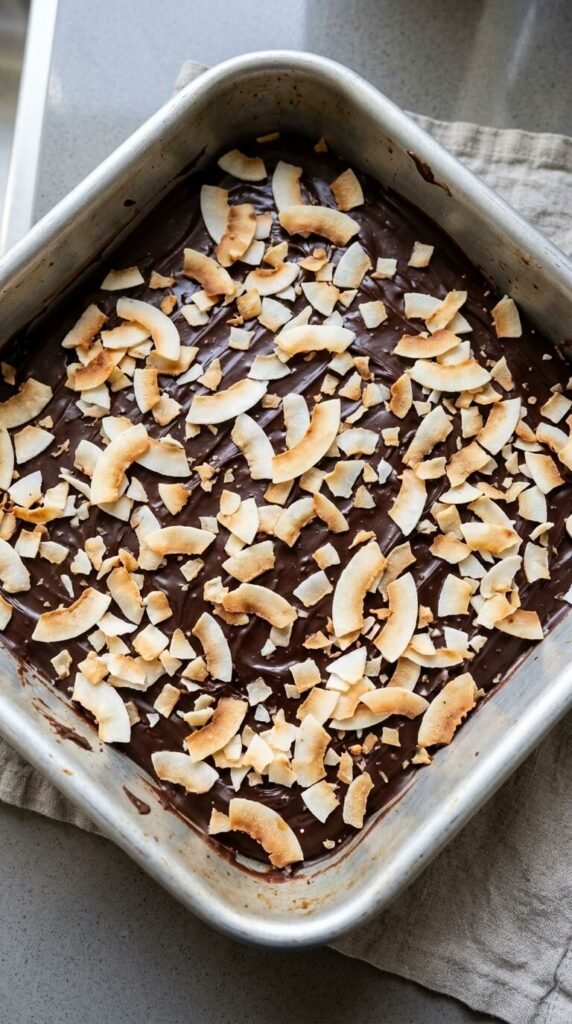
Toasted coconut flakes add texture and a subtle tropical note. Toast ½ cup of shredded coconut in a dry skillet until golden. Sprinkle over the wet chocolate layer right before it sets, pressing lightly so it sticks. Coconut and caramel are a classic combination. Combined with pecans and chocolate, the result is something close to a candy bar you cannot buy in stores. A bag of shredded coconut costs about $3 and adds a whole new dimension to the bars. Works with sweetened or unsweetened coconut — b oth are good.
24. Drizzle Extra Caramel Right Before Serving
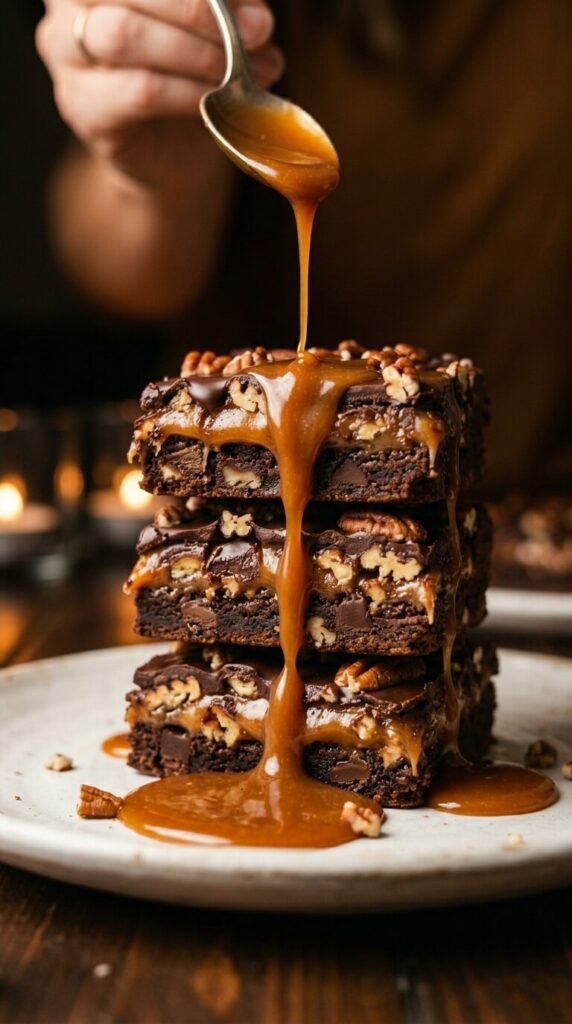
The finishing drizzle is purely theatrical — and completely worth it. Right before you serve the bars, warm a few tablespoons of caramel sauce and drizzle it over the top. Use a spoon for a loose, rustic look or a squeeze bottle for clean lines. This adds zero prep time and takes the presentation from “homemade” to “wow.” It also adds a tiny bit of extra gooeyness to the top layer, which people absolutely love. Even bars that have been sitting in the fridge for two days taste freshly made with a little warm caramel over them.
Conclusion
No-bake turtle bars are proof that some of the best things you can make in a kitchen do not require turning on the oven. These 24 ideas give you everything you need — from a solid base to creative toppings, budget-friendly swaps to make-ahead strategies. The formula is simple: a crunchy base, gooey caramel, toasted pecans, and a smooth chocolate layer on top. Everything else is just you making it your own. Pick two or three ideas that speak to you and start there. Make a batch, share them, and watch how quickly they disappear. Then make another batch — because you will want to.