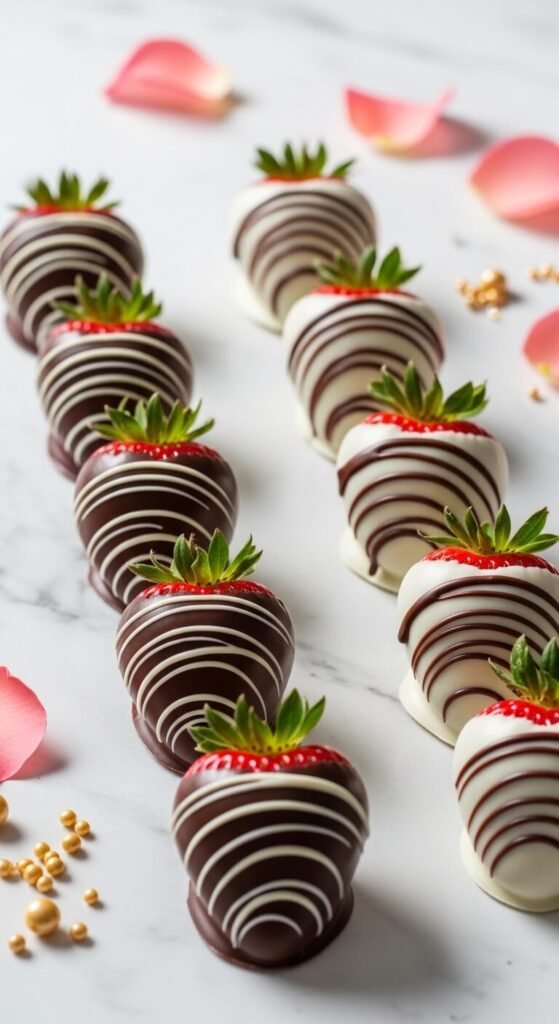
Walk into any chocolate boutique and you’ll see them displayed like edible jewels — glossy, perfectly coated, drizzled with precision, and priced accordingly. Here’s the thing nobody in that shop wants you to know: chocolate covered strawberries are one of the easiest things you can make at home, and with just a few simple techniques, yours can look just as stunning as the ones in the glass case. We’re talking mirror-shine chocolate, clean dips, beautiful drizzles, and zero cracked coating or white streaks in sight.
The secret isn’t talent. It’s technique — and you’re about to learn all of it.
Why Homemade Looks (and Tastes) Better
Store-bought chocolate covered strawberries are often made hours or even days in advance, which means the strawberries can release moisture into the chocolate, causing that dreaded sweating and cracking. When you make them fresh at home, you control every variable:
- The chocolate quality — real couverture or high-quality chocolate chips, not compound coating.
- The freshness — made same-day means the coating stays pristine and the berry inside is at peak ripeness.
- The presentation — your drizzles, your toppings, your creativity.
- The size — choose the biggest, most gorgeous strawberries in the punnet. No one does that at the factory.
Professional results come from professional habits — and this guide walks you through every single one of them.
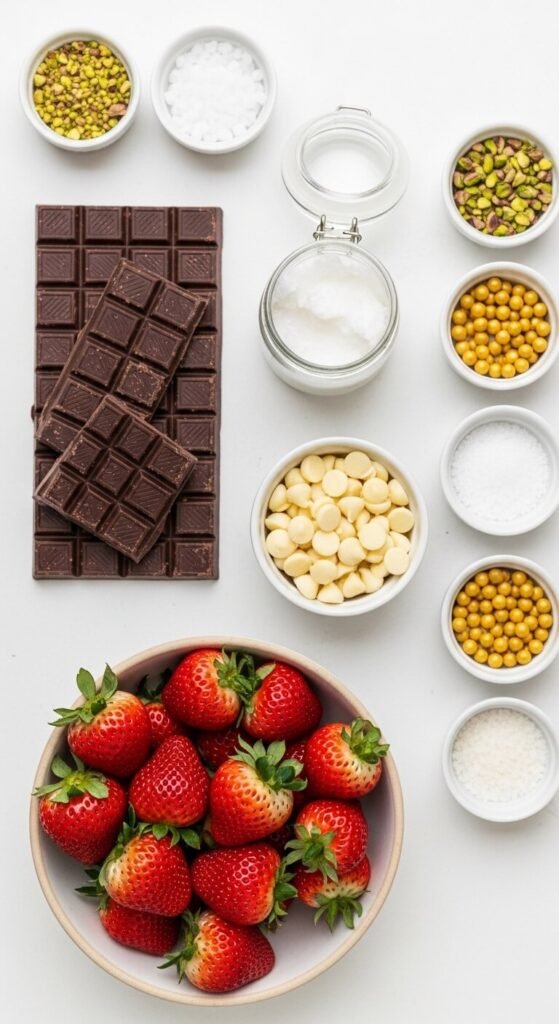
What You’ll Need
The strawberries:
- 1 pound large, firm strawberries with intact green hulls (the leaves make the perfect handle)
- Completely dry — this is non-negotiable (more on this below)
The chocolate:
- 8 oz high-quality dark chocolate (60–70% cacao), finely chopped or in chip form
- 4 oz white chocolate, for drizzling (optional but stunning)
- 1½ teaspoons coconut oil per 8 oz of chocolate (the secret to a glossy, snappy shell)
For decorating:
- Crushed freeze-dried strawberries or raspberries
- Finely chopped pistachios or toasted almonds
- Gold or silver sugar pearls
- Rainbow sprinkles for a fun, celebratory look
- Flaky sea salt for a sophisticated finish
Step 1: Prep Your Strawberries Perfectly
This is the step most people skip and the reason most homemade chocolate covered strawberries look amateurish or develop cracks within hours. Water and chocolate are enemies. Even one drop of moisture will cause the chocolate to seize or prevent it from adhering smoothly.
- Wash strawberries gently and pat them completely dry with paper towels.
- Lay them on a clean dry towel and let them air dry at room temperature for at least 30 minutes — ideally an hour.
- Do not refrigerate after washing — cold berries cause condensation, which ruins the coating.
- Make sure the hulls (green tops) are dry too — moisture hides there easily.
Dry strawberries = flawless chocolate. This step alone separates amateur dips from professional ones.
Step 2: Temper (or Melt) Your Chocolate
For that signature glossy, snappy chocolate shell, tempering is the gold standard — but a simplified version works beautifully for home use.
The easy tempering method:
- Place two-thirds of your finely chopped chocolate in a dry, heatproof bowl.
- Microwave in 30-second bursts, stirring well between each, until just melted and smooth.
- Add the remaining one-third of chopped chocolate and stir continuously until fully melted and the mixture has cooled slightly — around 88–90°F if you have a thermometer.
- Stir in the coconut oil until glossy.
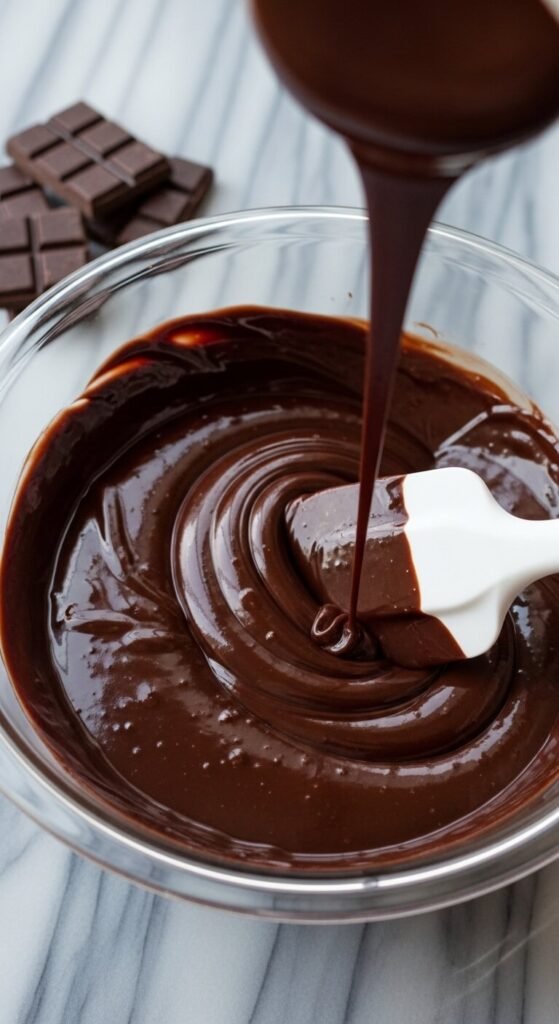
No thermometer? No problem. The chocolate is ready when it feels just barely warm — not hot — against your inner wrist. It should look mirror-shiny and flow smoothly off the spoon.
Step 3: Dip With Confidence
Technique here matters more than speed.
- Hold each strawberry by the hull and dip it straight down into the chocolate.
- Submerge it about three-quarters of the way up, leaving a clean border of red near the top.
- Lift it out and let the excess chocolate drip back into the bowl — rotate the strawberry slowly as you lift for an even coat.
- Give it one gentle shake to remove any last drips, then transfer it to a parchment-lined tray.
The professional trick: Drag the bottom of the strawberry lightly across the lip of the bowl as you remove it. This removes the excess drip at the base and gives you that clean, sharp chocolate edge that screams made by someone who knows what they’re doing.
Repeat with all the strawberries, working quickly before the chocolate cools and thickens too much.
Step 4: Decorate Before the Chocolate Sets
You have a narrow window — about 60 to 90 seconds per strawberry — before the chocolate becomes too firm to hold toppings. Work with a few strawberries at a time.
- For toppings: Sprinkle crushed nuts, freeze-dried berries, sea salt, or sprinkles immediately after dipping while the chocolate is still wet and tacky.
- For drizzle: Melt white chocolate with a little coconut oil, transfer to a small zip-lock bag, snip a tiny corner off, and drizzle back and forth over the set dark chocolate in thin, confident lines.
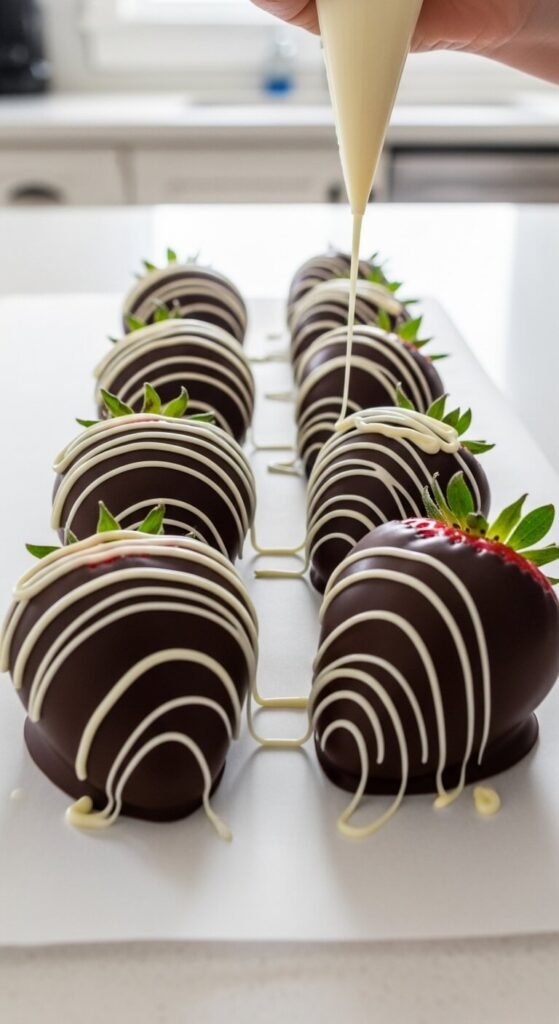
Let the drizzle set completely before moving or stacking the strawberries.
Step 5: Set, Store, and Serve
- Let the finished strawberries set at room temperature for 20–30 minutes until completely firm.
- Do not refrigerate during this time — the cold creates condensation that dulls the shine.
- Once fully set, serve immediately for peak presentation, or store loosely covered at cool room temperature for up to 8 hours.
- If you must refrigerate, place them uncovered on a parchment-lined tray for up to 24 hours — expect a slight loss of shine, but the taste will be perfect.
The golden rule: Chocolate covered strawberries are a same-day treat. Make them the morning of or a few hours before serving for the absolute best results.
Tips That Make All the Difference
- Buy the best chocolate you can find — this is a two-ingredient recipe at its core. Quality chocolate is everything.
- Bigger strawberries dip cleaner — large, uniform berries are easier to handle and look far more impressive on the finished platter.
- Work in a cool kitchen — if your kitchen is warm, the chocolate will take longer to set and may lose its shine.
- Use a tall, narrow glass or mug for dipping instead of a wide bowl — it gives you more depth, wastes less chocolate, and makes the angle much easier to control.
- Don’t skip the coconut oil — even a small amount transforms average melted chocolate into a glossy, professional-looking coating that sets with a satisfying snap.
The Gift That Always Impresses
Chocolate covered strawberries sit at that perfect intersection of simple and spectacular. They take under an hour from start to finish, cost a fraction of the boutique price, and land on any table looking like they were made by someone with real skill — because now they are.
Whether you’re making them for Valentine’s Day, a dinner party, an anniversary, or a Thursday when someone deserves something beautiful, these will never fail to impress.
Save this recipe, share it with someone who loves strawberries, and make a batch this week — because homemade always looks better when you know the secrets. 🍓🍫✨