You’ve been there. The chocolate is melting beautifully, everything is going perfectly, and then — without warning — it turns into a thick, grainy, unworkable paste that no amount of stirring, reheating, or wishful thinking can fix. Seized chocolate is one of the most frustrating kitchen moments in home confectionery, and it happens to experienced cooks almost as often as beginners. The good news? It’s entirely preventable. Once you understand exactly why chocolate seizes and how to work with it correctly, your dipping sessions will go smoothly every single time — glossy, fluid, and completely cooperative from first dip to last.
Understanding chocolate is the skill. Everything else is just practice.
What “Seizing” Actually Means — And Why It Happens
Chocolate seizing is when melted chocolate suddenly transforms from smooth and fluid into a stiff, grainy, lumpy mass. It’s jarring, it’s frustrating, and it feels like something went catastrophically wrong. In a sense it did — but it’s a very specific, understandable chemical reaction, not random kitchen chaos.
Here’s exactly what causes it:
- Water is the primary culprit. Chocolate is made of fat — cocoa butter — and tiny particles of cocoa and sugar. When even a small amount of water enters melted chocolate, those dry particles absorb it and clump together into a paste. This is seizing. Just one drop of steam dripping from a lid, a wet spoon, or a damp bowl is enough to ruin an entire batch.
- Overheating causes graininess. When chocolate gets too hot, the cocoa butter separates from the solids, leaving a dull, greasy, grainy mess that sets with a matte finish and unpleasant texture.
- Sudden temperature changes can cause the fat to behave unpredictably, resulting in chocolate that blooms white or sets soft rather than snapping cleanly.
Once you know the enemies — water, excessive heat, and temperature shock — avoiding them becomes straightforward.
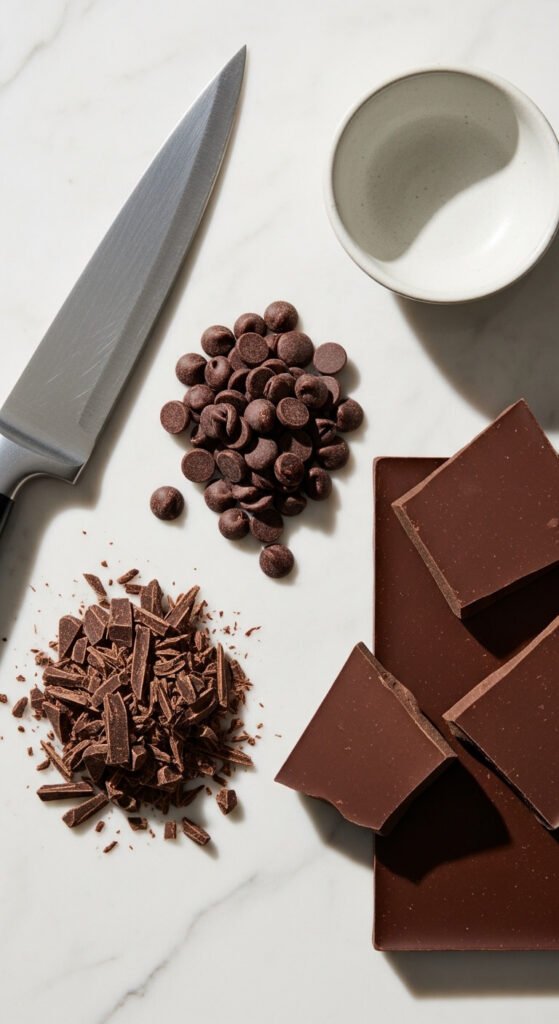
Choosing the Right Chocolate for Dipping
Not all chocolate melts the same way, and starting with the right type makes everything easier.
- Couverture chocolate (found at baking specialty shops) has a higher cocoa butter percentage — typically 30–40% — which makes it flow beautifully when melted and sets with a professional-level gloss and snap. It’s the gold standard for dipping.
- Good-quality chocolate bars (not candy coating) work very well. Look for bars with cocoa butter listed in the ingredients — this is what gives chocolate its melt-in-your-mouth quality.
- Chocolate chips can work but are formulated to hold their shape during baking, which means they contain stabilisers that make them slightly thicker when melted. They dip fine but won’t flow as elegantly as chopped chocolate.
- Avoid compound chocolate or candy melts if you want real chocolate flavour — they’re easier to work with but sacrifice taste significantly.
The golden rule: If you wouldn’t happily eat it as a snack, it won’t make a great dipping chocolate.
The Right Way to Melt Chocolate
This is where most seizing happens, and where the right technique makes all the difference.
The double boiler method (most reliable):
- Fill a saucepan with 1–2 inches of water and bring to a gentle simmer — not a boil.
- Place a heatproof bowl on top, ensuring the bottom of the bowl does not touch the water.
- Add finely chopped chocolate to the dry bowl and stir gently as it melts.
- Keep the heat low and patient — you’re coaxing the chocolate, not rushing it.
- Remove from heat the moment it’s smooth.
The microwave method (faster, equally effective when done right):
- Use a completely dry, microwave-safe bowl.
- Heat in 20-second bursts on medium power — not full power.
- Stir thoroughly between every single interval.
- Stop microwaving when about 80% of the chocolate is melted — the residual heat will finish the rest.
- Stir until completely smooth before applying any more heat.
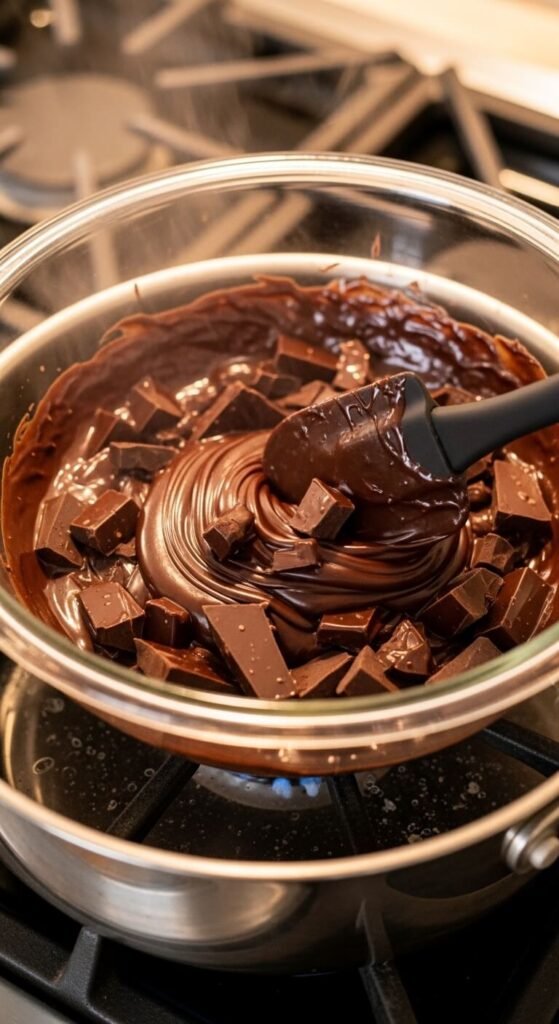
The rules that apply to both methods:
- Every bowl, spoon, and spatula must be completely dry before touching the chocolate.
- Never cover the bowl — steam condensation drips back in and causes seizing instantly.
- Work with medium-low heat only — patience here is not optional.
Adding Coconut Oil: The Secret to a Perfect Dipping Chocolate
Even perfect melting technique produces chocolate that can be too thick for clean, elegant dipping. The fix is simple and makes an enormous difference:
- Add 1 teaspoon of refined coconut oil per cup of chocolate chips before melting.
- It thins the chocolate to a more fluid, dippable consistency.
- It adds a subtle sheen that makes finished dipped treats look glossy and professional.
- It helps the chocolate set with a clean snap rather than a soft, waxy finish.
Refined coconut oil is flavourless and odourless — it will not make your chocolate taste like coconut. Unrefined coconut oil has a distinct coconut flavour, so avoid it unless that’s intentional.
A small addition. A significant result.
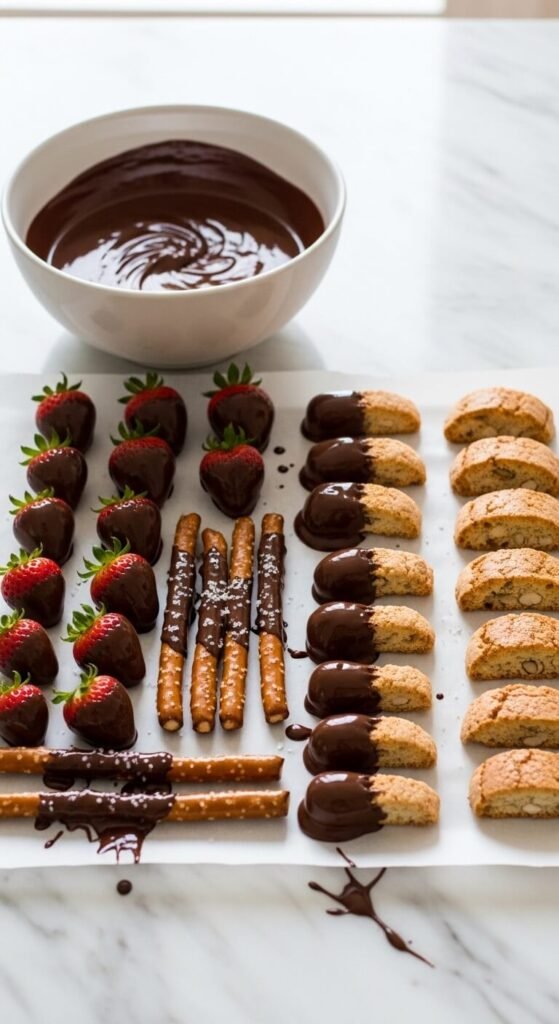
The Dipping Technique That Gets It Right
Even perfect melted chocolate produces disappointing results if the dipping technique is rushed or careless.
- Make sure whatever you’re dipping is completely dry and at room temperature — moisture and temperature extremes are both enemies.
- Hold the item by its tip, stem, or a skewer and submerge it in one smooth, confident motion.
- Lift straight up and let the excess drip back into the bowl for several seconds — rotate slowly for an even coat.
- Drag the bottom lightly across the rim of the bowl to remove the final drip.
- Place on parchment paper to set — never on a plate or foil, which can cause sticking or uneven setting.

Work in small batches and keep your chocolate warm between dips by setting the bowl back over the warm water for 30 seconds if it starts to thicken.
How to Fix Seized Chocolate (Yes, It’s Possible)
Even with the best preparation, accidents happen. If your chocolate seizes, don’t throw it out.
- For mild seizing — add boiling water one teaspoon at a time, stirring vigorously between each addition. This sounds counterintuitive but actually works: you’re adding enough water to dissolve the sugar clumps rather than just wetting them. The result won’t be ideal for dipping but works beautifully as a sauce, ganache, or brownie mix-in.
- For overheated chocolate — unfortunately, overheated chocolate is difficult to rescue for dipping. Use it for baking where texture matters less and start a fresh batch for dipping.
Prevention is always easier than rescue — but knowing the fix removes the panic when it happens.
Tips That Make Every Dipping Session a Success
- Chop chocolate finely before melting — smaller pieces melt more evenly and reduce the risk of hot spots.
- Pre-warm your bowl by rinsing it with hot water and drying completely before adding chocolate — a cold bowl causes uneven melting.
- Keep the working temperature consistent — chocolate dipping works best in a cool, dry kitchen. High humidity is genuinely the enemy.
- Use a tall, narrow vessel for dipping rather than a wide, shallow bowl — you get more depth for clean dips and waste significantly less chocolate.
- Reheat seized-free chocolate gently if it thickens during a long dipping session — a few seconds over the warm water bath brings it right back.
Confident Chocolate, Every Single Time
Chocolate dipping stops being stressful the moment you understand what chocolate actually needs: low, gentle heat, completely dry equipment, and a little patience. Give it those three things and it will reward you with a glossy, smooth, perfectly behaved dipping chocolate every single time.
No seized batches. No grainy disasters. No mystery.
Just clean, confident dips and treats that look exactly the way you imagined them.
Save this guide for later, share it with anyone who has ever watched their chocolate seize in despair, and dip something delicious this weekend — you’ve got this. 🍫✨