Ten minutes. That’s the active time between having a craving and having a pan of chocolate peanut butter bars on the counter. No oven, no mixer, no special equipment. Just one bowl, a handful of pantry staples, and the deeply satisfying knowledge that the combination of chocolate and peanut butter is one of the greatest flavor pairings in the history of dessert. These bars are thick, fudgy, and unapologetically rich — with a creamy peanut butter base and a glossy chocolate top that snaps cleanly when you cut through it. They taste like a Reese’s peanut butter cup grew up, went to pastry school, and came home as a shareable slab. Here’s how to make them.

Why This Recipe Works So Well
Most chocolate peanut butter bar recipes involve either baking or a complicated double boiler setup. This version sidesteps both completely.
The peanut butter base is bound with powdered sugar and melted butter — no heat required for that layer. The chocolate topping is melted in the microwave in three minutes flat. The whole thing sets in the fridge in about an hour. The result is a bar that’s structurally firm, slices cleanly, and has exactly the texture you want: slightly dense peanut butter base, thin crisp chocolate top, and a clean snap when you bite through.
The only real skill this recipe requires is patience while it chills. Which, honestly, is the hardest part.
What You’ll Need
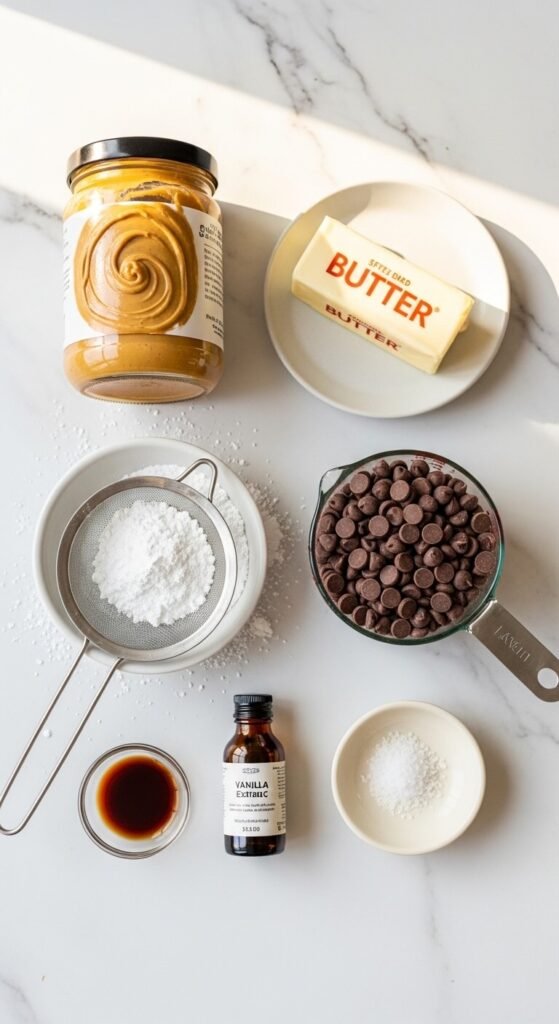
Ingredients (makes 16 bars in an 8×8 pan, or 24 bars in a 9×13 pan):
For the peanut butter base:
- 2 cups (250g) powdered sugar, sifted
- 1½ cups (375g) creamy peanut butter — use regular Jif or Skippy style, not natural peanut butter. Natural peanut butter’s oil content makes the base too greasy and prevents it from setting firmly.
- 6 tablespoons (85g) unsalted butter, melted
- 1 teaspoon vanilla extract
- ¼ teaspoon salt
For the chocolate topping:
- 1½ cups (255g) semi-sweet or dark chocolate chips
- 2 tablespoons unsalted butter — adds gloss and keeps the top slightly softer for easier cutting
- Optional: ½ teaspoon flaky sea salt for finishing
Substitutions that work:
- Almond butter or sunflower seed butter in place of peanut butter
- Milk chocolate chips for a sweeter, less intense topping
- White chocolate chips for a completely different — but equally delicious — visual
- Coconut oil instead of butter in the chocolate layer for a slightly firmer set
Make the Peanut Butter Base
This takes under five minutes and requires nothing beyond a bowl and a spatula.
- Combine the melted butter and peanut butter in a large mixing bowl and stir until completely smooth and uniform
- Add the vanilla and salt and stir to combine
- Add the sifted powdered sugar in two additions, stirring firmly between each. The mixture will transform from a loose, glossy liquid into a thick, dense, almost dough-like base. This is exactly right.
- Press firmly and evenly into a parchment-lined pan — use damp hands or the bottom of a measuring cup to create an even, compact layer across the entire base. The more firmly you press, the cleaner the bars will cut later.
Important: Line the pan with parchment paper and leave an overhang on the sides. This is your handle for lifting the entire slab out later — without it, cutting bars in the pan leads to damaged edges and uneven pieces.
Refrigerate the base while you prepare the chocolate — about 5 minutes of chilling firms it slightly so the chocolate sits on top cleanly rather than sinking in.
Make the Chocolate Topping
Combine chocolate chips and butter in a microwave-safe bowl. Microwave in 30-second intervals, stirring after each, until just melted and completely smooth — usually 2–3 rounds. Stop microwaving the moment the last few unmelted pieces are visible and stir them in with residual heat. Overheating chocolate makes it grainy and seized.
Let the melted chocolate cool for 2–3 minutes until it’s no longer steaming — warm but not hot. Pouring very hot chocolate onto a cold peanut butter base causes it to set immediately on contact and creates an uneven surface with air bubbles.
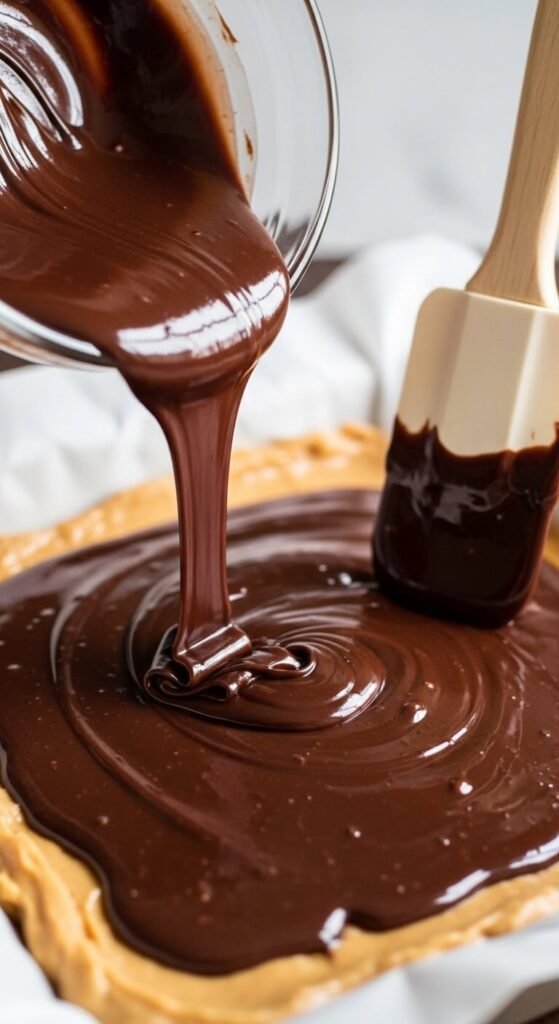
Pour the melted chocolate over the peanut butter base and spread immediately with an offset spatula or the back of a large spoon until the chocolate reaches every edge in an even, smooth layer. Tap the pan gently on the counter twice to settle the chocolate and release any surface bubbles.
Sprinkle with flaky sea salt immediately before the chocolate begins to set.
Chill Until Set
Cover the pan loosely with plastic wrap — without pressing the wrap against the chocolate surface, which would dull the finish — and refrigerate for 1 hour minimum until the chocolate is completely set and the peanut butter layer is firm throughout.
Chill time guide:
- 1 hour — chocolate is set, peanut butter layer is firm and sliceable
- 2 hours or overnight — optimal. The layers become more cohesive and the bars cut with the cleanest, most satisfying snap
Cut Like a Professional
Cold bars cut cleanly. Room temperature bars bend and smear. Keep the pan in the fridge until the moment you’re ready to cut.
The technique:
- Lift the entire slab from the pan using the parchment overhang and place on a cutting board
- Run a sharp chef’s knife under very hot water for 10 seconds, then dry completely
- Make one firm, decisive downward cut — do not saw. A single clean press cuts through both layers without dragging the chocolate
- Wipe the knife clean and repeat the warm water step between every cut
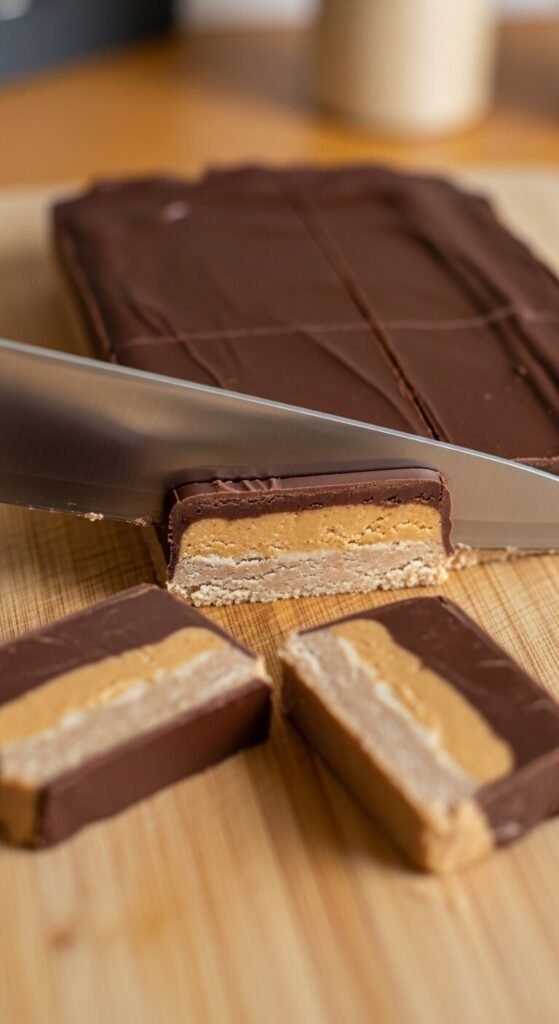
This technique gives you bars with clean, professional edges and distinct, visible layers — the kind of presentation that makes people reach for the box before they’ve even asked what’s in it.
Variations Worth Trying
Once you’ve made the classic, the formula adapts beautifully:
- S’mores bars — add a layer of mini marshmallows over the peanut butter before pouring the chocolate, then press gently to adhere
- Pretzel crunch bars — press crushed salted pretzels into the top of the peanut butter layer before adding chocolate for a salty crunch
- Oat and honey bars — stir ½ cup of quick oats and 2 tablespoons of honey into the peanut butter base for extra texture
- Double chocolate bars — mix 2 tablespoons of cocoa powder into the peanut butter base for a fully chocolate-on-chocolate experience
- White chocolate peanut butter bars — substitute white chocolate for the topping and add a dark chocolate drizzle on top
The Takeaway
Ten minutes of actual work. One hour of waiting. A pan of bars that tastes like significantly more effort than either of those things.
Save this recipe for the next time a craving hits, a guest is coming over, or you need a bring-something dessert with almost no notice — because the ingredients are already in your pantry and the bars will be ready before anyone realizes you just made them from scratch. 🍫🥜✨