You know those frozen fruit bars from the store that promise “made with real fruit” and then list juice concentrate as the second ingredient? These are not those. These homemade Frozen Fruit Bars are packed with honest-to-goodness chunks of real fruit, a naturally sweet base, and absolutely zero mystery ingredients. They’re bright, refreshing, beautiful to look at, and taste like summer decided to live in your freezer permanently.
The best part? You control every single ingredient — the fruit, the sweetness, the texture — everything.
Why Real Fruit Makes All the Difference
Most store-bought fruit bars are built around juice, sugar, and stabilizers. Fruit is often an afterthought — a color agent more than an actual ingredient. When you make them at home with whole fruit, everything changes:
- The flavor is bolder and more complex — real strawberries taste nothing like strawberry flavoring.
- The texture is more interesting — you get actual bites of fruit, not just a smooth, uniform pop.
- The color is naturally gorgeous — no artificial dyes needed when you’re working with mangoes, raspberries, and kiwi.
- They’re genuinely nutritious — fiber, vitamins, and antioxidants all intact.
- You can customize endlessly — mix and match fruits, add coconut milk, throw in fresh herbs, go wild.
Once you’ve had a homemade fruit bar, the store-bought version feels like a disappointing substitute.
What You’ll Need
The beauty of this recipe is its flexibility. Choose one fruit combination or make several batches in different flavors — the method is exactly the same for all of them.
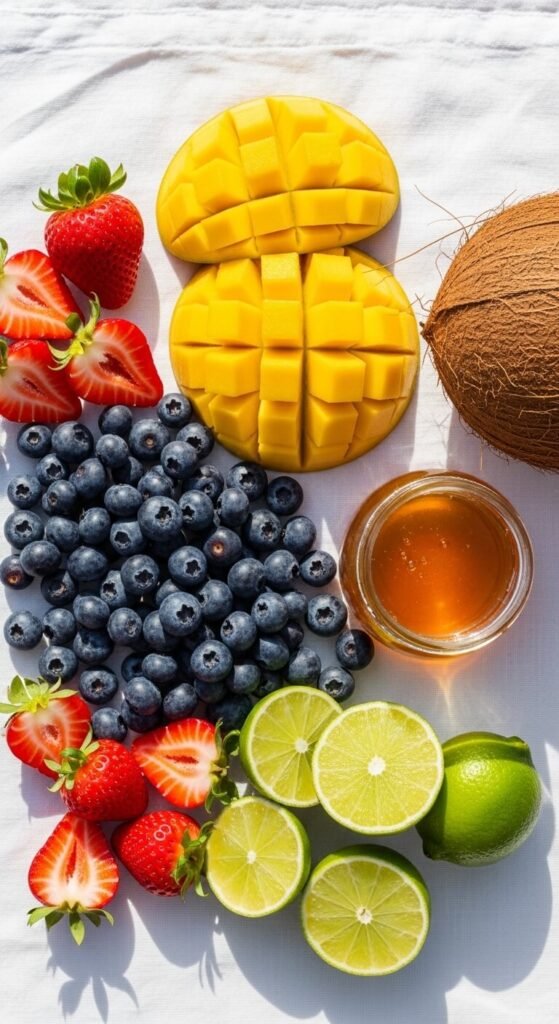
The base (choose one or mix):
- 2 cups fresh or frozen strawberries
- 2 cups fresh mango chunks
- 2 cups mixed berries (blueberries, raspberries, blackberries)
- 2 cups watermelon cubes (seeds removed)
The liquid base:
- ½ cup coconut water, coconut milk, or plain water
- 2–3 tablespoons honey, maple syrup, or agave (adjust to taste and fruit sweetness)
- 1 tablespoon fresh lime or lemon juice (brightens everything beautifully)
- Pinch of sea salt
For the chunky fruit layer (optional but highly recommended):
- Extra sliced fruit to press into the molds before filling
Equipment:
- Popsicle molds (silicone molds are easiest to unmold)
- Wooden popsicle sticks
- A blender
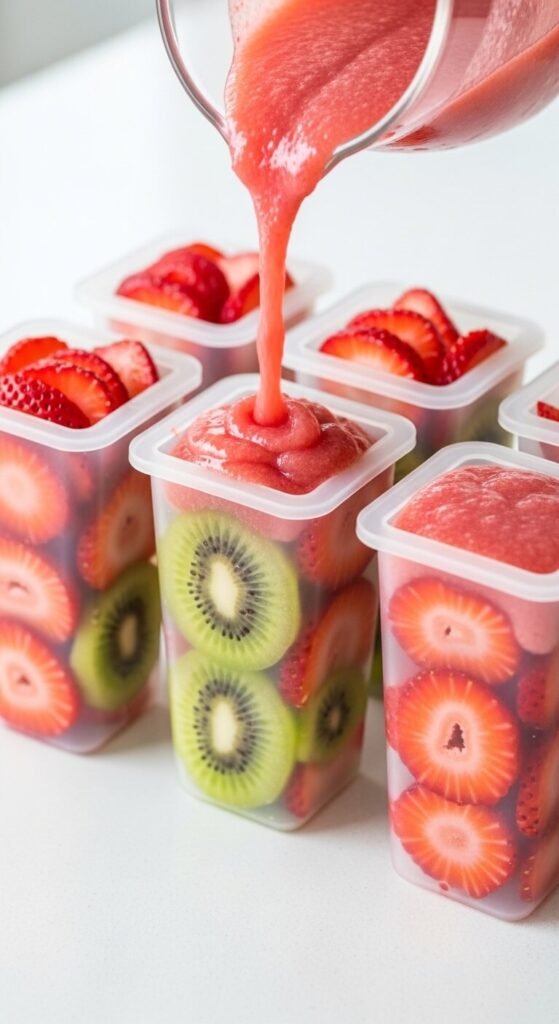
Step 1: Blend Your Fruit Base
Start with about two-thirds of your fruit. The rest gets saved for adding real texture and visual wow-factor inside the bars.
- Add your chosen fruit to the blender along with the liquid base, sweetener, citrus juice, and pinch of salt.
- Blend until smooth — but don’t over-process if you want a slightly rustic texture with small fruit flecks throughout.
- Taste and adjust. More honey if you want it sweeter, more citrus if you want it brighter.
The sweetness tip: Frozen fruits are often less sweet than fresh, so always taste before you pour. If you’re using perfectly ripe summer fruit, you may barely need any sweetener at all.
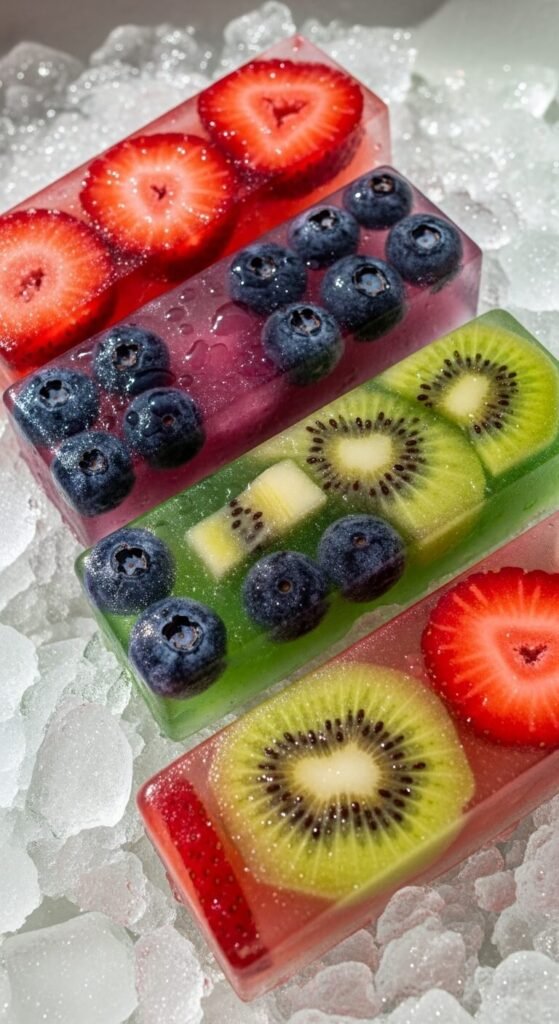
Step 2: Prep Your Molds With Real Fruit Pieces
This is the step that separates a great homemade fruit bar from a truly stunning one — and it takes about 30 seconds.
- Slice your reserved fruit thinly: strawberry rounds, kiwi half-moons, mango chunks, whole blueberries or raspberries.
- Press pieces directly against the inside walls of each mold.
- The fruit will be visible through the sides once frozen, creating that irresistible jewel-toned, produce-aisle-worthy look.
Don’t overthink the placement — a casual, slightly imperfect arrangement looks the most natural and appealing once frozen.
Step 3: Fill, Insert Sticks, and Freeze
- Pour or ladle the blended fruit base into each mold, leaving about ¼ inch of space at the top (the mixture expands slightly as it freezes).
- Tap the molds gently on the counter a few times to release any air bubbles and help the fruit pieces settle into place.
- Insert popsicle sticks — most molds have a built-in holder, but if yours doesn’t, freeze for about 45 minutes first until the mixture is slushy enough to hold a stick upright.
- Cover the molds and freeze for a minimum of 4–6 hours, or overnight for the cleanest, most solid bars.
Patience is the only real skill this recipe requires.
Step 4: Unmold Like a Pro
This is the moment of truth — and it’s easier than you think.
- Run the outside of the mold briefly under warm (not hot) water for 10–15 seconds.
- Gently twist and pull the bar free. It should release cleanly with a satisfying pop.
- If it resists, run under warm water for another 5 seconds and try again — never force it.
Silicone molds are significantly more forgiving than plastic ones and are worth the small investment if you plan to make these regularly.

Flavor Combinations to Try
This is where the real fun begins. Once you’ve nailed the technique, the flavor possibilities are genuinely endless:
- Strawberry Basil — blend strawberries with a few fresh basil leaves and lemon juice for a sophisticated, herb-kissed bar.
- Mango Coconut — use coconut milk as your base with fresh mango and a squeeze of lime. Tropical perfection.
- Watermelon Mint — watermelon blended with fresh mint and a touch of honey. The ultimate summer refresher.
- Mixed Berry Lemonade — blended raspberries and blueberries with fresh lemon juice and a drizzle of honey.
- Peach Ginger — ripe peaches blended with a tiny knob of fresh ginger and coconut water for a warming twist.
Tips for the Best Frozen Fruit Bars
- Use ripe fruit — the riper the fruit, the sweeter and more flavorful your bars will be without needing much added sweetener.
- Frozen fruit works just as well as fresh and is often more economical — just thaw slightly before blending for the smoothest results.
- Layer different flavors in the same mold for an ombré effect that looks absolutely stunning on the plate.
- Make a big batch — bars keep in the freezer for up to six weeks, so there’s no reason not to fill every mold you own.
- Wrap individually in plastic wrap or parchment once frozen for easy grab-and-go snacking all week long.
Your Freezer Deserves Better This Summer
These Frozen Fruit Bars are the kind of recipe that makes you feel good on every level — they’re wholesome, vibrant, made with real ingredients, and genuinely more delicious than anything in the freezer aisle. They’re perfect for kids, beautiful enough to serve at a summer gathering, and simple enough to whip up on any given afternoon.
When real fruit is the star of the show, no artificial flavoring can even come close.
Save this recipe for later, try a new fruit combination every week, and make your freezer the most exciting place in your kitchen this summer. 🍓🥭✨