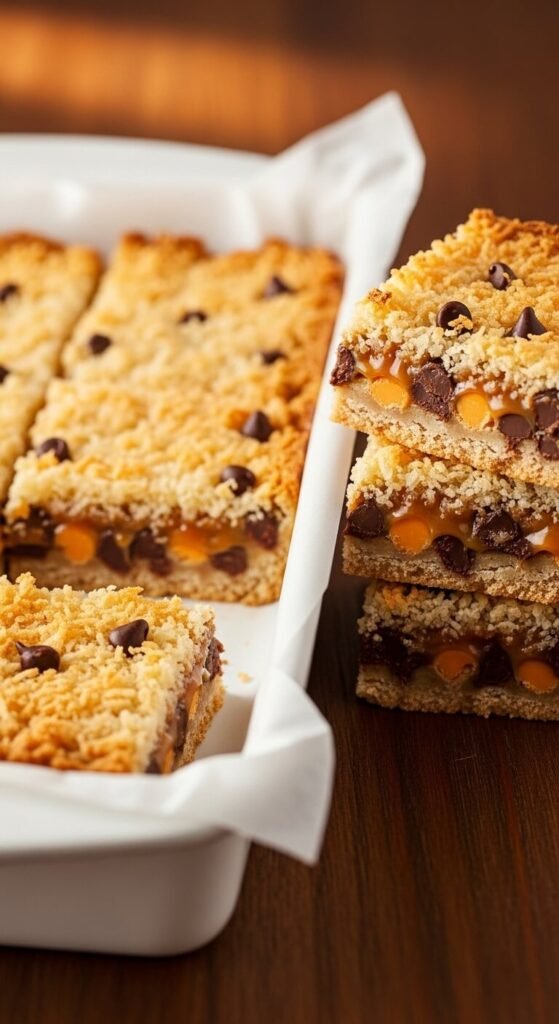
Every gathering has that one dessert — the one that’s gone before the main course is finished, the one people ask about quietly on the way out, the one that earns a recipe request before anyone has even swallowed the last bite. Magic bars are that dessert. Also known as seven-layer bars or Hello Dolly bars, they’ve been showing up at potlucks, holiday parties, and family gatherings for decades with an unbroken record of complete and total disappearance. And for good reason — each bar is a layered monument of butter, chocolate, coconut, nuts, and caramel in every single bite. The best part? They require approximately zero technique and about ten minutes of active effort. Here’s how to make them.
What Makes Magic Bars Actually Magical
The genius of this recipe isn’t in technique — it’s in construction. Magic bars are built on a single transformative process: sweetened condensed milk poured over layered dry ingredients and baked until everything melds together into a chewy, caramelized, impossible-to-stop-eating slab.
The condensed milk does something extraordinary in the oven. It seeps down through every layer, binds the chocolate chips and coconut and nuts together, caramelizes slightly at the edges, and creates a fudgy, sticky, rich glue that holds every element in place without any mixing or blending required.
You’re not making a batter. You’re making a landscape of ingredients that the oven fuses into something greater than the sum of its parts. It’s genuinely magical.
What You’ll Need
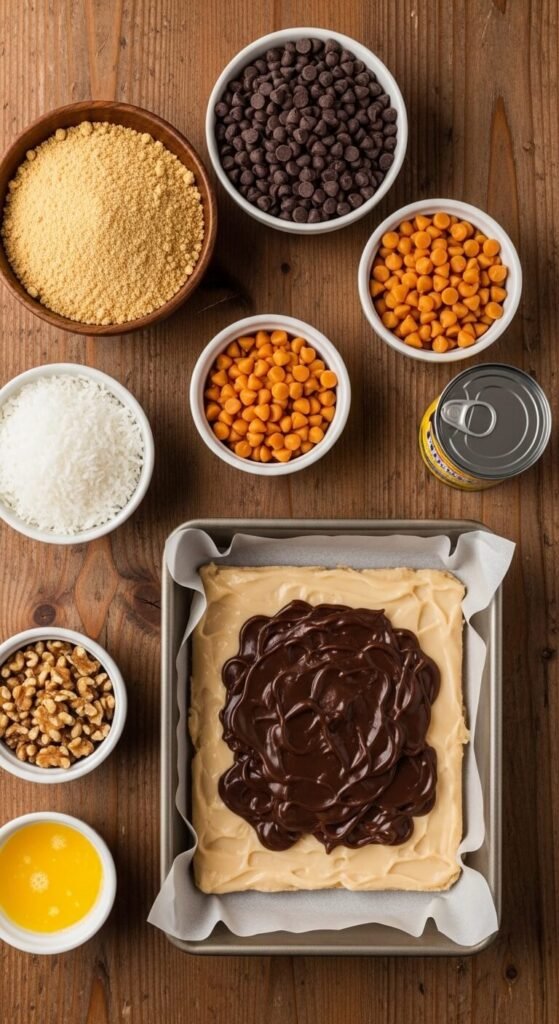
Ingredients (makes 24 bars in a 9×13 pan):
- ½ cup (115g) unsalted butter, melted
- 1½ cups (150g) graham cracker crumbs — about 12 full crackers, crushed to a fine, even crumb
- 1 can (14 oz) sweetened condensed milk — the entire can, poured over everything
- 1 cup (170g) semi-sweet chocolate chips
- 1 cup (170g) butterscotch chips — this is what separates magic bars from every other chocolate chip bar. Don’t skip it.
- 1⅓ cups (125g) sweetened shredded coconut
- 1 cup (120g) chopped walnuts or pecans — lightly toasted if you have a few extra minutes
Optional seventh layer (any one of these):
- White chocolate chips for extra sweetness
- Peanut butter chips for a nutty richness
- Dried cranberries or cherries for a tart contrast
- Toffee bits for extra caramel crunch
The classic recipe is six or seven layers depending on who you ask — but the absolute non-negotiables are the butter base, the graham cracker crust, the condensed milk, and at least two types of chips. Everything else is delicious customization.
Build Your Layers
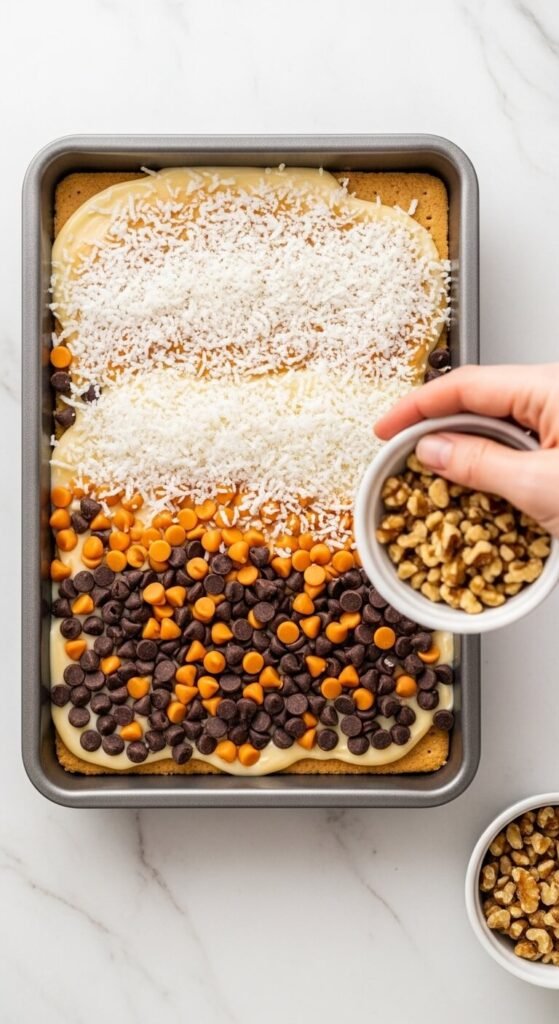
This is less a cooking process and more an assembly project. Each layer goes in the pan in sequence, and you don’t stir, mix, or combine anything.
Step 1 — The butter base Pour the melted butter into a 9×13 inch baking pan lined with parchment paper (leave overhang on the sides for easy lifting). Tilt the pan to coat the bottom evenly. This butter is the foundation everything else rests on.
Step 2 — The graham cracker crust Sprinkle the graham cracker crumbs evenly over the melted butter. Press down gently and firmly with your fingertips or the back of a spoon until the crumbs are compact and level. Don’t press too hard — just enough to pack them into a loose crust.
Step 3 — The condensed milk Pour the entire can of sweetened condensed milk evenly over the graham cracker layer, spreading it to the edges. It will look like too much. It isn’t. This is the ingredient that does all the real work.
Step 4 — The chips Scatter the chocolate chips evenly across the condensed milk, followed by the butterscotch chips. Spread both layers gently to distribute them as evenly as possible — every bite should have both.
Step 5 — The coconut Sprinkle the shredded coconut evenly over the chips in a generous, even layer. The coconut on top toasts as it bakes, turning golden and slightly crispy — it becomes the most beautiful and fragrant layer of the entire bar.
Step 6 — The nuts Scatter chopped walnuts or pecans across the coconut layer. Press down very gently across the entire surface — this final press helps the toppings adhere slightly and ensures an even bake.
Bake Until Golden
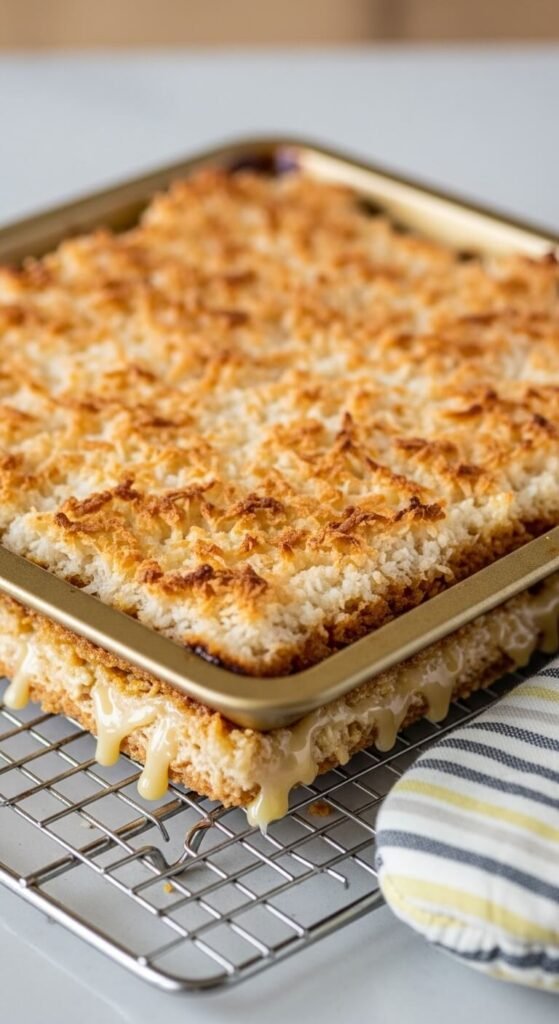
Bake at 350°F (175°C) for 25–30 minutes — until the coconut on top is toasted golden brown and the edges are bubbling with caramelized condensed milk.
Visual cues that tell you they’re done:
- The coconut is uniformly golden — not pale white, not dark brown. A warm, toasty gold.
- The edges are visibly bubbling and slightly darker than the center
- The whole pan smells deeply of toasted coconut and caramelized sugar
Remove from the oven and let cool in the pan on a wire rack for at least 2 hours before cutting. This is the most important and most frequently ignored step in the entire recipe.
Magic bars that are cut warm will collapse, smear, and look nothing like the clean, layered bars you’re aiming for. Cool bars — or better yet, refrigerated bars — cut with clean, sharp edges and hold their shape on the plate. The patience is worth every minute.
Cut, Store, and Try Not to Eat the Whole Pan
Once completely cooled — ideally refrigerated for 1 hour — lift the slab from the pan using the parchment overhang. Place on a cutting board.
Cut with a sharp knife wiped clean between cuts. Start with a few cuts across the length, then across the width. Aim for roughly 2-inch squares — these are rich bars and a moderate portion size is genuinely satisfying.
Storage:
- Room temperature — airtight container for up to 4 days
- Refrigerator — up to one week, and the bars actually firm up beautifully when cold
- Freezer — up to 3 months, wrapped individually in plastic wrap. Thaw at room temperature for 30 minutes before serving.
For gifting: Layer bars between parchment sheets in a tin or gift box. They transport perfectly and hold their shape for days — making them one of the most practical homemade gifts you can give.
The Takeaway
Magic bars are the dessert equivalent of a standing ovation — effortless to make, impossible to resist, and somehow exactly what every table needs. Six layers, one can of condensed milk, and 30 minutes in the oven is genuinely all it takes.
Save this recipe before your next gathering — make them the day before so they’re properly set, cut them into neat squares, and watch the magic happen the moment they hit the table. Just don’t expect any leftovers. 🍫🥥✨