Everyone has made Rice Krispie treats at some point — and everyone has also experienced the heartbreak of biting into one the next day and finding a dry, crumbly, almost cement-like square where something soft and chewy used to be. It doesn’t have to be that way. With a few small but meaningful adjustments to the classic recipe, you can make marshmallow treats that stay genuinely soft, pillowy, and pull-apart perfect for days after you make them. Not hours. Days. This is the version you’ve been making all along — just done right.
Same ingredients. Better technique. Completely different result.
Why Most Marshmallow Treats Go Hard (And How to Fix It)
The culprit behind hard, stale marshmallow treats is almost always the same thing: too much heat, applied for too long, to too few marshmallows. Here’s what’s actually happening:
- Overcooked marshmallows lose moisture and set up firm and dense instead of soft and stretchy.
- Not enough butter means the mixture dries out faster once it hits the pan.
- Compacting the mixture too hard forces out all the air pockets that create that light, chewy texture.
- Cutting too soon before the treats are fully set causes crumbling rather than clean, soft squares.
Fix those four things and you fix the recipe entirely. Every single adjustment is simple — and every single one makes a measurable, lasting difference.
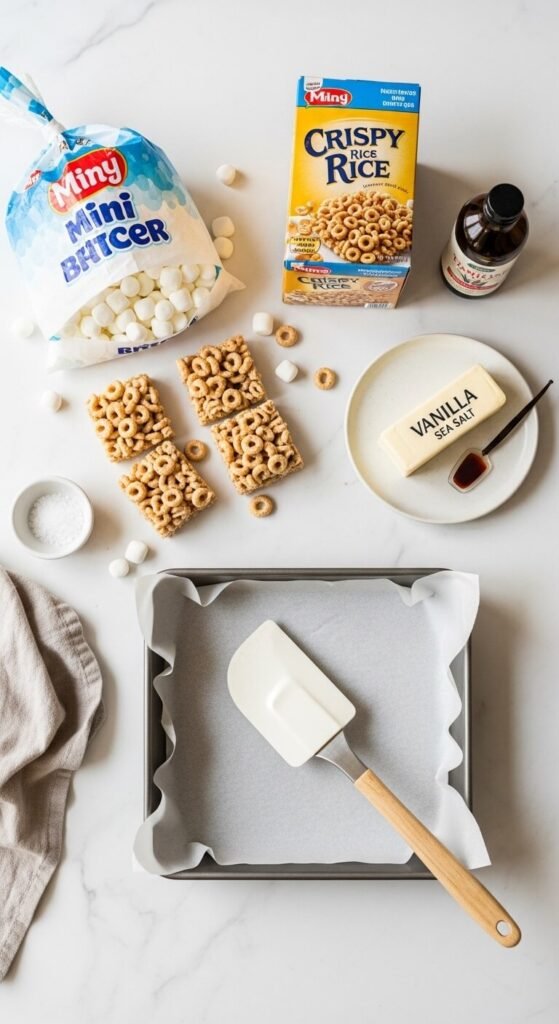
What You’ll Need
The ingredient list stays beautifully minimal. The upgrades are all in the ratios and technique.
The base recipe:
- 6 tablespoons unsalted butter (the extra butter is the first key upgrade — most recipes use 4)
- 16 oz mini marshmallows, divided (about 8 cups — reserve 2 cups to stir in at the end)
- 6 cups crispy rice cereal (measure after opening — packing the cup makes them dense)
- 1 teaspoon vanilla extract
- ¼ teaspoon fine sea salt
Optional mix-ins:
- 1 cup mini chocolate chips (stirred in after the heat is off)
- ½ cup rainbow sprinkles for a birthday cake vibe
- ¼ cup peanut butter swirled into the melted marshmallow
- Crushed Oreos, toffee bits, or freeze-dried strawberries
For the pan:
- Butter or non-stick spray for greasing
- Parchment paper for lining
Step 1: Start With More Butter Than You Think You Need
This is the single most impactful change you can make to a marshmallow treat recipe — and it costs almost nothing.
- Melt the full 6 tablespoons of butter in a large, wide saucepan over low heat.
- Let it melt slowly and completely before adding anything else.
- Optional but excellent: let the butter cook for an extra minute or two until it turns a very light golden brown and smells nutty — this is brown butter, and it adds a caramel-like depth to the finished treats that is completely addictive.
More butter means more moisture retained in the final bar. It also means a richer, more complex flavour that makes these taste noticeably more homemade and intentional than the average version.
Step 2: Melt the Marshmallows Low and Slow
Here is where most recipes go wrong — high heat and impatience.
- Add three-quarters of the marshmallows to the melted butter (reserve the remaining quarter for later).
- Keep the heat on low and stir gently and constantly.
- Melt until just smooth — the moment the last lump disappears, take the pan off the heat immediately.
- Stir in the vanilla extract and sea salt.
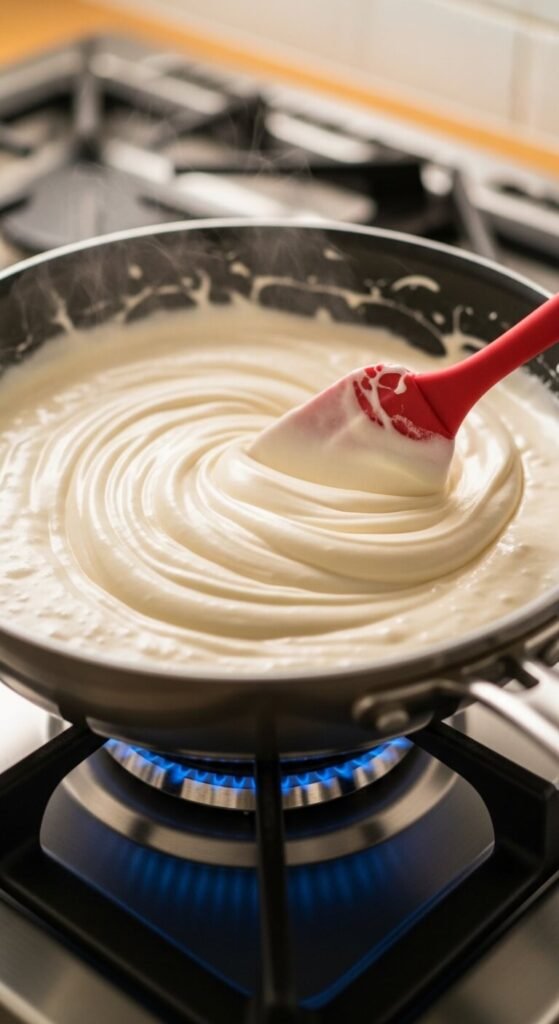
Taking the pan off the heat as soon as the marshmallows melt — not a moment later — is the technique that preserves moisture, keeps the mixture pliable, and makes the difference between soft-for-days and hard-by-tomorrow.
Step 3: The Secret Reserved Marshmallow Trick
This is the step nobody tells you about — and it changes everything.
- Working off the heat, immediately stir in the reserved unmelted marshmallows.
- They won’t melt completely — that’s the whole point. They’ll soften into the mixture and leave irregular pockets of fluffy, gooey marshmallow throughout every square.
- Add the crispy rice cereal and fold everything together gently until just combined.
Gentle is the operative word. You want to coat the cereal, not compress it. Overworking the mixture squashes all the air out and turns soft, pillowy treats into dense, chewy ones.
If you’re adding chocolate chips or sprinkles, stir them in now while the mixture is warm but no longer scorching hot.
Step 4: Press In — Lightly
Transfer the mixture to a well-buttered and parchment-lined 9×13-inch pan.
- Use buttered fingertips or a piece of parchment to press the mixture into the pan.
- Press just enough to create an even layer — not so hard that you compact it completely.
- Think of it like tucking something in rather than packing a suitcase.
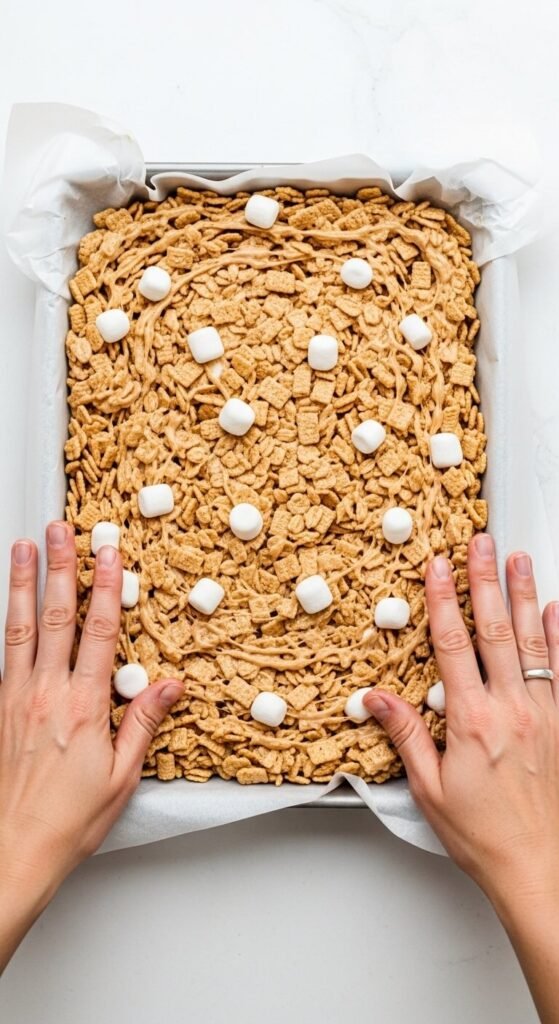
A lighter press means more air stays trapped in the mixture — and more air means softer, chewier treats that hold their texture long after they’ve cooled.
Let the pan sit at room temperature for 1 hour before cutting. Don’t rush it. The waiting time lets the treats set properly without the edges drying out from refrigerator air.
Step 5: Cut and Store for Maximum Softness
- Use a sharp knife or a bench scraper and cut in one smooth, downward press rather than sawing.
- Wipe the blade between cuts for clean edges.
- Butter the knife lightly if the treats are sticking — it glides right through.
For storage — and this matters as much as the recipe itself:
- Wrap each square individually in plastic wrap the moment they’re cut. Exposure to air is the enemy of softness.
- Store at room temperature in an airtight container — the fridge actually dries them out faster.
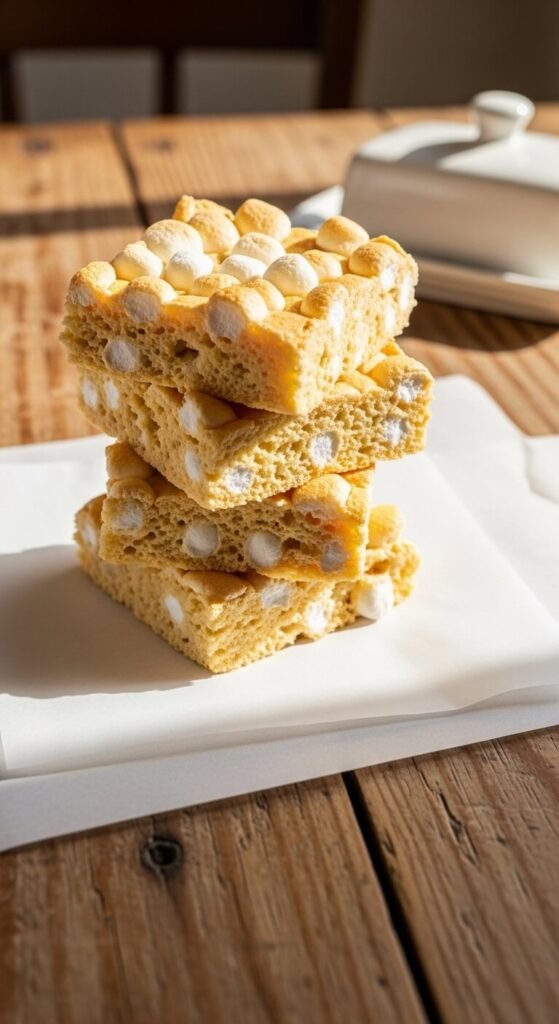
- Properly wrapped and stored, these stay soft and chewy for up to five days.
Flavour Variations Worth Making
- Brown Butter Birthday Cake Treats — use browned butter, stir in rainbow sprinkles, and press extra sprinkles onto the top before setting.
- Chocolate Peanut Butter Treats — swirl 3 tablespoons of peanut butter into the melted marshmallow and top with a drizzle of melted chocolate once set.
- S’mores Treats — add crushed graham crackers and mini chocolate chips to the mixture, then press whole marshmallows onto the top and torch them lightly before serving.
- Strawberry Treats — fold in freeze-dried crushed strawberries for a natural pink colour and fruit flavour that’s genuinely beautiful.
- Salted Caramel Treats — drizzle store-bought caramel sauce over the top before setting and finish with a generous pinch of flaky sea salt.
Tips That Make Every Batch Better
- Mini marshmallows melt faster and more evenly than large ones — always use mini for the base.
- Measure the cereal loosely — a packed cup adds too much cereal and creates dense, dry bars.
- Work quickly once the cereal is added — the mixture sets fast, so have your pan ready before you start.
- Buttered hands beat every other tool for pressing the mixture into the pan without sticking.
- Reheat leftover treats for 8–10 seconds in the microwave if they’ve firmed up — they go right back to soft and gooey in seconds.
The Treat That Stays as Good as Day One
Soft marshmallow treats on day one are expected. Soft marshmallow treats on day four are a revelation — and now you know exactly how to make them. More butter, lower heat, reserved marshmallows, a gentle press, and proper wrapping. Five small changes that transform a beloved classic into something that holds up, keeps well, and impresses every single time someone reaches in for a square and finds it still perfectly soft.
Save this recipe for later, share it with everyone who has ever been betrayed by a stale marshmallow treat, and make a batch this week — day four softness guaranteed. 🍥✨