No-bake bars have one job. One. Hold together when you cut them and stay that way until they’re eaten. And yet — somehow — crumbling, falling-apart bars are one of the most common baking frustrations people encounter. You press everything into the pan, you wait patiently, you pull out a knife with full confidence, and the whole thing shatters like a dropped tile. Or it’s so sticky that each slice deforms completely the moment it hits the spatula.
The problem is almost never the recipe. It’s almost always the technique. And once you understand three specific things — the right binder ratio, the correct pressing method, and the non-negotiable chilling protocol — your bars will slice cleanly, stack neatly, and hold together from pan to plate to the last bite.
Why No-Bake Bars Fall Apart — and Why Yours Won’t Anymore
There are three structural reasons most no-bake bars fail to hold together:
1. Not enough binder. The binder is whatever holds the dry ingredients together — typically nut butter, honey, melted butter, or a combination. Too little and the bars are crumbly. The mixture needs to be cohesive enough that when squeezed in your fist, it holds its shape without falling apart.
2. Not pressed firmly enough. Pressing is the step most people do halfheartedly. A gentle press isn’t sufficient — you need real, sustained pressure applied evenly across the entire surface to compact the mixture into a unified slab rather than a loose pile of ingredients that happens to be pan-shaped.
3. Not chilled long enough or at the right temperature. Room temperature bars made with any fat-based binder will be soft and unstable. The fat needs to solidify completely before cutting — and that requires either a full refrigerator chill or a shorter freezer session.
The Base Formula for Bars That Actually Hold
This recipe produces 16 clean-slicing bars. The base formula is adaptable — once you understand the ratios, you can swap ingredients endlessly.
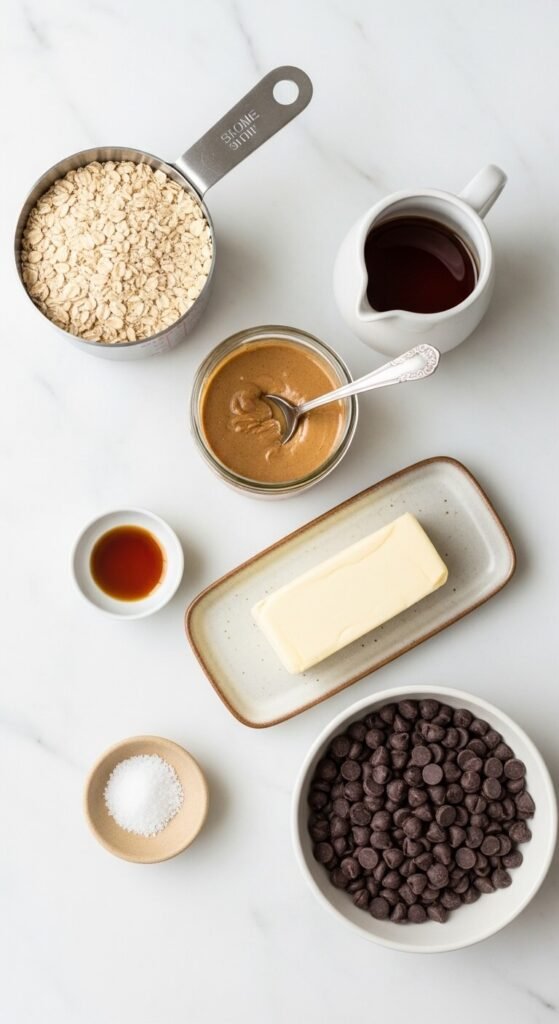
For the oat base:
- 2½ cups old-fashioned rolled oats
- ½ cup natural almond butter or peanut butter
- ⅓ cup honey or pure maple syrup
- 4 tablespoons unsalted butter, melted
- 1 teaspoon pure vanilla extract
- ½ teaspoon salt
- ½ cup mix-ins of choice — chocolate chips, dried fruit, seeds, or chopped nuts
For the chocolate top layer:
- 1 cup dark chocolate chips or chopped chocolate
- 2 tablespoons coconut oil
- Flaky sea salt for finishing
Key ratio principle: For every 2½ cups of dry ingredients, you need approximately ¾ to 1 cup of combined binders — the nut butter, honey, and melted butter together. This ratio is what produces a bar that compresses properly and slices without crumbling.
The Pressing Step — This Is Where Bars Are Made or Broken
Mix the oats, salt, and any mix-ins together in a large bowl first. In a separate small bowl, combine the melted butter, nut butter, honey, and vanilla and stir until unified. Pour the wet mixture over the dry and stir until every oat is coated and the mixture holds together when pressed.
Line an 8×8 or 9×9 inch pan with parchment paper, leaving overhang on two sides. This overhang is your lifting handle later — do not skip it.
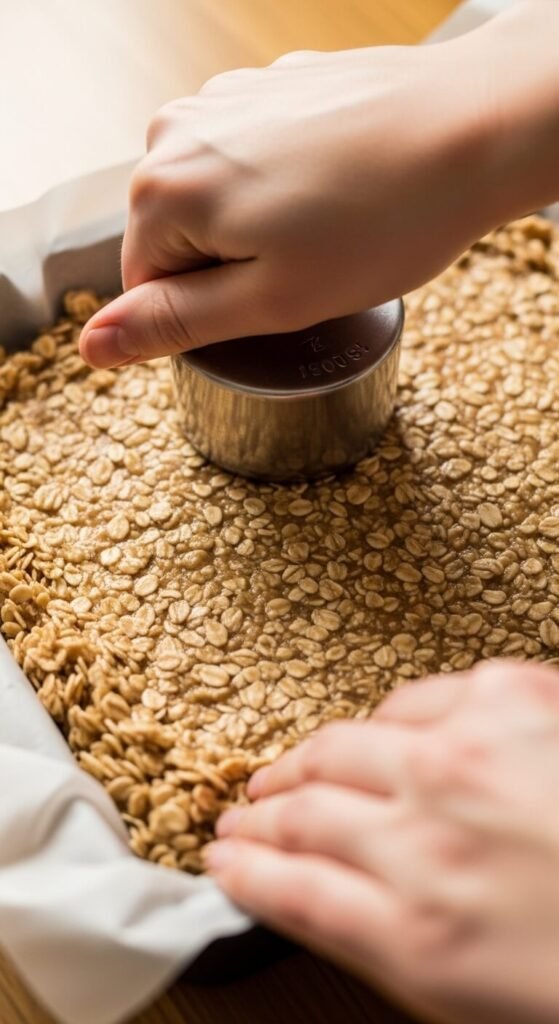
Now press. Really press.
Transfer the mixture to the pan. Use your hands first to distribute it roughly evenly. Then take the flat bottom of a measuring cup and press with firm, deliberate pressure across the entire surface — working from the center outward and then back again. Pay special attention to the corners and edges, which tend to be looser than the center.
The mixture should look compressed and uniform, not fluffy or textured. If you press the surface with a finger, it should feel dense and resist the pressure rather than giving way easily.
Add the Chocolate Layer
Melt the chocolate chips and coconut oil together in a microwave-safe bowl in 30-second intervals, stirring between each, until completely smooth and pourable.
Pour the melted chocolate over the pressed oat base and tilt the pan gently in all directions until the chocolate spreads to cover the entire surface evenly. A small offset spatula helps reach the corners without disturbing the base layer.
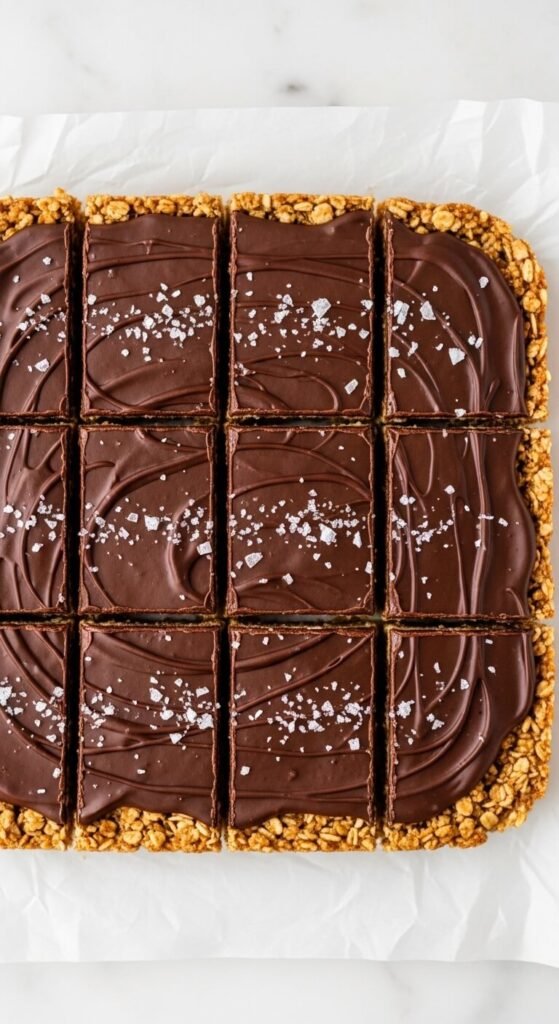
Sprinkle flaky sea salt over the chocolate surface immediately before it begins to set.
Do not refrigerate yet. Let the chocolate settle at room temperature for 5 minutes first so it self-levels completely before the cold locks it in place.
The Chilling Protocol That Produces Clean Cuts
This is the step where patience genuinely pays off — but you don’t need as much of it as most recipes demand.
Option 1 — Refrigerator: Chill for a minimum of 2 hours. The chocolate will be fully set and the oat base will be firm throughout. This is the safest method for consistently clean cuts.
Option 2 — Freezer: Chill for 45 to 60 minutes in the freezer, then transfer to the fridge for 20 minutes before cutting. The 20-minute fridge rest prevents the chocolate from cracking and shattering when the knife goes through.
Never cut straight from the freezer. Rock-hard chocolate shatters under a knife rather than slicing — the slight thaw makes all the difference.
The Cutting Technique That Keeps Everything Intact
Even a perfectly chilled bar can be ruined by poor cutting technique. These details matter:
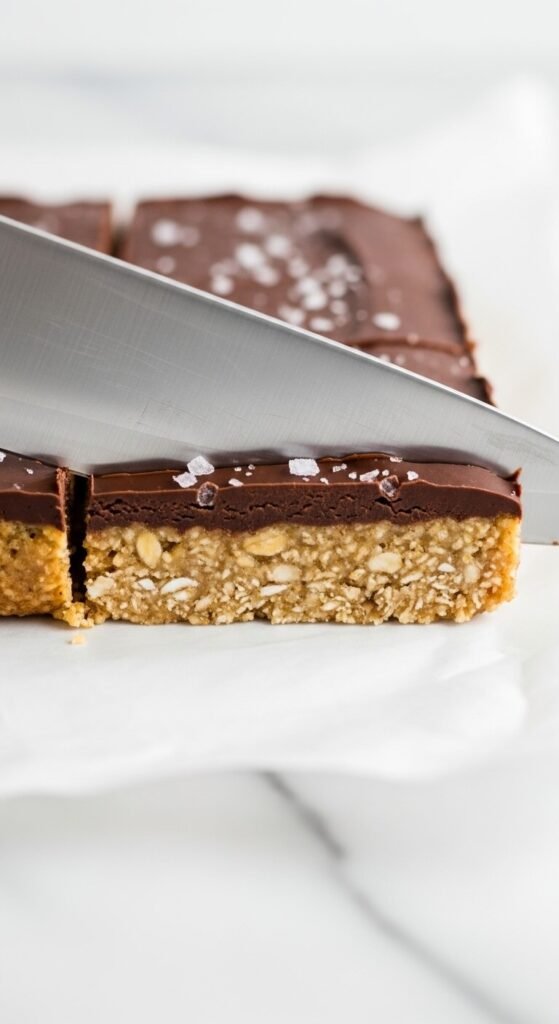
- Use a sharp chef’s knife. A dull knife drags and crumbles the edges.
- Run the knife blade under hot water and dry it before each cut. The warm blade glides through cold chocolate without cracking it.
- Press straight down rather than sawing back and forth. One clean, decisive downward motion per cut.
- Use the parchment overhang to lift the entire slab out of the pan onto a cutting board before slicing — this gives you full control over every cut.
Variations Worth Adding to Your Rotation
Peanut Butter Chocolate Crunch: Add ½ cup of crushed pretzels to the oat base and use peanut butter as the primary binder. Top with milk chocolate and a drizzle of extra peanut butter.
Coconut Almond: Replace ½ cup of oats with toasted shredded coconut. Add ¼ cup of sliced almonds to the base. Top with dark chocolate and a scatter of toasted coconut flakes.
Date and Seed Bars: Replace honey with 6 medjool dates blended smooth. Add pumpkin seeds and sunflower seeds in place of mix-ins for a fully natural, refined-sugar-free version.
Save This — You’ll Make These on Repeat
No-bake bars that hold together aren’t complicated — they just require understanding why they fail and applying the right techniques at each stage. Get the binder ratio right, press firmly and evenly, chill completely before cutting, and use a warm knife for slicing.
Save this recipe to your snack board or meal prep collection and make a batch this weekend — clean-slicing, perfectly structured bars that stay together are one session away.