Every great party platter needs that one dessert — the one that disappears first, gets asked about repeatedly, and earns you the reputation as the person who always brings the good food. These No-Bake Cheesecake Bites are exactly that. Creamy, tangy, individually portioned, and beautiful enough to anchor an entire dessert table, they’re built for sharing and genuinely effortless to make. No oven, no springform pan, no slicing, no serving drama — just bite-sized pieces of perfect cheesecake that guests can pick up, pop in their mouths, and immediately reach for another.
Make them the day before. Show up like a hero.
Why These Are the Perfect Party Dessert
Party desserts live or die by three things: how easy they are to serve, how well they hold up over a few hours, and how impressive they look on a platter. These cheesecake bites nail all three — and then some.
Here’s the full case for making these your go-to party contribution:
- No slicing, no serving utensils, no plates needed — guests grab one and go, which is exactly the kind of frictionless dessert that disappears fastest at any gathering.
- Made completely ahead of time — they actually improve after an overnight chill, making them the ideal prep-the-night-before party food.
- Infinitely toppable — fresh fruit, caramel drizzle, lemon curd, chocolate ganache, crushed Oreos. Every bite can look different, which makes the platter visually stunning and gives guests choices.
- Sturdy enough for a platter — unlike whipped cream desserts that deflate within an hour, these hold their shape beautifully for the duration of any party.
- Universally loved — creamy, slightly tangy, not too sweet, and familiar enough to appeal to every kind of guest.
These are the bites people photograph before eating and ask for the recipe while still chewing.
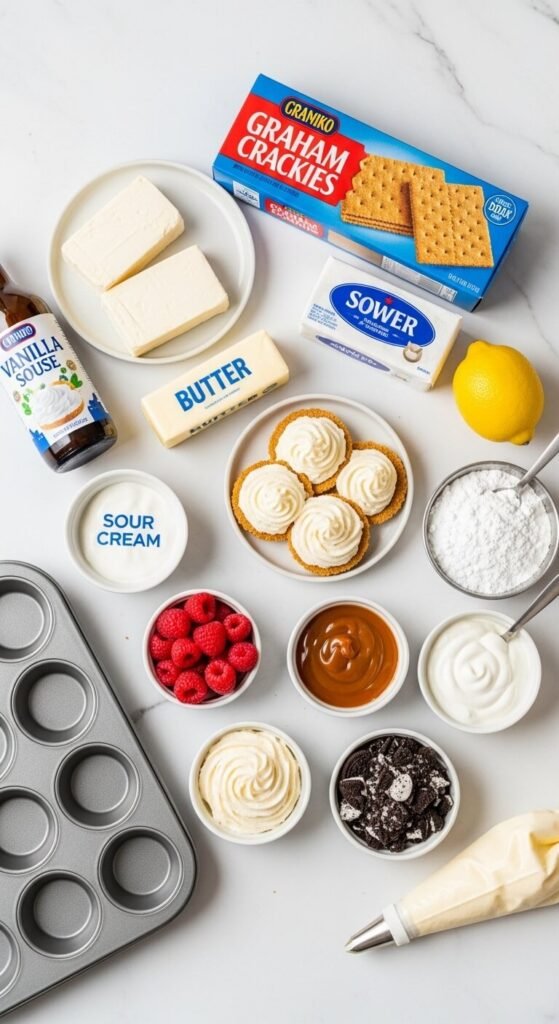
What You’ll Need
For the graham cracker bases:
- 1½ cups graham cracker crumbs (about 10 full crackers, finely crushed)
- 5 tablespoons unsalted butter, melted
- 2 tablespoons sugar
- Pinch of fine sea salt
For the cheesecake filling:
- 16 oz full-fat cream cheese, softened fully to room temperature
- ½ cup powdered sugar, sifted
- 1 teaspoon vanilla extract
- 2 tablespoons sour cream or full-fat Greek yogurt
- 1 tablespoon fresh lemon juice
- Pinch of fine sea salt
Equipment:
- 24-cup mini muffin tin
- Small paper liners
- Piping bag or zip-lock bag (for a clean, professional finish)
- Small offset spatula or butter knife
For topping — choose several for a platter variety:
- Fresh raspberries, strawberries, or blueberries
- Lemon curd
- Caramel sauce and flaky sea salt
- Chocolate ganache drizzle
- Crushed Oreos or graham cracker crumbs
- Whipped cream rosette piped just before serving
Step 1: Make the Crust Bases
The crust is the foundation of every bite — press it firmly and it holds clean; press it loosely and bites crumble the moment a guest picks them up.
- Line a 24-cup mini muffin tin with small paper liners.
- Combine the graham cracker crumbs, melted butter, sugar, and sea salt in a bowl and stir until every crumb is coated and the mixture holds its shape when squeezed.
- Add approximately 1 heaping teaspoon of crust mixture to each liner.
- Press down firmly using the back of a small spoon, the bottom of a shot glass, or the flat end of a wine cork — anything that fits the cup and lets you compact the base evenly.
- Refrigerate for 15 minutes while you prepare the filling.
Uniformly pressed bases means uniformly neat bites — and on a party platter, consistency is what makes everything look intentional and polished.
Step 2: Make the Cheesecake Filling
Fully softened cream cheese is the single most important ingredient condition in this entire recipe. Pull it from the fridge a full hour before you start — not 10 minutes, not 30. A full hour at room temperature is what gives you that silky, lump-free filling that pipes beautifully and sets perfectly.
- Beat the cream cheese with a hand mixer on medium speed until completely smooth — about 2 minutes.
- Add the powdered sugar, vanilla, sour cream, lemon juice, and sea salt.
- Beat on medium speed until the filling is fully combined, light, and silky — about 2 more minutes.
- Taste and adjust — more lemon for brightness, more vanilla for warmth, a touch more salt if the sweetness needs balancing.
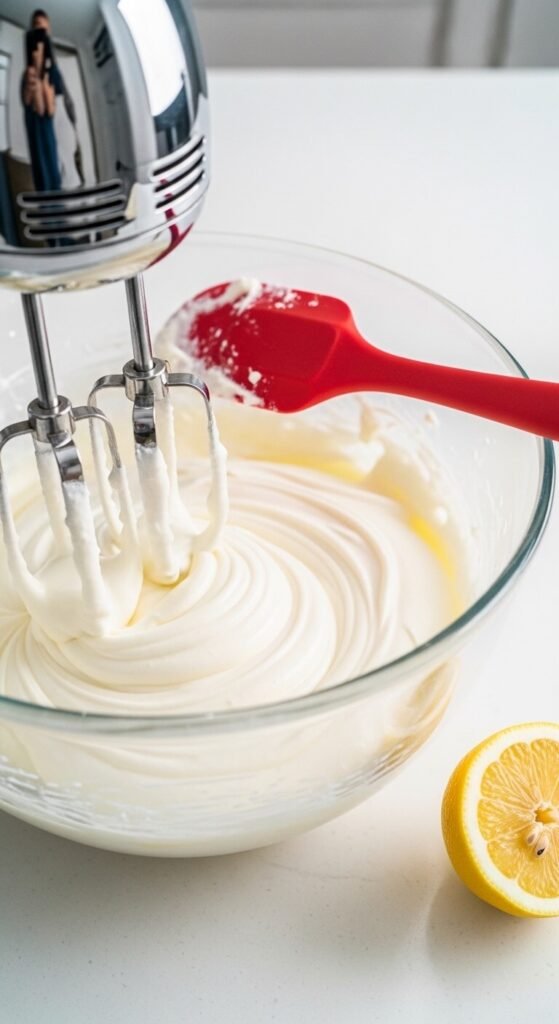
Transfer the filling to a piping bag fitted with a round or star tip — or simply snip the corner off a large zip-lock bag. Piping gives you a far cleaner, more consistent finish than spooning, and it takes about the same amount of time.
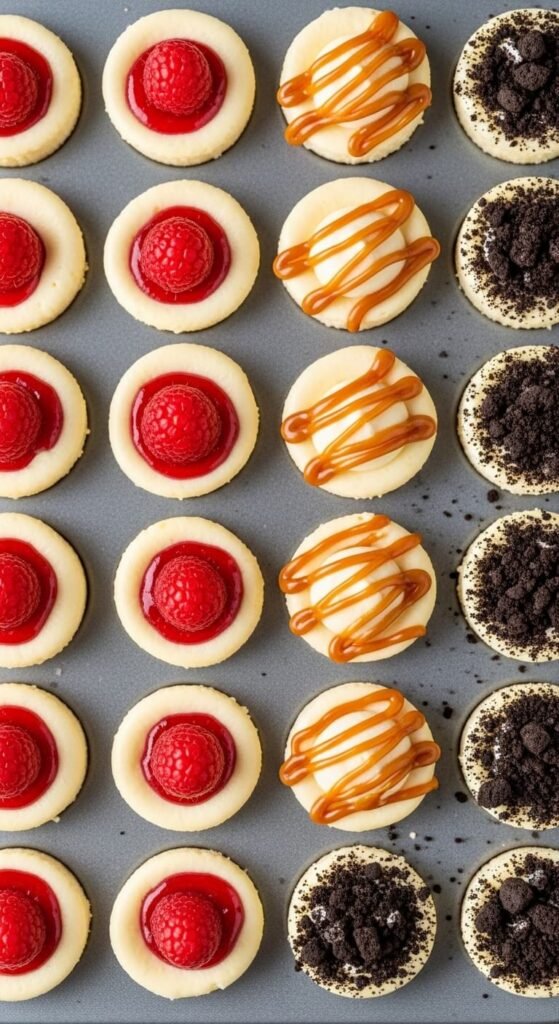
Step 3: Fill and Top
Remove the crust-lined tin from the fridge and pipe the cheesecake filling into each cup in a smooth, generous swirl — filling them right to the top or just slightly above, so they look full and generous rather than flat and skimpy.
A few technique notes:
- Hold the bag vertically with the tip just touching the center of the crust and squeeze steadily as you pull straight up — this creates a neat dome.
- For a flat finish, pipe in and smooth with a small offset spatula or the back of a spoon dipped in warm water.
- Don’t overfill — the tops should sit at or just above the liner edge for a clean look.
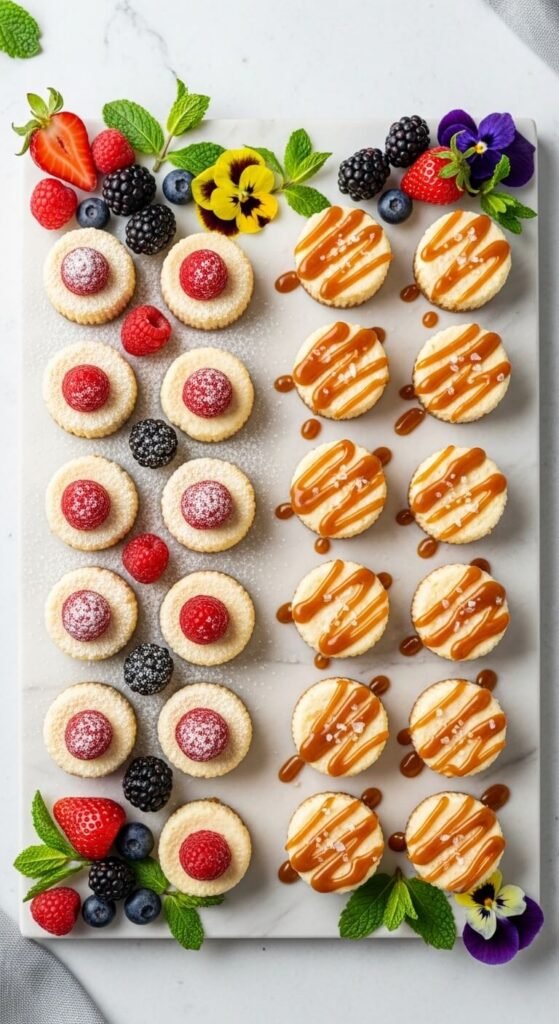
Now for the platter magic — topping variety. For a party-ready spread, use at least three different toppings across the batch:
- Press a single fresh raspberry or blueberry into the center of some.
- Add a small teaspoon of lemon curd to others and spread gently.
- Drizzle caramel over a third of the batch and add a pinch of flaky sea salt.
- Dust a few with finely crushed Oreo crumbs for a cookies-and-cream look.
Step 4: Chill, Plate, and Present
- Cover the tin loosely with plastic wrap and refrigerate for a minimum of 2 hours — overnight is genuinely better.
- When ready to serve, peel each paper liner away cleanly and arrange on your platter.
- For the most impressive presentation, vary the toppings deliberately — cluster similar ones together in groups rather than scattering randomly. Grouped variety looks curated; random variety can look messy.
- Add fresh mint sprigs, a few whole berries, and perhaps a small dish of extra caramel or lemon curd alongside for guests who want to add their own touch.
Make-Ahead and Storage Notes
This is what makes these bites such ideal party food — the timeline works entirely in your favour.
- Make them up to 2 days ahead and store covered in the fridge — they hold perfectly and actually taste better as the flavours settle.
- Add fruit toppings the day of serving — fresh berries release moisture over time and look best added within a few hours of serving.
- Transport in the muffin tin covered with plastic wrap and remove liners and plate on arrival — far easier than transporting a plated arrangement.
- Leftovers keep refrigerated for up to 5 days, though they rarely survive the party.
Tips for a Stunning Party Platter
- Make 48 instead of 24 — one batch disappears fast at a gathering of any size. Two batches with varied toppings makes the platter genuinely spectacular.
- Use a slate board or dark marble surface for presenting — the white cheesecake bites pop dramatically against a dark background.
- Label the toppings with small cards if you’re making multiple flavours — guests love knowing what they’re choosing.
- Pipe the filling just before serving if you want the sharpest, freshest appearance — the crust bases can be made days ahead and stored in the tin in the fridge.
The Bite That Owns Every Platter
A great party dessert doesn’t need to be complicated — it needs to be shareable, beautiful, make-ahead friendly, and completely delicious. These No-Bake Cheesecake Bites check every box without asking anything difficult of you in return.
Make them the night before, plate them beautifully, and let them do the work of making you look like the most thoughtful, talented person at the party.
Save this recipe, share it before your next gathering, and make a double batch — one for the party and one for the very necessary quality testing beforehand. 🍓🧁✨