Birthdays deserve something special — but not everyone wants to spend hours measuring, baking, and decorating a layer cake from scratch. Enter the no-bake cookie cake: the dessert that looks like a proper celebration centerpiece, tastes like the best cookie you’ve ever had, and comes together without turning on the oven once. It’s thick, rich, deeply chocolatey, loaded with cookie pieces, and topped with the kind of frosting swirls that make people reach for their phones before they reach for a fork. Whether it’s for a child’s birthday, a casual gathering, or any occasion that calls for something a little extraordinary without the stress — this is the recipe to have in your back pocket.
Why No-Bake Cookie Cake Actually Works
The secret to a no-bake cookie cake that holds its shape, slices cleanly, and tastes genuinely like a celebration dessert — rather than a refrigerated slab of mixed ingredients — comes down to the base.
This recipe uses a combination of:
- Cream cheese for richness, slight tang, and structural integrity
- Butter for that classic cookie flavor and smooth texture
- Powdered sugar to sweeten and help the mixture firm up when chilled
- Crushed cookies as both the flavor foundation and the texture that makes every bite taste like a cookie
- Mini chocolate chips stirred throughout for pockets of real chocolate in every slice
The mixture presses into a springform pan, chills into a perfectly sliceable cake, and gets topped with real buttercream frosting — so the finished result looks and eats exactly like what it is: a proper birthday cake that just happens to require zero baking.
What You’ll Need
For the cookie cake base (makes one 9-inch cake, serves 12):
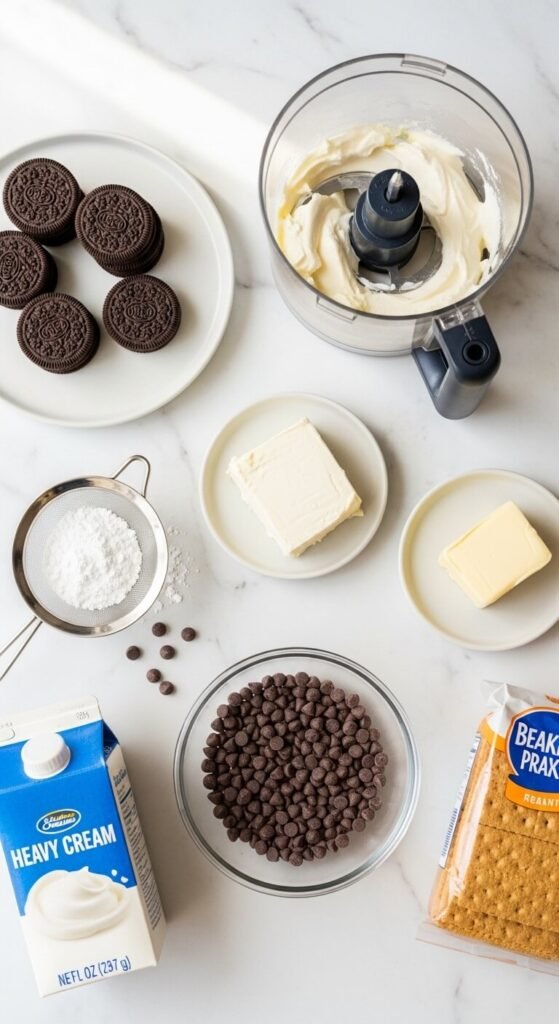
- 2 cups (200g) Oreo crumbs — about 20 Oreos, filling included, crushed finely in a food processor
- 1 cup (100g) graham cracker crumbs — adds structure and a slightly honeyed base note
- 8 oz (225g) full-fat cream cheese, softened to room temperature
- ½ cup (115g) unsalted butter, softened
- 1½ cups (180g) powdered sugar, sifted
- 1 teaspoon vanilla extract
- Pinch of salt
- ¾ cup (130g) mini chocolate chips
- ¼ cup (60ml) heavy cream — loosens the mixture to a spreadable consistency
For the chocolate buttercream frosting:
- ½ cup (115g) unsalted butter, softened
- 1½ cups (180g) powdered sugar, sifted
- 3 tablespoons unsweetened cocoa powder
- 2–3 tablespoons heavy cream
- ½ teaspoon vanilla extract
- Pinch of salt
For decorating:
- Oreo halves, mini chocolate chips, rainbow sprinkles, crushed cookies, birthday candles
Make the Cookie Cake Base
Step 1 — Prepare the pan Line the bottom of a 9-inch springform pan with parchment paper. Lightly grease the sides. The springform pan is important here — it allows you to release the cake cleanly without having to flip or lift it.
Step 2 — Beat the cream cheese and butter In a large mixing bowl, beat the softened cream cheese and butter together on medium speed until completely smooth, fluffy, and uniform — about 3 minutes. There should be no lumps remaining. This is the structural foundation of your cake, so take the time to get it truly smooth.
Step 3 — Add sugar, vanilla, and cream Add the sifted powdered sugar in two additions, beating on low between each to prevent a sugar cloud. Add vanilla, salt, and heavy cream. Beat on medium until light and smooth.
Step 4 — Fold in the cookie crumbs and chips Add the Oreo crumbs, graham cracker crumbs, and mini chocolate chips all at once. Fold with a spatula until completely combined — the mixture will be thick, almost dough-like, and smell extraordinarily good.
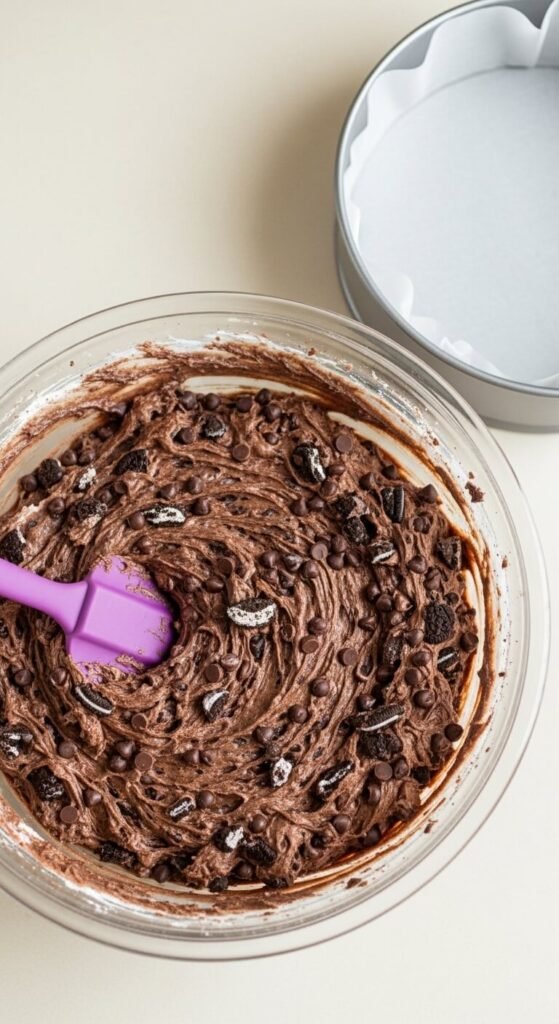
Step 5 — Press and smooth Transfer the mixture to the prepared springform pan. Press firmly and evenly into the pan using damp hands or the back of a large spoon, smoothing the top as flat as possible. The more even the surface, the more beautiful the frosting will look.
Cover with plastic wrap and refrigerate for a minimum of 4 hours — overnight is better. The cake needs to chill completely until firm enough to hold clean slices and support the frosting without denting.
Make the Chocolate Buttercream
While the cake chills, the buttercream comes together in minutes.
Beat the softened butter alone for 2 minutes until pale and fluffy. Add sifted powdered sugar and cocoa powder and beat on low until combined, then increase to medium-high for 2 minutes until light. Add vanilla, salt, and heavy cream one tablespoon at a time until the frosting is smooth, pipeable, and holds stiff peaks when the beater is lifted.
Consistency tip: The frosting should be firm enough to pipe into swirls that hold their shape but soft enough to spread easily. If it’s too stiff, add cream one teaspoon at a time. If it’s too soft, add powdered sugar one tablespoon at a time and beat again.
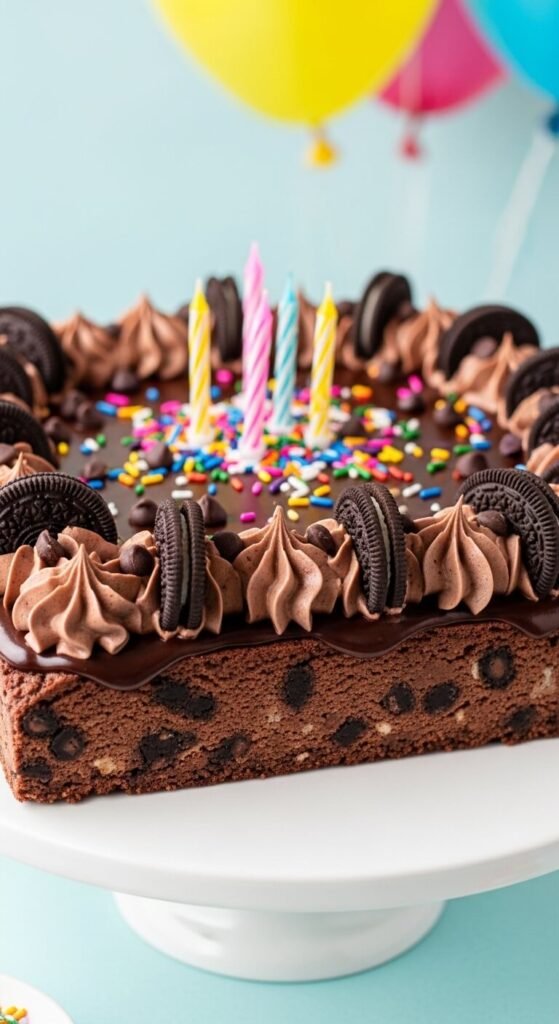
Decorate Like It’s a Real Celebration
This is the most fun part — and the part that transforms a chilled cake into a birthday centerpiece.
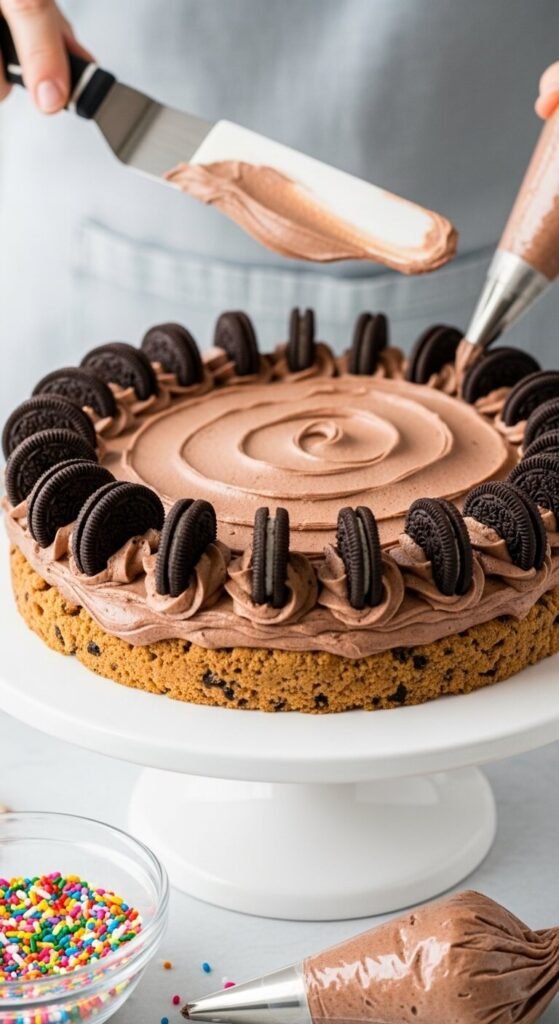
Release the cake first: Run a thin knife or offset spatula around the inside edge of the springform pan, then release the latch and lift the ring away. The cake should hold its shape perfectly and look beautiful even before a single swirl of frosting goes on.
Frosting techniques that work for everyone:
- Beginner: Spread the buttercream over the top of the cake using an offset spatula in sweeping strokes, creating a natural swirled texture. Simple, beautiful, completely forgiving.
- Intermediate: Transfer frosting to a piping bag fitted with a large star tip and pipe rosette swirls around the outer edge of the top, leaving the center open for sprinkles and decorations.
- For a ganache finish: Melt ½ cup chocolate chips with 2 tablespoons of heavy cream and pour over the top before piping, letting it drip slightly over the edges for a dramatic, professional look.
Decoration ideas that always delight:
- Press Oreo cookie halves around the edge, alternating with chocolate chip clusters
- Scatter rainbow sprinkles across the entire surface
- Write a name or message in the center using a piping bag of white buttercream
- Add birthday candles in a ring or cluster in the center
Make-Ahead and Storage Tips
- Make it the day before — the extra chill time only improves the texture and flavor
- Decorate the morning of the celebration for the freshest looking frosting
- Leftovers keep covered in the refrigerator for up to 5 days — the cake actually gets richer and more fudgy as it sits
- Freeze for up to 1 month unfrosted, wrapped tightly in plastic wrap then foil — thaw overnight in the fridge before decorating
The Takeaway
A no-bake cookie cake doesn’t just solve the birthday cake problem — it solves it beautifully. Rich, fudgy, completely customizable, and ready for candles without a single minute of oven time.
Save this recipe before the next birthday on your calendar — make it the night before, decorate it in the morning, and watch the birthday person’s face when they realize the cake that looks this good took almost no effort at all. 🎂🍪✨