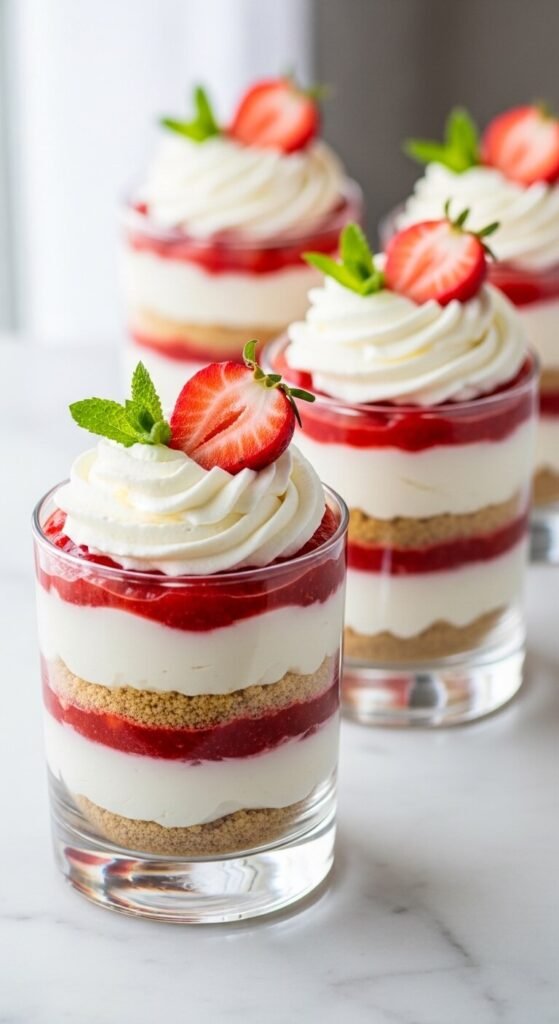
Individual dessert cups are the rare category where looking spectacular and being genuinely easy to make are not competing priorities — they’re the same priority. A single-serving dessert presented in a clear glass does most of the visual work for you automatically. The layers show. The colors contrast. The toppings sit right at eye level. What would look ordinary spread across a baking dish becomes something people photograph before they eat when it’s served in an individual glass with visible, distinct layers and a thoughtfully placed garnish. And none of it requires a piping bag, a turntable, or any skill that takes more than five minutes to learn.
Why Individual Cups Beat a Full Dessert Every Time
Before the technique, a moment on why dessert cups are worth making specifically rather than a whole cake or pan of bars.
They’re portion-controlled. Guests serve themselves without the awkward cutting ritual. Everyone gets a beautiful, identical portion and nobody takes a slice that collapses.
They’re faster. No crust to press evenly across a whole pan. No worrying about clean cuts. Each cup is its own contained unit — if one has slightly more filling than another, nobody knows.
They look like restaurant desserts. A clear glass shows every layer you built, which communicates effort and care even when the actual work was minimal. The visual presentation does emotional work that a slice from a pan simply cannot replicate.
The Design Principle Behind Beautiful Dessert Cups
Every visually striking dessert cup follows the same underlying structure, regardless of flavor:
- A crunchy base layer — graham cracker crumbs, crushed Oreos, crumbled brownies, or granola
- A creamy middle layer — cheesecake filling, mousse, pudding, or whipped cream
- A colorful or contrasting layer — fruit compote, caramel sauce, chocolate ganache, or lemon curd
- A topping that adds height — a whipped cream rosette, fresh fruit, a cookie standing upright, or chocolate shavings
The rule is contrast at every transition. Dark crust against white filling. White filling against red berry layer. Berry layer against pale cream topping. Each layer should be visually distinct from the one above and below it — which means color, texture, or both should change at every level.
The Base Recipe — Classic No-Bake Cheesecake Cups
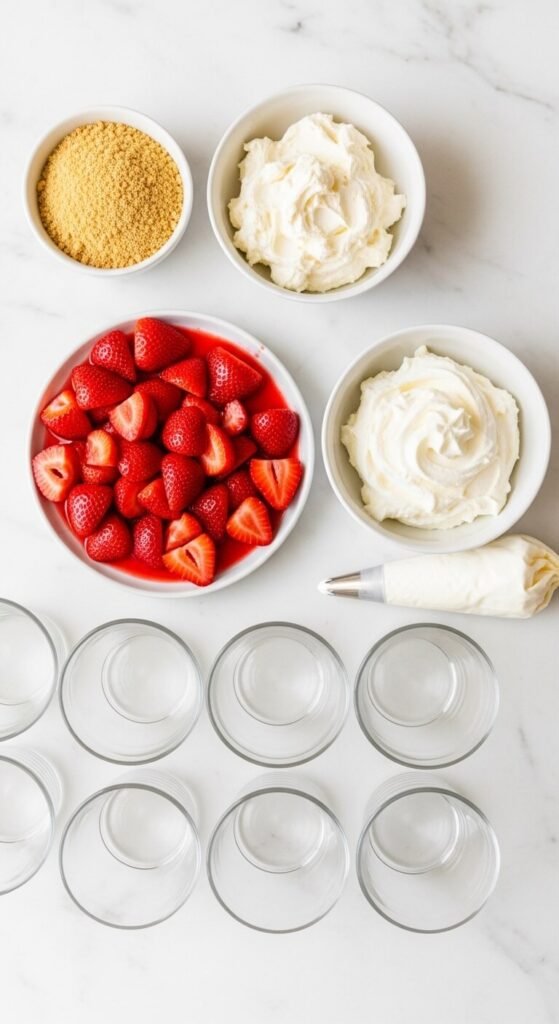
This recipe makes 6 individual cups in 8 oz clear glasses or mason jars.
For the crust layer:
- 1½ cups graham cracker crumbs
- 4 tablespoons unsalted butter, melted
- 2 tablespoons granulated sugar
For the cheesecake filling:
- 8 oz full-fat block cream cheese, room temperature
- ½ cup powdered sugar, sifted
- 1 teaspoon pure vanilla extract
- 1 tablespoon fresh lemon juice
- ¾ cup heavy whipping cream, cold — whipped to firm peaks separately
For the topping layer:
- 1 cup fresh strawberries, hulled and sliced — tossed with 1 tablespoon sugar and left to macerate for 15 minutes
For finishing:
- ½ cup heavy cream whipped with 1 tablespoon powdered sugar — for topping rosettes
- Fresh mint, extra fruit, or chocolate shavings
Assembly — Layering for Maximum Visual Impact
The assembly is where the visual magic happens — and three specific techniques produce the cleanest, most professional-looking result.
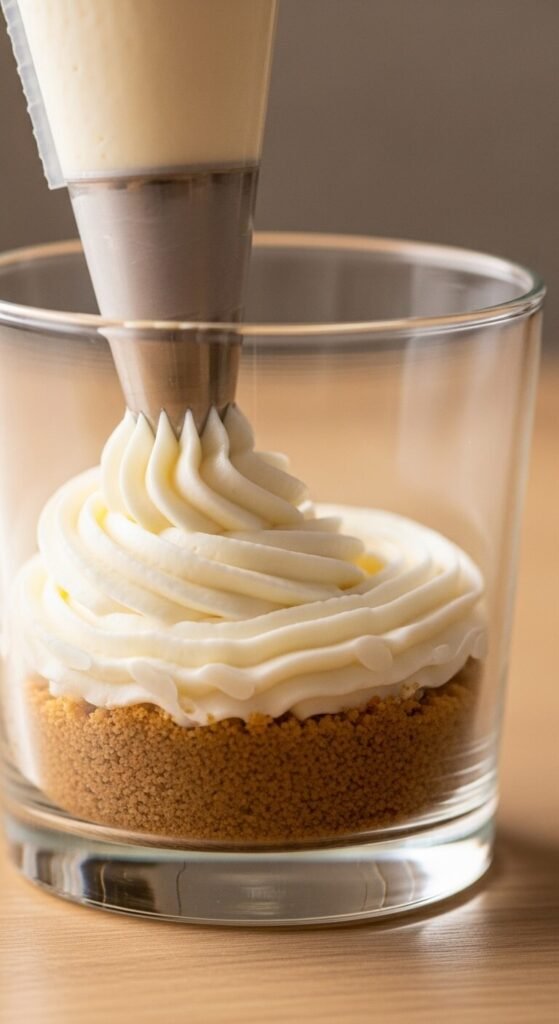
Technique 1: Use a piping bag or zip-lock bag for the filling. Spooning filling into a glass creates uneven, smeared edges that show through the glass walls. A piping bag — or a zip-lock bag with one corner snipped off — deposits filling in a controlled spiral from the center outward, leaving the glass walls clean and the layer surface level.
Technique 2: Tap the glass between layers. After adding each layer, tap the bottom of the glass firmly on the counter two or three times. This settles the layer flat, eliminates air pockets at the glass walls, and sharpens the visual boundary between layers.
Technique 3: Chill between layers for the crispest lines. If clean, defined layer separation is the priority — refrigerate for 15 minutes after adding the cheesecake filling layer before adding the fruit layer on top. The chilled filling holds its shape and the fruit layer sits on top with a clean edge rather than sinking in.
The Topping — Where the Instagram Moment Happens
The top of a dessert cup is the first thing seen and the last thing eaten. It should do both jobs well.
For a whipped cream rosette: Fill a piping bag fitted with a large star tip with cold whipped cream. Hold the bag directly above the center of the cup. Apply even pressure and pipe in one continuous circular motion from the center outward and upward to create a spiral rosette that sits above the rim of the glass.
If you don’t have a piping tip: Spoon a generous dollop of whipped cream in the center and use the back of a small spoon to create a slight swirl on the surface. Then place garnishes directly on top of the cream — they’ll hold in the soft surface without sliding.
Garnishes that photograph well:
- A fresh strawberry half standing upright with the cut side facing outward
- A single mint sprig tucked beside the cream at a slight angle
- Two or three thin chocolate shavings laid across the cream
- A small piece of the same cookie used for the crust, standing vertically in the cream
Variations That Work Beautifully in Cups
Oreo Cheesecake Cups: Replace graham crust with crushed Oreos. Use the cheesecake filling above. Top with chocolate ganache and half an Oreo standing upright.
Lemon Curd Cups: Graham crust base, cheesecake filling with 2 tablespoons of lemon zest added, a generous layer of store-bought lemon curd, whipped cream rosette, and a thin lemon slice twisted and placed against the glass rim.
Chocolate Mousse Cups: Skip the crust entirely. Fill with chocolate mousse made from whipped cream folded into melted dark chocolate. Top with raspberries, gold dust, and a chocolate curl.
Tiramisu Cups: Layer ladyfinger pieces dipped in espresso, mascarpone cream, another ladyfinger layer, more cream, and a heavy dusting of Dutch-process cocoa powder over the top.
Practical Tips for Serving and Storing
- Make up to 24 hours ahead — the layers meld and the flavors develop. Add whipped cream toppings and fresh fruit garnishes within 1 hour of serving only.
- Transport easily by covering each cup with plastic wrap pressed gently against the surface. They travel without spilling or shifting.
- Use identical glasses for the cleanest visual presentation when serving a group — mismatched vessels make even beautiful layers look haphazard.
Save This Recipe — Beautiful Desserts Start Here
No-bake dessert cups are the shortcut that doesn’t look like a shortcut — and that combination is genuinely rare in home cooking. Clean layers, a whipped cream rosette, a fresh garnish, and a clear glass do the work of communicating care, effort, and skill without requiring any of the time that usually produces those results.
Pin this article to your entertaining or no-bake desserts board right now — make a batch for your next dinner party and watch every single guest photograph theirs before picking up a spoon.