Grainy fudge is one of the most frustrating things that can happen in a kitchen. You follow the recipe, you let it set, you cut into it — and instead of that silky, melt-in-your-mouth texture you were expecting, you get something that feels like sweetened sand. The good news is that grainy fudge is completely preventable. And no-bake fudge, made the right way, sidesteps most of the pitfalls that trip up traditional cooked fudge entirely. No candy thermometer, no precise boiling stages, no sugar crystallization drama. Just smooth, dense, rich fudge that sets in the fridge and slices like a dream.
Why No-Bake Fudge Is Smoother Than Traditional Fudge
Traditional fudge gets grainy when sugar crystals form too early or too aggressively during the cooling process. It’s a chemistry problem — and it’s why classic fudge recipes are genuinely tricky to nail consistently.
No-bake fudge avoids this entirely.
Instead of relying on a precise sugar-cooking process, no-bake fudge uses ingredients that are already smooth and stable — melted chocolate, sweetened condensed milk, nut butter, or cream cheese — and combines them into a mixture that sets through refrigeration rather than crystallization.
The result is fudge with a consistently smooth texture every single time, because there’s no sugar recrystallization happening at all. The ingredients you’re starting with are already smooth. Your job is simply to combine them correctly and let the cold do the rest.
The Ingredients That Make It Work
No-bake fudge relies on a few specific ingredients doing specific jobs. Understanding what each one contributes helps you avoid substitution mistakes.
Sweetened condensed milk is the backbone of most no-bake fudge recipes. It provides sweetness, body, and — most importantly — a sugar that’s already been processed into a completely smooth liquid form. It will never turn grainy on you.
High-quality chocolate (chips or chopped bars) melts into the condensed milk to create structure and flavor. Use 60% or higher cacao content for a fudge that tastes rich rather than just sweet.
Butter adds fat and gloss. It makes the fudge feel luxurious and helps it release cleanly from the pan. Use real butter — not margarine, which has too high a water content.
Vanilla extract deepens every other flavor in the recipe. Don’t skip it.
Optional add-ins: crushed nuts, sea salt, espresso powder, peppermint extract, caramel swirl, or chopped dried fruit.
The Base No-Bake Fudge Recipe
This is the recipe to start with. It works every time, takes about 10 minutes of active work, and produces a fudge that genuinely competes with anything you’d buy from a candy shop.
Ingredients:
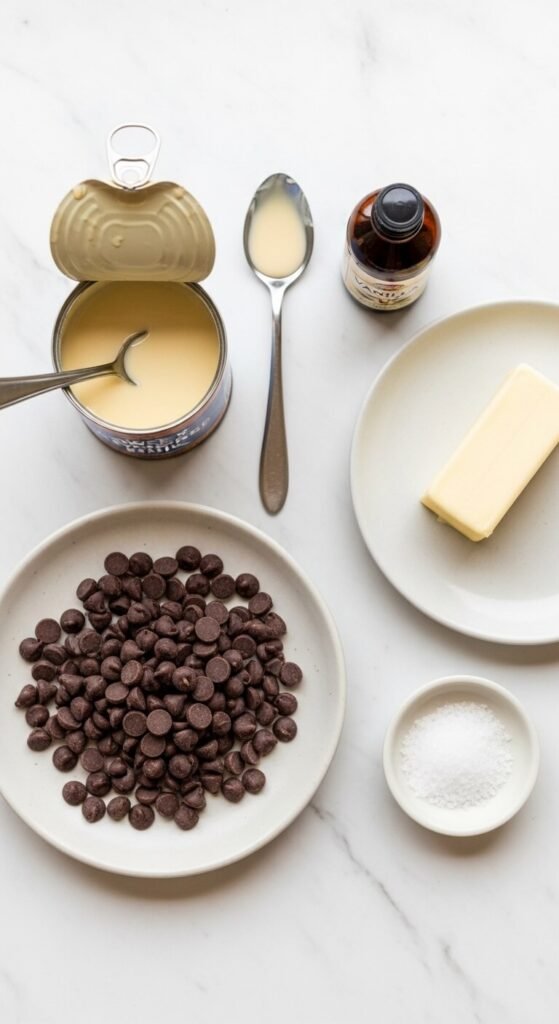
- 3 cups dark chocolate chips (or chopped 60%+ chocolate)
- 1 can (14 oz) sweetened condensed milk
- 2 tablespoons unsalted butter
- 1½ teaspoons vanilla extract
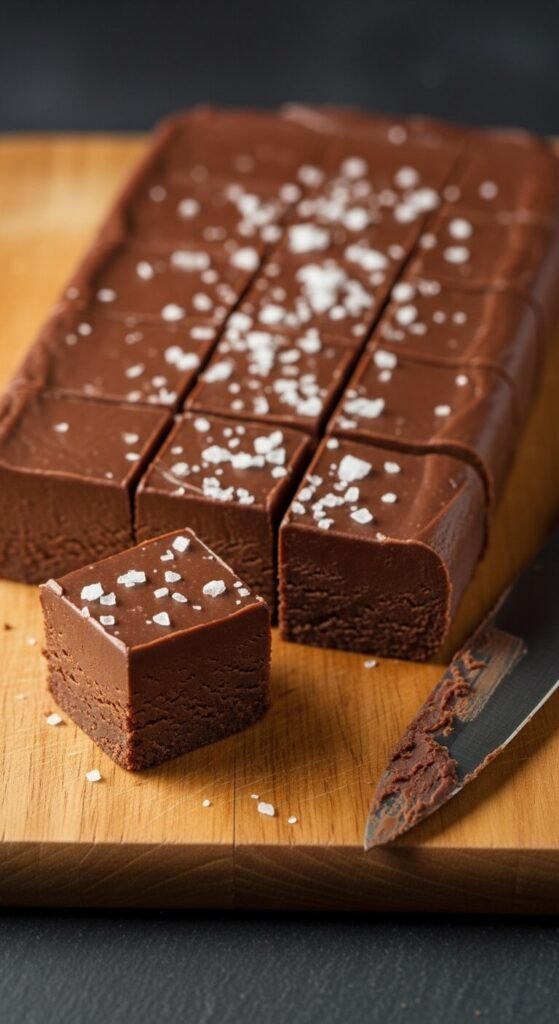
- ½ teaspoon flaky sea salt (for topping)
Instructions:
- Line an 8×8 inch pan with parchment paper, leaving overhang on two sides for easy lifting
- Combine chocolate chips, condensed milk, and butter in a medium saucepan over low heat
- Stir continuously with a silicone spatula — don’t walk away — until everything is fully melted and completely smooth
- Remove from heat, stir in vanilla
- Pour into the prepared pan and smooth the top with the spatula
- Scatter flaky sea salt across the surface immediately
- Refrigerate for a minimum of 2 hours — 4 hours for cleaner slices
To slice: lift the fudge from the pan using the parchment overhang, place on a cutting board, and use a sharp knife warmed under hot water (then dried) for the cleanest cuts.

How to Keep It Perfectly Smooth Every Time
A few specific techniques prevent the most common texture problems:
Use low heat, always. High heat causes chocolate to seize — suddenly turning from silky to thick and grainy. Keep the burner on low and be patient. The mixture will melt completely in 5 to 8 minutes on low with constant stirring.
Don’t let any water near the chocolate. Even a single drop of water from a wet spoon or steamy lid can cause chocolate to seize. Make sure your pan, spatula, and all utensils are completely dry before you start.
Stir constantly and slowly. Fast, vigorous stirring can cool one part of the mixture faster than another and introduce air bubbles. Slow, consistent stirring keeps the temperature even throughout.
Refrigerate — don’t freeze. Freezing fudge causes moisture to form on the surface as it thaws, which affects texture. The fridge is the right setting environment. Patience here pays off in texture.
Flavor Variations That Work Beautifully
Once you have the base recipe down, the variations are almost endless.
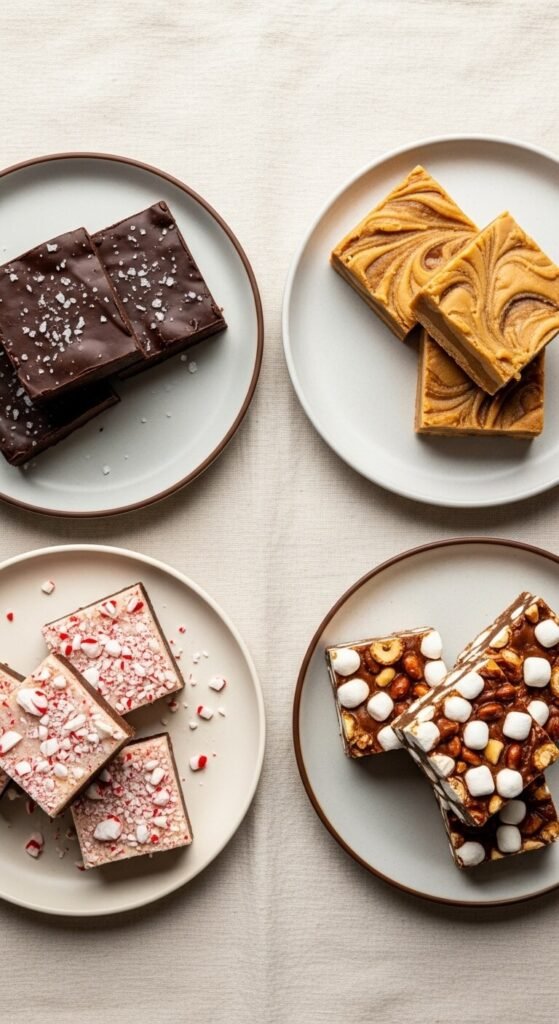
Peanut Butter Swirl Fudge Make the base recipe. While the chocolate is still warm in the pan, drop 6 to 8 spoonfuls of peanut butter across the surface and swirl with a toothpick or skewer. Refrigerate as normal.
Peppermint Bark Fudge Add 1 teaspoon of peppermint extract with the vanilla. Top with crushed candy canes before refrigerating. Use a mix of dark and white chocolate for visual contrast.
Espresso Dark Chocolate Fudge Add 2 teaspoons of instant espresso powder to the melted mixture. It deepens the chocolate flavor dramatically without tasting overtly like coffee.
Rocky Road Fudge Fold in ½ cup each of mini marshmallows, chopped walnuts, and chocolate chips immediately before pouring into the pan. The add-ins should be at room temperature so they don’t cause the fudge to set unevenly.
Storage and Shelf Life
No-bake fudge keeps beautifully when stored correctly:
- In the refrigerator: Up to 2 weeks in an airtight container, layers separated by parchment paper
- At room temperature: Up to 3 days in a cool, dry environment — ideal for gifting
- In the freezer: Up to 3 months, wrapped tightly in plastic wrap and then placed in a freezer bag. Thaw overnight in the refrigerator — never at room temperature
For gifting, stack fudge squares in a small box lined with parchment and tie with ribbon. It looks completely professional and costs a fraction of what boxed chocolates run in a shop.
Smooth Fudge Is Closer Than You Think
The difference between grainy fudge and perfectly smooth fudge isn’t skill level — it’s method. Low heat, dry utensils, constant stirring, and enough time in the fridge. Follow those four rules and the texture takes care of itself every single time.
Start with the base recipe. Get comfortable with how the mixture should look and feel. Then work through the variations at your own pace.
Save this article for your next batch and share it with anyone who’s ever been let down by a grainy, crumbly fudge recipe — because this one won’t disappoint.