Store-bought granola bars have a fundamental problem that the packaging works very hard to distract you from: they’re expensive, they’re smaller than they look, and the ingredient list reads like a chemistry exam. The good ones cost $2 to $3 each. The affordable ones taste like sweetened cardboard held together with corn syrup and optimism. Meanwhile, a batch of homemade no-bake granola bars costs about $4 in ingredients, produces 16 generous portions, takes 20 minutes to make, and tastes so much better than anything in the snack aisle that you’ll genuinely stop buying the packaged version within two batches. The texture is chewier, the flavor is richer, and you control exactly what goes into them — which turns out to matter quite a lot once you’ve read the back of a Nature Valley wrapper in sufficient detail.
Why Homemade Granola Bars Win Every Time
The store-bought granola bar formula prioritizes shelf stability and cost over flavor and texture. To stay crisp and intact through months of warehousing and shipping, commercial bars use highly processed binding agents, added preservatives, and enough sugar to keep everything locked in a rigid structure that survives a backpack.
Homemade no-bake granola bars are made to be eaten within two weeks — and that different timeline completely changes what you can put in them and how good they can taste. Real honey instead of corn syrup. Real butter instead of palm oil. Fresh nuts instead of processed nut fragments. The flavor difference is immediate and it’s significant.
The Ingredient Formula That Makes Them Hold Together
The most common homemade granola bar failure is bars that crumble the moment you cut them or fall apart completely when picked up. The structural integrity comes entirely from getting the binder ratio right.
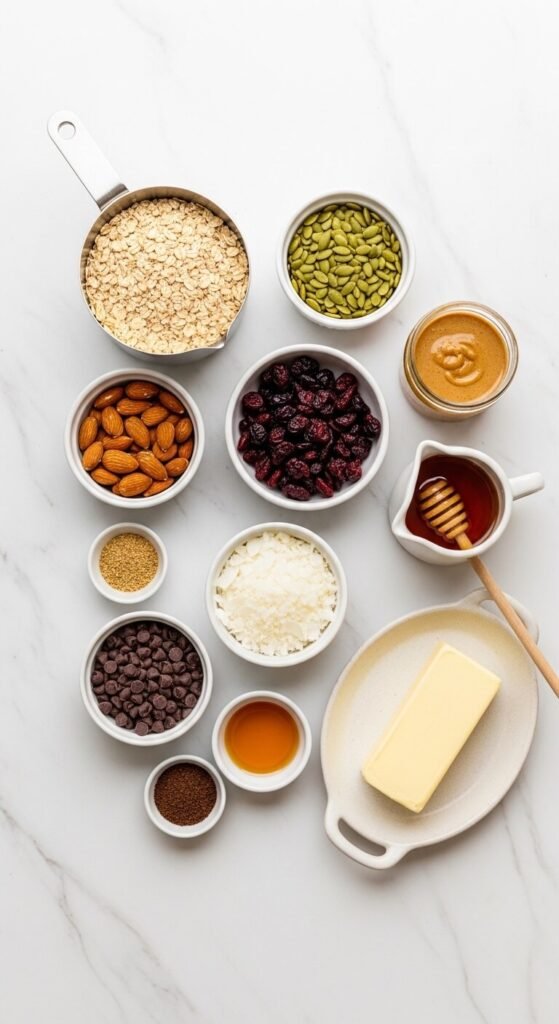
Base ingredients for 16 bars in a 9×13 pan:
- 3 cups old-fashioned rolled oats
- 1 cup mixed nuts, roughly chopped — almonds, cashews, and pecans all work well
- ½ cup sunflower seeds or pumpkin seeds
- ½ cup shredded unsweetened coconut
- ½ cup dried fruit — cranberries, cherries, or chopped apricots
- ½ cup chocolate chips or cacao nibs — added after cooling, not into the warm mixture
For the binder:
- ½ cup natural almond butter or peanut butter
- ½ cup honey or pure maple syrup
- 4 tablespoons unsalted butter
- 1 teaspoon pure vanilla extract
- ½ teaspoon salt
- 1 tablespoon light brown sugar
The binder ratio rule: For every 4 cups of dry ingredients, you need approximately ¾ to 1 cup of combined binder — the nut butter, honey, and butter together. Below this ratio, the bars crumble. Above it, they’re too sticky and soft to hold their shape.
Toast the Dry Ingredients First
This is the step that separates good homemade granola bars from extraordinary ones — and it takes only 10 minutes.
How to toast:
- Spread oats, chopped nuts, seeds, and coconut in an even layer on a rimmed baking sheet
- Bake at 325°F for 10 minutes, stirring once halfway through
- Watch carefully — coconut browns faster than oats and can burn in the final 2 minutes
- Remove from oven and pour into a large mixing bowl immediately to stop the cooking
Why it matters: Raw oats and nuts taste flat and slightly starchy. Toasted oats and nuts develop a nutty, caramel-like depth of flavor that carries through the entire bar. This single step is responsible for more of the flavor difference between homemade and store-bought than any other technique in this recipe.
Make the Binder and Combine Everything
While the toasted mixture is still warm — not hot, just warm — make the binder.
Step by step:
- Combine the nut butter, honey, butter, brown sugar, and salt in a small saucepan over medium-low heat
- Stir constantly until the butter melts and everything combines into a smooth, unified liquid — about 3 minutes
- Remove from heat and stir in the vanilla
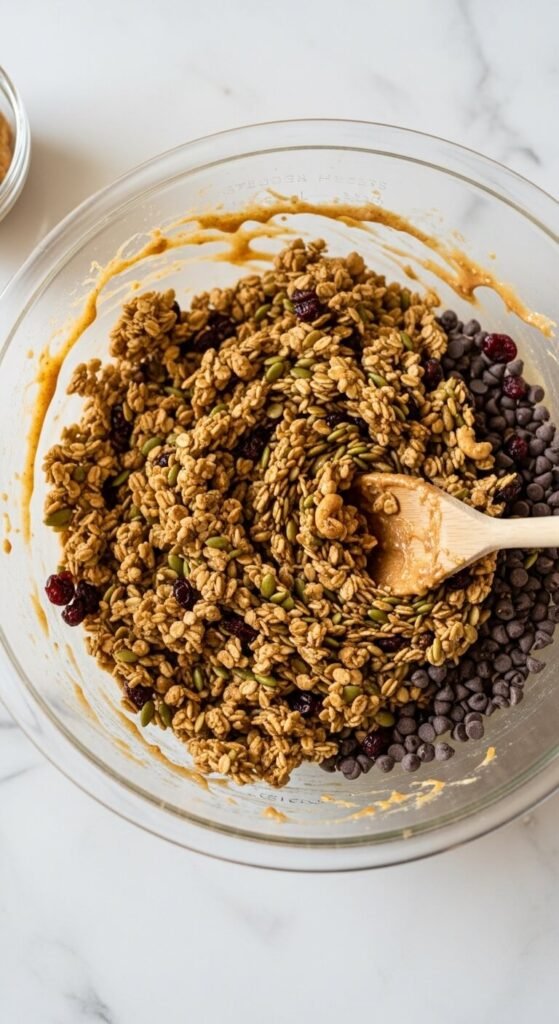
- Pour the warm binder over the warm toasted oat mixture immediately — warm binder distributes more evenly than cold and coats every piece thoroughly
- Add the dried fruit and stir until everything is completely coated
- Let the mixture cool for 5 minutes before adding chocolate chips — hot mixture melts the chips completely rather than keeping them intact
The Pressing Technique That Produces Clean Cuts
Transfer the mixture to a parchment-lined 9×13 inch pan while still warm and pliable. Cold mixture compacts unevenly and crumbles at the edges.
Press firmly. Very firmly.
This is the step most people do insufficiently. Use the flat bottom of a measuring cup and press with genuine force across the entire surface — working from the center to the edges and then back again. The mixture should look compressed and dense, not fluffy or loose.
Pay extra attention to corners and edges — these are where bars crumble first if the compression is uneven.
Refrigerate for at least 2 hours before cutting. Overnight produces the most reliable results.
Cutting for the Cleanest Bars
- Use the parchment overhang to lift the entire slab onto a cutting board before cutting
- Run a sharp chef’s knife under hot water and dry before each cut
- Cut with one clean downward motion — no sawing
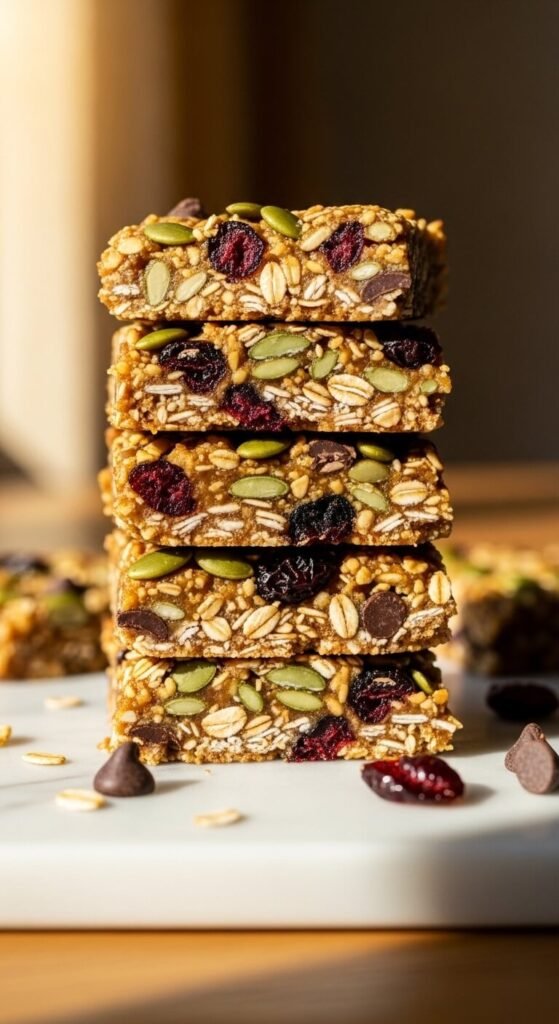
- Cut into bars about 1.5 inches wide — narrower cuts look like commercial bars, wider cuts feel more satisfying and substantial
Variations That Keep the Recipe Interesting
Dark chocolate almond: Add 2 tablespoons of cocoa powder to the warm binder and use dark chocolate chips. Finish with a drizzle of melted chocolate over the surface after pressing.
Tropical version: Replace dried cranberries with chopped dried mango and pineapple. Replace coconut with macadamia nuts. Use maple syrup instead of honey.
Seed bar: Replace all nuts with a mix of sunflower seeds, pumpkin seeds, sesame seeds, and hemp seeds for a completely nut-free version that schools and offices can accommodate.
Storage That Keeps Them Perfect
- Room temperature: Airtight container for up to 5 days — keep bars separated by parchment to prevent sticking
- Refrigerator: Up to 2 weeks — bars firm up nicely when cold
- Freezer: Wrap individually in plastic wrap, then store in a labeled bag for up to 3 months — thaw at room temperature for 15 minutes
Save This Recipe — Your Snack Drawer Just Got Better
Homemade no-bake granola bars cost a fraction of store-bought, taste considerably better, and take less time to make than a trip to the grocery store to buy the packaged kind. Toast the dry ingredients, nail the binder ratio, press firmly, and chill completely before cutting.
Pin this recipe to your meal prep or healthy snack board right now and make your first batch this weekend — by Monday morning you’ll have 16 genuinely good bars ready to go, and the store-bought box in your pantry will start looking like a significant downgrade.