If there’s one flavor that tastes unmistakably like summer, it’s key lime pie. That electric combination of tart, creamy, and sweet — cool and refreshing but rich enough to feel like a genuine indulgence — is unlike anything else in the dessert world. The traditional baked version is wonderful, but it requires careful oven timing and the perpetual anxiety of watching custard set without overcooking. The no-bake version? It’s arguably better. Silkier filling, no oven, no stress, and that same bright, puckery, deeply satisfying tang that makes people close their eyes after the first bite. Here’s how to make it perfectly.
Real Key Limes vs. Regular Limes — Does It Matter?
Yes. And here’s why it’s worth tracking down the real thing.
Key limes are smaller, more aromatic, and more floral than regular Persian limes. They have a more complex acidity — sharper and more perfumed — that gives authentic key lime pie its distinctive flavor. That slightly floral, almost tropical edge is what separates a truly great key lime pie from a good lime pie.
That said, real key limes are small and seedy, which means juicing them takes time. If you can find key lime juice bottled (Nellie & Joe’s Famous Key West Lime Juice is the widely available standard), it’s a completely legitimate shortcut that professional bakeries use without apology.
Lime guide:
- Fresh key limes — 20–24 limes for ½ cup of juice. Worth it for the freshest flavor.
- Bottled key lime juice — measure straight from the bottle, equally tangy and reliable
- Fresh Persian limes — the most accessible option. Use a little more zest to compensate for the slightly less complex flavor — about 6–7 limes for ½ cup of juice.
Whatever you use, taste the filling before it sets and adjust. More lime juice for more tang, more sweetened condensed milk for more sweetness. The filling is completely adjustable before it goes into the crust.
What You’ll Need
For the graham cracker crust:
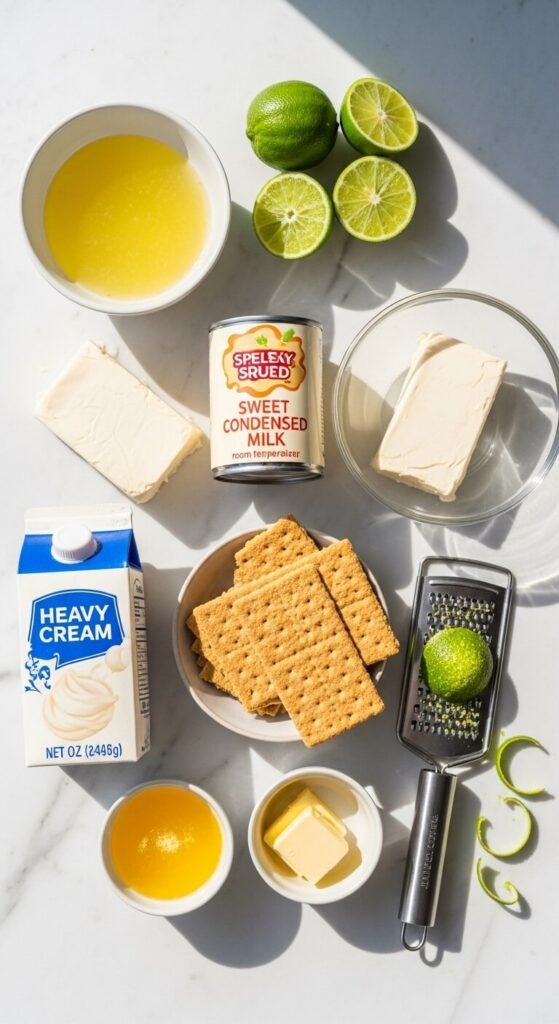
- 1½ cups (150g) graham cracker crumbs — about 12 full crackers
- ⅓ cup (75g) unsalted butter, melted
- 3 tablespoons granulated sugar
- Pinch of salt
For the no-bake key lime filling:
- 16 oz (450g) full-fat cream cheese, softened to room temperature
- 1 can (14 oz) sweetened condensed milk — the backbone of the filling’s sweetness and set
- ½ cup (120ml) fresh key lime juice or bottled key lime juice
- Zest of 3 key limes or 2 regular limes — essential for depth of flavor
- 1 teaspoon vanilla extract
- 1 cup (240ml) heavy whipping cream, cold — whipped and folded in for lightness
For the topping:
- 1 cup (240ml) heavy whipping cream
- 2 tablespoons powdered sugar
- ½ teaspoon vanilla extract
- Lime slices and extra zest for garnish
Make the Crust
Combine graham cracker crumbs, melted butter, sugar, and salt in a bowl and stir until the crumbs are evenly coated. The mixture should hold its shape when pressed — if it crumbles, add a teaspoon more melted butter.
Press firmly and evenly into a 9-inch pie dish using the back of a measuring cup or your fingertips, working the crumbs up the sides as well as across the base. The side walls give the finished pie its classic shape and make each slice stand cleanly.
Refrigerate the crust for 30 minutes before filling. A well-chilled crust holds its shape when the filling goes in and gives a defined, clean border between crust and filling in every slice.
Pro tip: For an extra-sturdy crust that holds together even better, bake at 350°F for 8 minutes, then cool completely before filling. It’s still significantly less work than a full baked pie and gives you a crust with a noticeably more toasted, buttery flavor.
Make the Key Lime Filling
This is where the magic happens — and it takes about five minutes.
Step 1 — Beat the cream cheese Beat softened cream cheese on medium-high speed for 2 minutes until completely smooth and fluffy with no lumps. Room temperature cream cheese is essential — cold cream cheese will never beat completely smooth and leaves a slightly grainy texture in the finished filling.
Step 2 — Add condensed milk, lime, and vanilla Pour in the sweetened condensed milk and beat until fully combined — about 1 minute. Add the lime juice, lime zest, and vanilla extract. Beat on medium until incorporated and smooth.
The filling will be fairly loose at this stage — this is correct. The lime juice’s acidity reacts with the condensed milk proteins and will help the filling set as it chills.
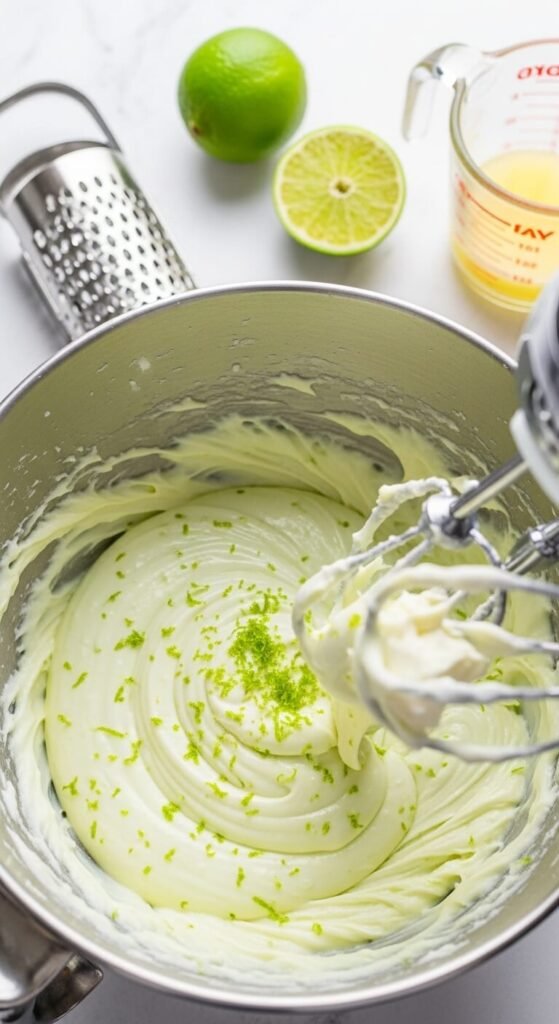
Step 3 — Fold in the whipped cream In a separate chilled bowl, whip the cold heavy cream to stiff peaks. Fold it into the lime filling in two additions using slow, sweeping strokes with a large spatula. This step transforms the dense, tangy filling into something lighter and mousse-like — with a texture that’s luxuriously creamy rather than heavy.
Taste and adjust:
- More tangy? Add an extra tablespoon of lime juice and stir to combine
- More sweet? Stir in a tablespoon of powdered sugar
- More lime flavor? Add extra zest — this is where the most vibrant citrus notes come from
Fill and Chill
Pour the filling into the chilled crust and smooth the surface with an offset spatula until completely even. The filling should come right up to the top of the crust walls without overflowing.
Cover loosely with plastic wrap — without pressing it against the surface — and refrigerate for at least 6 hours. Overnight is strongly recommended.
This chill time is the entire technique. As the pie sits, the lime juice continues reacting with the condensed milk, the cream cheese firms up, and the whipped cream stabilizes everything into a filling that slices with a clean edge and holds its shape on the fork. A 4-hour chill is technically enough. A 12-hour overnight chill is transformative.
Top and Garnish
The topping goes on right before serving — not before refrigerating.
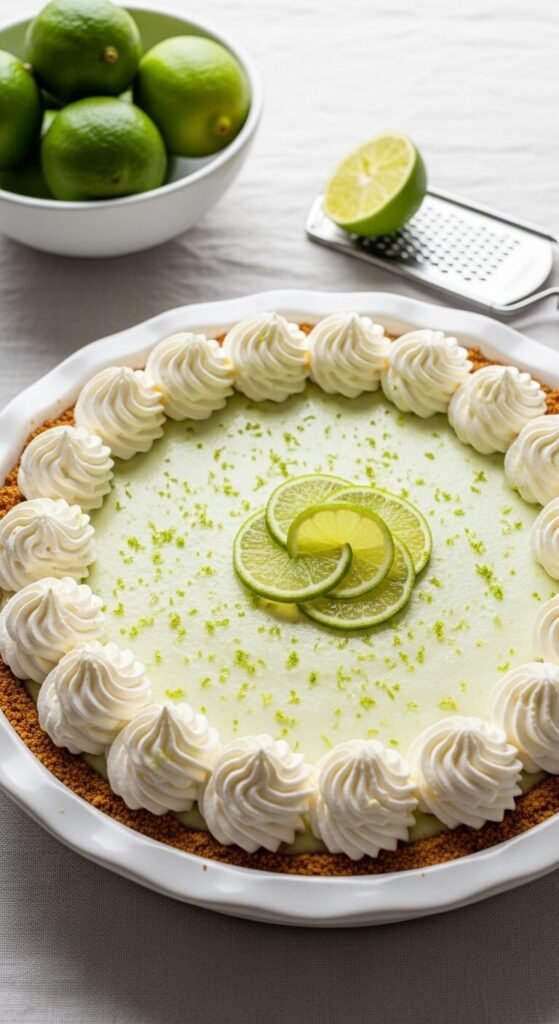
Whip the heavy cream, powdered sugar, and vanilla to stiff peaks. Transfer to a piping bag fitted with a large star tip and pipe generous rosette swirls around the outer edge of the pie, leaving the center open for the garnish.
Finishing touches that make it beautiful:
- Thin rounds of lime sliced paper-thin and fanned in the center
- Extra lime zest grated directly over the whipped cream for a pop of bright green
- A few sugared lime slices for a more formal presentation
- A light dusting of Graham cracker crumbs along the inner edge of the whipped cream border

Storage Tips
- Refrigerate uncovered for the first 30 minutes after adding toppings so the whipped cream sets slightly
- Cover loosely and store in the fridge for up to 4 days — the filling gets slightly firmer each day
- This pie does not freeze well with the whipped cream on top — freeze the filling-only pie, then thaw overnight and add fresh topping before serving
The Takeaway
No-bake key lime pie delivers everything the baked version promises — that sharp, creamy, endlessly refreshing tang — with a fraction of the effort and none of the oven anxiety. Make it the night before, top it in the morning, and let it be the coolest, most crowd-pleasing thing on the table.
Save this recipe for your next summer gathering — because the moment someone asks “what’s in this?” and you say “key lime pie I made from scratch,” the look on their face will be worth every squeeze of that tiny, beautiful fruit. 🍋✨