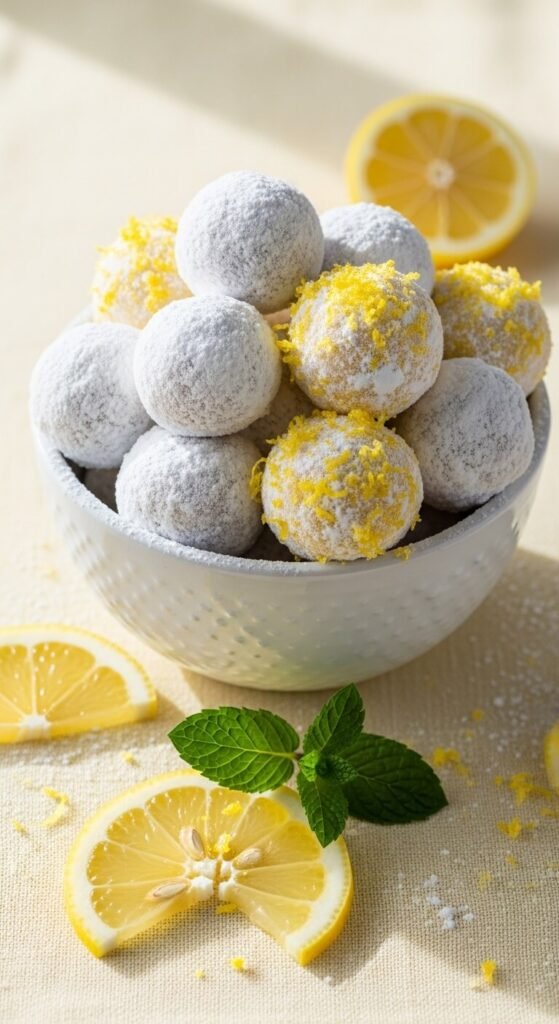
Most truffles are all about chocolate — deep, dark, and rich. These are not those. These No-Bake Lemon Truffles are bright, bold, and unapologetically citrusy — the kind of bite that wakes up your taste buds the moment they hit your tongue. They’re creamy and dense on the inside, rolled in powdered sugar or white chocolate on the outside, and packed with enough real lemon flavor to make you forget that chocolate truffles ever existed. And they come together in under 20 minutes with no oven, no thermometer, and no fuss whatsoever.
Bright. Creamy. Completely irresistible. Let’s make them.
Why Lemon Truffles Deserve More Hype
Chocolate truffles get all the attention — and they deserve it — but lemon truffles are quietly one of the most elegant, crowd-pleasing confections you can make at home. Here’s why they belong on your rotation:
- They taste genuinely luxurious — creamy white chocolate and cream cheese carry lemon flavor in a way that feels rich and refined, not just sweet.
- They’re naturally show-stopping — pale yellow with a dusting of white sugar, they look like something from a patisserie display case.
- They’re incredibly fast to make — 20 minutes of active work, then the fridge takes over.
- They travel and store beautifully — firm, compact, and fridge-stable for up to two weeks.
- They feel unexpected — at a gathering full of chocolate desserts, a plate of lemon truffles stands out completely.
These are the truffles that make people say “wait, what is in these?” — and then immediately reach for a second one.
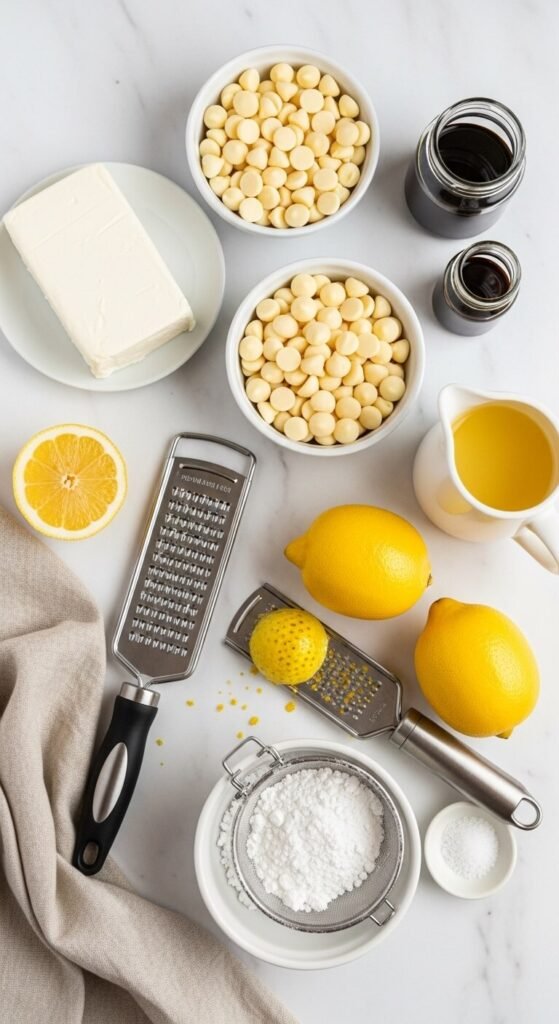
What You’ll Need
The ingredient list is short, fresh, and wonderfully unfussy.
For the truffle base:
- 8 oz full-fat cream cheese, softened to room temperature
- 1½ cups white chocolate chips or finely chopped white chocolate
- Zest of 2 large lemons (this is the non-negotiable flavour powerhouse)
- 3 tablespoons fresh lemon juice (freshly squeezed — no bottled shortcuts here)
- 1 teaspoon vanilla extract
- ¼ teaspoon fine sea salt
- 1½ cups powdered sugar, sifted, plus extra for rolling
For coating options:
- Powdered sugar (classic, clean, elegant)
- Finely grated lemon zest mixed with granulated sugar (bright and fragrant)
- Melted white chocolate for dipping (most impressive finish)
- Crushed freeze-dried lemon slices for a bold, tart crunch
Step 1: Melt the White Chocolate
White chocolate is more delicate than dark — it scorches easily and turns grainy and seized if overheated. Treat it gently and it rewards you with a silky, creamy base that carries lemon flavor beautifully.
- Place white chocolate chips in a heatproof bowl.
- Melt using the microwave in 20-second bursts, stirring thoroughly between each interval.
- Stop microwaving the moment the last few chips melt from residual heat — don’t wait until it looks fully melted before pulling it out.
- Stir until completely smooth and glossy, then set aside to cool for 5 minutes.
Alternatively, use a double boiler over barely simmering water — low and slow, stirring constantly.
Step 2: Make the Lemon Truffle Base
Room temperature cream cheese is essential. Cold cream cheese won’t blend smoothly into the melted chocolate and you’ll end up with small white lumps that no amount of stirring will fix.
- Beat the softened cream cheese until completely smooth — about 1 minute with a hand mixer.
- Pour in the cooled melted white chocolate and beat again until fully combined and silky.
- Add the lemon zest, lemon juice, vanilla extract, and sea salt. Mix until incorporated.
- Sift in the powdered sugar and beat on low speed until the mixture is smooth, thick, and uniform.
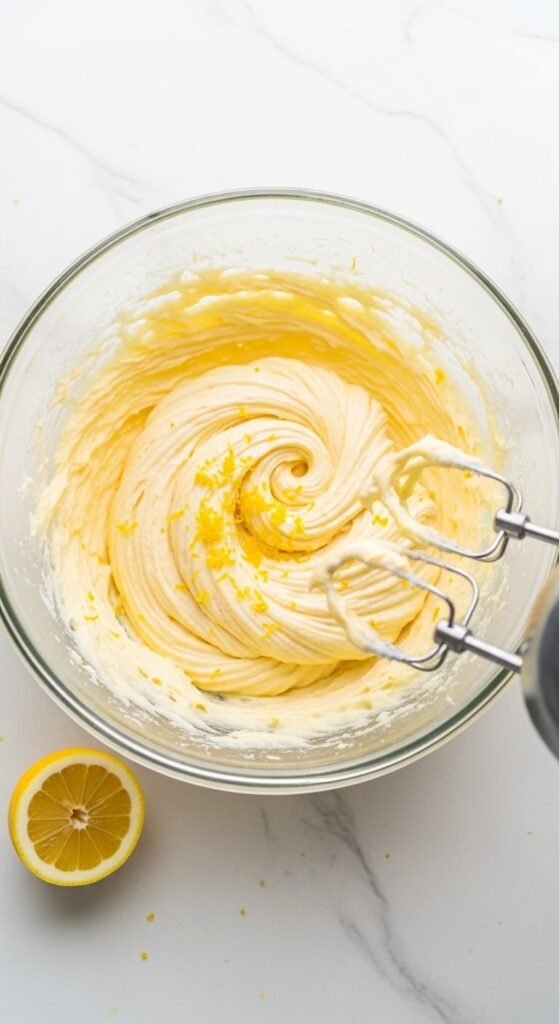
Taste the mixture at this point — it should be boldly lemony, creamy, and just sweet enough. If you want more citrus punch, add a little extra zest. Trust your palate.
Cover the bowl and refrigerate for 1–2 hours until the mixture is firm enough to scoop and roll without sticking to your hands.
Step 3: Scoop and Roll
This is the most tactile part of the whole process — and one of the most satisfying.
- Set up your coating station: a shallow bowl of powdered sugar, or your chosen coating, ready to go.
- Use a small cookie scoop or tablespoon to portion the chilled mixture into equal amounts.
- Roll each portion quickly between your palms into a smooth ball — work fast, as the warmth of your hands will soften the mixture.
- Drop immediately into the coating and roll to cover completely.
- Place finished truffles on a parchment-lined tray as you go.
If the mixture softens too much mid-rolling: pop the bowl back in the fridge for 15 minutes and continue. Cold truffle mixture rolls infinitely better than warm.
Aim for marble-sized balls — small enough to eat in one or two bites, which is exactly the point of a truffle.
Step 4: Chill and Set
Transfer the tray to the refrigerator and chill the finished truffles for at least 30 minutes before serving. This firms them back up after the warmth of rolling and gives them that perfect dense, fudgy center that defines a great truffle.

Once set, they’re ready to eat — or store in an airtight container in the fridge for up to two weeks. They also freeze beautifully for up to two months; just let them thaw in the fridge for an hour before serving.
Variations That Take These Even Further
Once you’ve mastered the original, these twists are all worth exploring:
- Lemon Lavender Truffles — add ½ teaspoon of culinary lavender to the mixture and roll in purple sugar for an elegant, floral version.
- Lemon Raspberry Truffles — press a frozen raspberry into the center of each truffle before rolling for a hidden fruit surprise.
- Limoncello Truffles — replace 1 tablespoon of lemon juice with limoncello for an adults-only version with a sophisticated boozy edge.
- Lemon Coconut Truffles — roll in toasted shredded coconut instead of powdered sugar for a tropical twist.
- White Chocolate Dipped Lemon Truffles — dip each chilled truffle in melted white chocolate, let the excess drip off, and finish with a curl of lemon zest on top before the coating sets.
Tips for Truffle Perfection
- Fresh lemon zest is everything — it contains the essential oils that deliver that vivid, true lemon flavour. Bottled zest simply doesn’t compare.
- Microplane graters give the finest zest — finer zest means it integrates more seamlessly into the filling rather than sitting in visible clumps.
- Cold hands make better truffles — run your hands under cold water and dry them before each rolling session to slow down the softening.
- Sift your powdered sugar — unsifted sugar has lumps that stick unevenly to the truffle surface and don’t look as clean.
- Make a double batch — these disappear faster than any other no-bake treat and you will absolutely wish you had more.
The Truffle That Steals the Spotlight
In a world full of chocolate desserts, a plate of lemon truffles stops people in their tracks. They’re bright where everything else is rich, citrusy where everything else is sweet, and elegant in a way that looks far more effortful than it actually is.
Twenty minutes of work, a few hours in the fridge, and you have a confection worthy of a gift box, a dinner party platter, or an afternoon when you simply want something beautiful and delicious to exist in your kitchen.
Save this recipe for later, share it with your fellow citrus lovers, and make a batch this week — because lemon season is always in season. 🍋✨