If your no-bake oatmeal bars have ever fallen apart the second you lifted one off the pan, you already know that “no-bake” doesn’t automatically mean “easy.” The crumble is real. The frustration is real. But so is the fix — and it’s simpler than you’d expect. The difference between bars that hold a clean edge and bars that dissolve into a pile of oats the moment you touch them comes down to a handful of specific techniques that most recipes gloss right over. This guide covers all of them, plus a base recipe that works every single time.
Why No-Bake Oatmeal Bars Fall Apart
Before fixing the problem, it helps to understand what’s causing it.
No-bake oatmeal bars hold their shape through a combination of fat, sugar, and binding agents that set firm when cooled. When bars crumble, it almost always comes down to one of three issues:
- Too little binder. Honey, maple syrup, or nut butter aren’t present in high enough quantities to coat and glue every oat together
- Not enough pressing. The mixture wasn’t compacted firmly enough into the pan before chilling — loose oats don’t bond, no matter how long they sit in the fridge
- Cut too soon. Bars removed from the fridge or freezer before they’ve fully set will crumble no matter what the recipe says
The good news is that all three of these are completely controllable. Once you know what to watch for, bars that hold together become the reliable result rather than the lucky accident.
The Ingredients That Actually Bind
Not all oatmeal bar recipes are created equal. These are the binding ingredients that genuinely work — and why each one earns its place.
Nut butter is the most powerful binder in the no-bake bar toolkit. It’s thick, sticky, and coats each oat with a film of fat that helps everything compress and adhere. Use the full-fat, conventional variety — natural nut butters with separated oil are too unstable and produce oily, loose bars.
Honey or maple syrup adds sweetness and acts as a liquid binder that, when slightly warmed, flows between oats and sets sticky as it cools. Use enough — at least ⅓ cup per 2½ cups of oats — or the bars will be dry.
Melted coconut oil sets firm at room temperature and below, effectively gluing all other ingredients in place once the bars are chilled. Even a small amount — 2 to 3 tablespoons — makes a significant difference in how well bars hold together.
Chocolate chips or a chocolate drizzle layer added between layers or on top adds another setting agent as the chocolate firms.

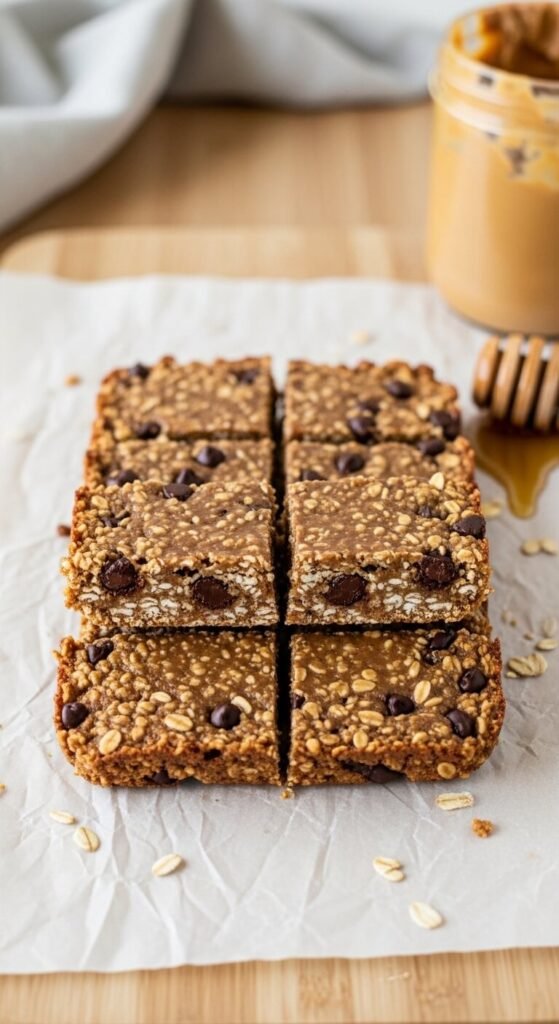
The Base Recipe That Holds Every Time
This recipe uses the right ratio of binders to oats — the specific quantities that produce firm, sliceable bars without being overly sweet or dense.
Ingredients:
- 2½ cups certified rolled oats
- ½ cup creamy peanut butter (or almond butter)
- ⅓ cup honey or maple syrup
- 3 tablespoons coconut oil, melted
- 1 teaspoon vanilla extract
- ¼ teaspoon salt
- ½ cup mix-ins of your choice (chocolate chips, dried cranberries, sunflower seeds, shredded coconut)
Instructions:
- Line an 8×8 inch pan with parchment paper, leaving overhang on two sides
- Warm the peanut butter, honey, and coconut oil together in a small saucepan over low heat, stirring until smooth and fully combined — about 2 minutes. Don’t boil
- Remove from heat and stir in vanilla and salt
- Pour the warm mixture over the oats and mix-ins in a large bowl. Stir until every single oat is coated — this step matters more than any other
- Transfer to the prepared pan and press firmly and repeatedly using the back of a flat spatula or the bottom of a glass. Press until the surface is completely smooth and compact
- Add an optional chocolate drizzle or pressed toppings before chilling
- Refrigerate for a minimum of 2 hours — 3 is better. Freezer for 45 minutes if you’re in a hurry
To slice: lift the slab from the pan using the parchment, place on a cutting board, and cut with one firm downward motion using a sharp knife.
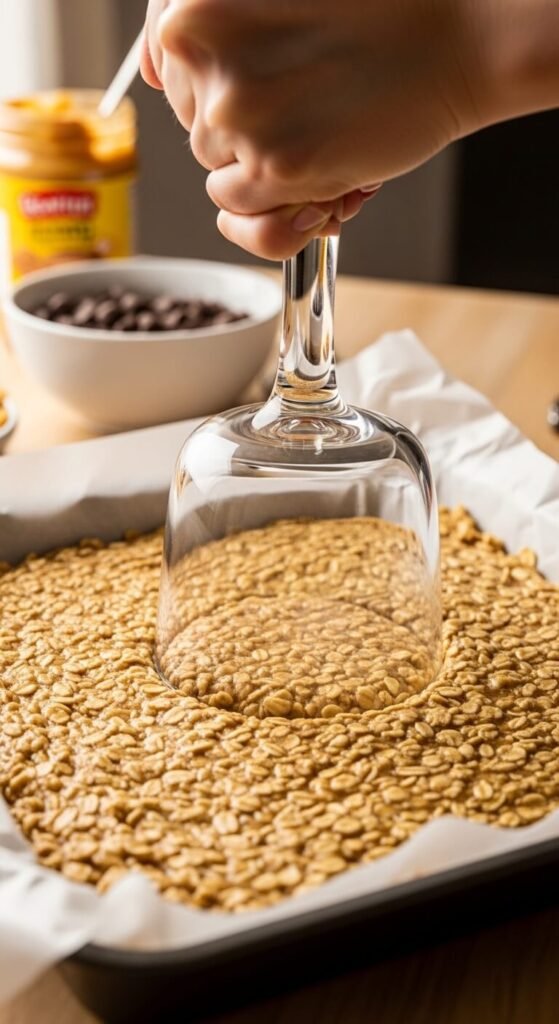
The Pressing Step — Why It Makes or Breaks Your Bars
This deserves its own section because it’s the step most people underdo.
When you transfer your oat mixture to the pan, it feels like it just needs to be spread out and left to chill. It doesn’t. It needs to be pressed with significant, sustained force until it compresses into a dense, unified slab.
Here’s how to press correctly:
- Use a flat, heavy surface — the bottom of a straight-sided glass, a metal measuring cup, or a flat spatula
- Press in sections, moving across the entire pan rather than pressing once in the center
- Apply real pressure — lean into it. The mixture should visibly compact and the surface should become smooth and tight
- Pay extra attention to edges and corners — these are the first places bars crumble, and they need the most compression
After pressing, the mixture should look uniform, feel firm to a light touch, and not spring back when you press your finger gently into the surface. If it bounces back, keep pressing.
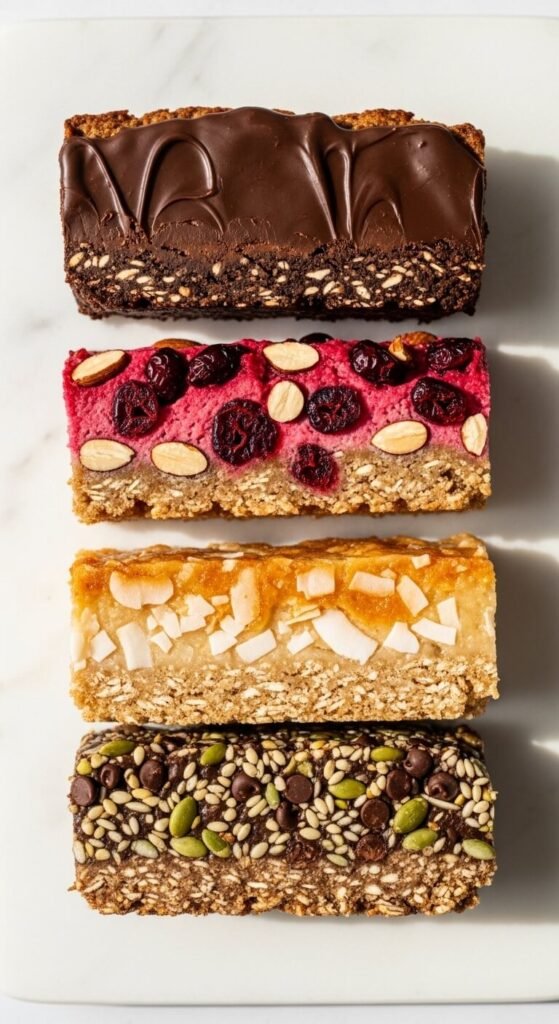
Flavor Variations That Work With the Base Recipe
Once you have the technique down, the variations are unlimited. These four are tested and reliable:
- Chocolate peanut butter: Stir 3 tablespoons of cacao powder into the warm binder mixture before combining with oats. Top with a melted dark chocolate layer before chilling
- Cranberry almond: Use almond butter instead of peanut butter and fold in dried cranberries and slivered almonds as the mix-in
- Coconut lime: Add ½ cup toasted shredded coconut and 2 teaspoons of lime zest. Use maple syrup for a lighter flavor
- Trail mix bars: Use a full ½ cup of mixed seeds, dried fruit, and chocolate chips as the mix-in for the most satisfying texture
Storage That Keeps Bars Firm
- Refrigerator: Store in an airtight container with parchment between layers for up to 1 week
- Freezer: Wrap individual bars in parchment and freeze for up to 3 months — thaw for 10 minutes before eating
- Room temperature: Up to 2 days in a cool kitchen — longer in warm weather causes the coconut oil to soften and bars may lose some firmness
One Pan, One Sunday, a Week of Perfectly Firm Bars
The crumbly oatmeal bar problem has one real solution: the right ratio of binders, every oat fully coated, and a pressing step done with actual commitment. Get those three things right and you’ll never have a bar fall apart on you again.
Save this recipe for your next meal prep day — and share it with anyone who’s given up on no-bake bars after one too many crumbly batches.