If you’ve ever bitten into a Reese’s Peanut Butter Cup and thought — this is the perfect food, someone should make a version of this that comes in a larger quantity and requires no trip to the gas station — this recipe is the answer to that specific thought. These no-bake peanut butter bars have the exact flavor profile of a Reese’s: the thick, slightly crumbly, sweet peanut butter layer and the smooth, snappy chocolate top. The difference is that you make them in a 9×13 pan, they slice into 24 bars, and the total cost is about $6 in ingredients.
They take 20 minutes to put together. They disappear faster than that.

Why These Actually Taste Like Reese’s
Most peanut butter bars taste like peanut butter and chocolate — which is good, but not quite the same thing. The Reese’s flavor comes from something specific: powdered sugar in the peanut butter layer and a particular ratio of butter to peanut butter that produces a slightly dense, almost crumbly texture rather than a soft, fudgy one.
The secret ingredient that bridges the gap is graham cracker crumbs mixed into the peanut butter layer. This is the detail most copycat recipes omit — and it’s the detail that produces the signature slightly dry, melt-in-your-mouth texture of the real thing rather than a dense peanut butter fudge.
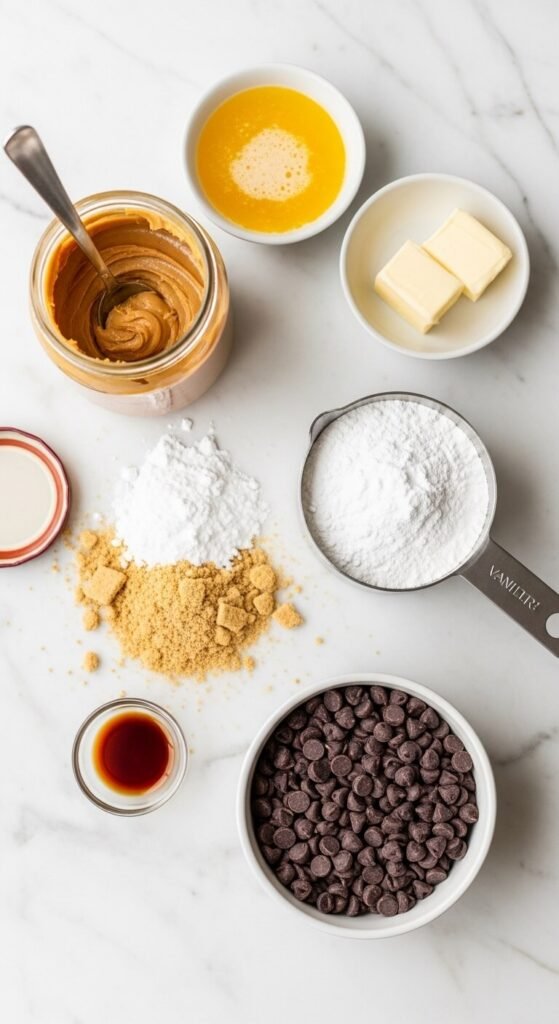
The Ingredients You Need
Everything here is available at any grocery store. No specialty items required.
For the peanut butter layer:
- 1½ cups creamy peanut butter — standard shelf-stable, not natural
- ½ cup unsalted butter, melted
- 2 cups powdered sugar, sifted
- 1½ cups graham cracker crumbs (about 10 to 12 full cracker sheets)
- 1 teaspoon pure vanilla extract
- ¼ teaspoon salt
For the chocolate layer:
- 1½ cups dark or semi-sweet chocolate chips
- 2 tablespoons creamy peanut butter
- 1 tablespoon coconut oil or unsalted butter
Ingredient notes that matter:
- Use standard creamy peanut butter — Jif or Skippy, not natural. Natural peanut butter has separated oils that make the layer greasy and prevent it from setting to the right texture.
- Sift the powdered sugar before measuring. Unsifted powdered sugar has lumps that don’t incorporate fully and leave white streaks in the finished layer.
- The 2 tablespoons of peanut butter in the chocolate layer isn’t optional — it keeps the chocolate flexible and prevents it from shattering when cut.
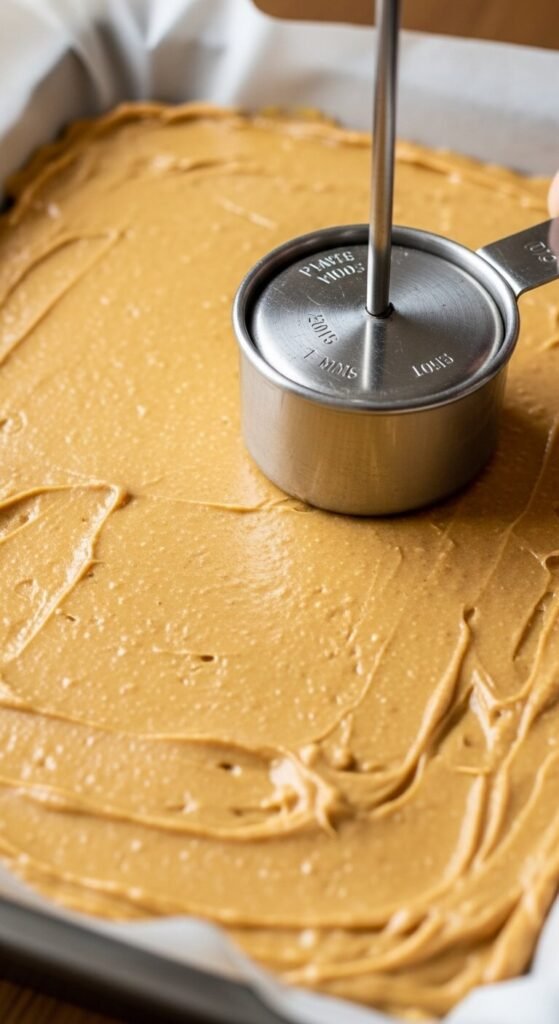
Make the Peanut Butter Layer
This layer comes together in one bowl with no cooking required. Fast, easy, and the batter alone tastes exactly like the inside of a Reese’s — which is its own reward.
Step by step:
- Combine the melted butter and peanut butter in a large mixing bowl and stir until unified and smooth.
- Add the vanilla and salt, then stir again.
- Add the powdered sugar and graham cracker crumbs in two additions, stirring between each until completely combined. The mixture will look crumbly at first and then come together into a cohesive, soft dough that holds its shape when pressed.
- Press firmly into a parchment-lined 9×13 inch pan. Use the flat bottom of a measuring cup to pack the layer tightly and evenly across the entire surface — pay close attention to corners and edges. The more compact this layer, the cleaner your bars will slice.
- Refrigerate for 15 minutes while you prepare the chocolate layer.
Add the Chocolate Layer
The chocolate layer is three ingredients and four minutes of work.
Step by step:
- Combine chocolate chips, 2 tablespoons of peanut butter, and coconut oil in a microwave-safe bowl.
- Microwave in 30-second intervals, stirring between each, until completely melted and smooth — usually 2 to 3 intervals total.
- Pour the melted chocolate over the chilled peanut butter layer and tilt the pan gently in all directions until the chocolate spreads to every edge. Use a small offset spatula to nudge it into the corners.
- Let it settle at room temperature for 3 to 5 minutes before refrigerating — this allows the chocolate to self-level completely before the cold sets it in place.
- Refrigerate for at least 1 hour until the chocolate is fully set.
The Cutting Technique That Keeps Everything Intact
Cutting these bars incorrectly is the only way to ruin them at this stage — and it’s completely avoidable.
Follow these steps for clean, intact bars:
- Let the pan sit at room temperature for 10 minutes after removing from the fridge. Chocolate cut while rock-cold shatters rather than slices.
- Use a sharp chef’s knife. Run the blade under hot water and dry it before each cut — the warm blade glides through set chocolate cleanly.
- Press straight down with one decisive motion per cut rather than sawing back and forth.
- Cut into rows first, then columns — 4 rows by 6 columns produces 24 bars in a size that feels satisfyingly close to an actual Reese’s cup.

Variations Worth Trying
White chocolate top: Replace dark chocolate with white chocolate chips and add a drizzle of dark chocolate across the surface once set. The flavor is sweeter and closer to a white chocolate Reese’s cup.
Extra salty version: Add an additional ¼ teaspoon of salt to the peanut butter layer and finish the chocolate top with a generous scatter of flaky sea salt immediately after pouring. The salt contrast makes the whole bar taste more complex and considerably more addictive.
Pretzel base crunch: Replace ½ cup of graham cracker crumbs with finely crushed pretzels for a salty-sweet crunch running through the peanut butter layer.
Storage That Keeps Them Perfect
- Refrigerator: Store in an airtight container between layers of parchment for up to two weeks — they actually get better after day two as the layers settle together
- Freezer: Freeze in a single layer first, then transfer to a container for up to three months — thaw for 10 minutes before eating
- Room temperature: These hold their shape for up to 4 hours at room temperature, making them ideal for parties and bake sales
Save This Recipe — You’ll Make It Every Single Week
No-bake peanut butter bars sit in a rare category of desserts where the effort involved and the result delivered are wildly, almost unfairly disproportionate. Twenty minutes of work. Two layers. One pan. And the finished result tastes better than the candy bar that inspired it — because you made more of it.
Pin this recipe to your no-bake desserts board right now and make your first batch this weekend. Fair warning: you’ll want to keep the pan hidden or it won’t last 24 hours.