The crumbling crust is the single most common no-bake pie problem — and it happens at the worst possible moment. You’ve made a beautiful filling, chilled the whole thing for hours, and then the first slice comes out and the crust shatters, falls apart, and ends up scattered across the plate in golden fragments that bear no resemblance to the clean, sturdy shell you were counting on. The filling is fine. The flavor is fine. But the structural failure ruins the presentation and makes serving the rest of the pie a stressful excavation project. The good news is that a crumbling crust is never a recipe problem — it’s always a technique problem with a completely reliable fix.
Why No-Bake Pie Crusts Fall Apart
Every crumbling no-bake crust traces back to one of four causes — and most failed crusts have more than one working against them simultaneously.
Not enough butter. Butter is the binder in a no-bake crust. It coats the crumbs, fills the spaces between them, and solidifies when cold to hold everything in a unified structure. Too little butter and you have a loose pile of crumbs that looks like a crust before chilling and falls apart like one the moment a fork touches it.
The wrong crumb texture. Crumbs that are too coarse leave large gaps between pieces that butter can’t bridge. Crumbs that are too fine compact into a dense, dry paste that crumbles when cut. The target is a consistent, medium-fine crumb that looks like damp sand when mixed with butter.
Pressed with insufficient force. Most people press a no-bake crust the way they’d press a bruise — gently and with concern. A crust that holds requires firm, sustained, deliberate pressure that compacts the crumbs into a dense, cohesive structure rather than a loosely gathered layer.
Not chilled long enough before filling. A crust that hasn’t fully solidified before the filling goes in absorbs moisture from the filling and softens before it ever had a chance to set properly.
The Butter Ratio That Produces a Structural Crust
This ratio works for any crumb type — graham crackers, Oreos, Nilla wafers, digestive biscuits, or gingersnaps.
The formula:
- 1½ cups fine crumbs — from approximately 10 to 12 full graham crackers or equivalent
- 6 tablespoons unsalted butter, melted — not 5, not 4, not the amount most recipes specify
- 3 tablespoons granulated sugar — for sweetness and additional binding
- ¼ teaspoon salt — sharpens flavor and makes the crust taste intentional rather than bland
Why 6 tablespoons specifically: Most standard recipes use 5 tablespoons — and that one tablespoon difference is exactly the margin between a crust that holds and one that crumbles at the edges. The additional fat fully saturates the crumb mixture so that every particle is coated and every gap is filled. When the butter solidifies in the refrigerator, it acts like mortar between individual crumb pieces.

Getting the Crumbs Right
The crumb texture is the foundation of everything that follows — and it’s worth the extra minute to get it right.
Food processor method: Pulse whole crackers until you reach an even, medium-fine texture with no pieces larger than a small pea. About 15 to 20 pulses.
Bag method: Place crackers in a sealed zip-lock bag and roll firmly back and forth with a rolling pin until completely uniform. Takes about 2 minutes. Shake the bag and check for large pieces — any visible chunks will create weak points in the finished crust.
The wet sand test: After mixing crumbs with butter and sugar, squeeze a handful in your fist. It should clump together and hold its shape cleanly when you open your hand — like wet beach sand. If it crumbles apart immediately, add another teaspoon of melted butter and test again.
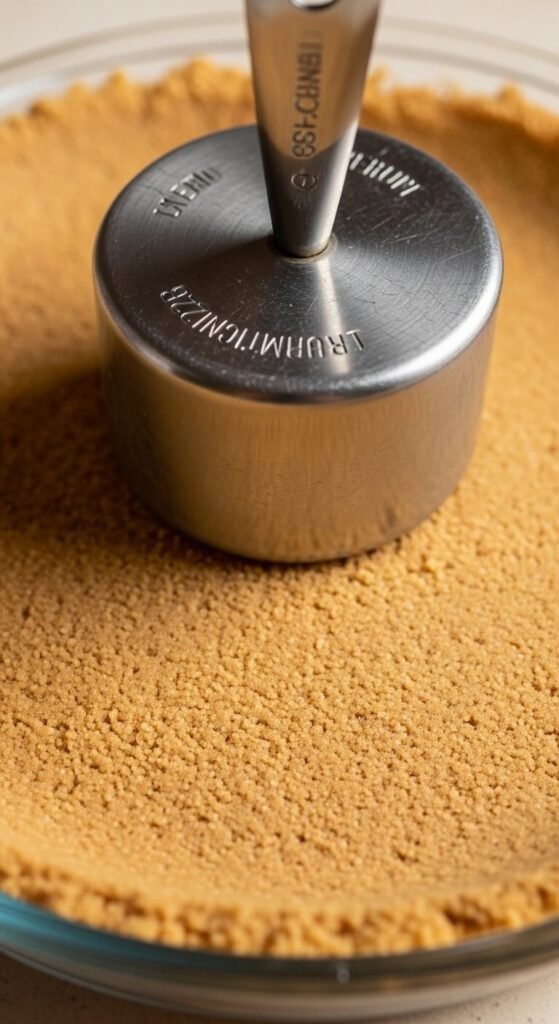
The Pressing Technique That Makes the Difference
Transfer the butter-crumb mixture to a 9-inch pie dish. Start by distributing the mixture roughly across the base and up the sides with your fingers.
Now press. Actually press.
For the base: Use the flat bottom of a dry measuring cup and press with firm, even downward force across the entire base. Overlap your pressing area by about half with each pass so no section gets missed. The base should look compressed, dense, and completely flat — not textured or fluffy.
For the sides: Use your thumb or the back of a spoon to press the mixture firmly against the sides of the dish and up to the rim. Work in small sections. The crust wall should be an even thickness — about ¼ inch — all the way around. Thin spots crack when sliced. Thick spots crumble because there’s not enough butter-to-crumb ratio at that thickness.
The rim detail that prevents edge crumbling: Once the sides are pressed, run your thumb around the top edge of the crust to compress it firmly into the dish rim. This is the part that crumbles first when sliced — compressing it now prevents that.
Chill the Crust Before Adding Any Filling
This step is the one most people skip when they’re eager to assemble the pie — and it’s the one that most directly prevents a soggy, structurally compromised crust.
Freeze the pressed crust for 15 to 20 minutes before adding any filling. Not refrigerate — freeze. The brief freeze fully solidifies the butter throughout the entire crust structure before the moist filling makes contact.
A properly frozen crust has already done most of its structural work before the filling ever touches it. The moisture the filling releases during chilling is absorbed at the surface of an already-solid crust rather than into an unstable, still-forming one.
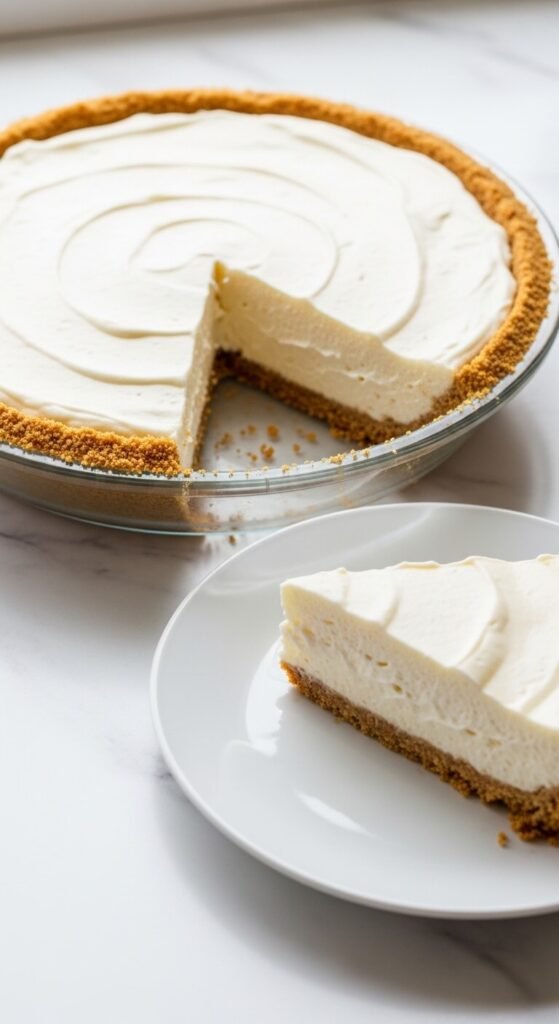
Filling and Final Chill
Pour your prepared no-bake filling into the frozen crust. Smooth the surface flat. Cover with plastic wrap pressed directly against the filling surface.
Refrigerate for a minimum of 6 hours — overnight is better. The long chill allows the filling to set completely and the crust to continue firming around it.
Before slicing:
- Run a sharp knife under hot water and dry it before each cut
- Press straight down with one clean motion rather than sawing
- Use a pie server with a sharp edge to lift each slice cleanly from the dish
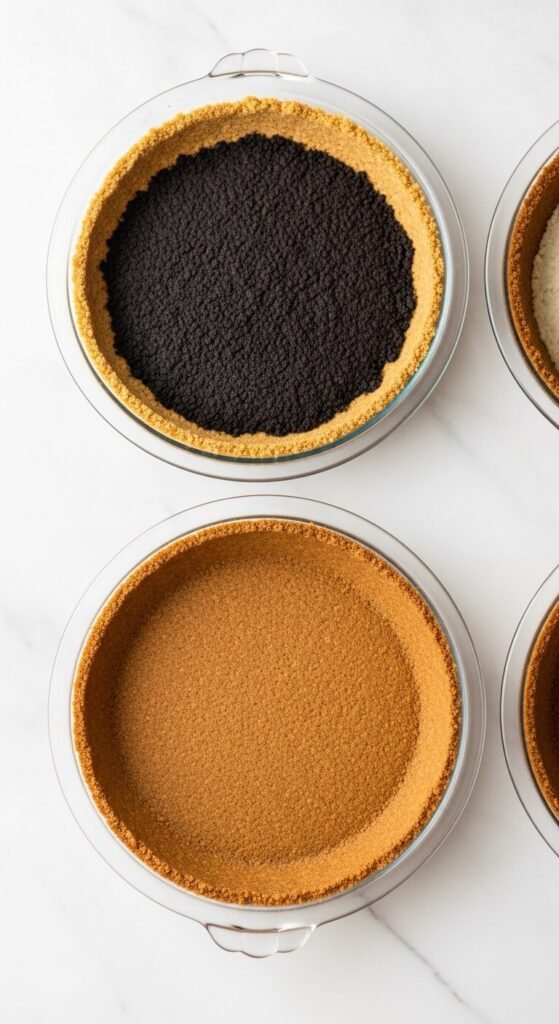
Variations That Work With This Crust Formula
- Oreo crust: Use 1½ cups of crushed Oreos — filling included — with 5 tablespoons of butter. The filling in Oreos adds its own binding, so slightly less butter is needed.
- Gingersnap crust: Use 1½ cups of gingersnap crumbs with the standard 6 tablespoons butter. The spiced crust pairs perfectly with pumpkin, lemon, or cream cheese fillings.
- Pretzel crust: Replace ½ cup of graham crumbs with finely crushed pretzels for a salty-sweet base that works beautifully under chocolate or peanut butter fillings.
Save This Recipe — Perfect Crust Starts Here
A no-bake pie crust that holds together when sliced is the result of the right butter ratio, correctly textured crumbs, genuine pressing force, and a proper freeze before filling. Four specific things — all of them simple, none of them complicated — that produce a crust you can cut cleanly, serve confidently, and be proud of every single time.
Pin this article to your no-bake pies or baking tips board right now — it’s the technique guide that fixes the one thing standing between you and a perfect no-bake pie at every occasion.