There is a specific texture that separates a truly extraordinary peanut butter ball from a merely good one — and most people have never experienced it because most recipes don’t pursue it. The ordinary version is dense, slightly grainy, and requires actual chewing effort. It tastes like compressed peanut butter with a chocolate shell. The extraordinary version practically dissolves the moment it makes contact with your tongue — releasing a wave of rich, buttery, sweet peanut butter flavor before the chocolate coating even has a chance to catch up. Getting from ordinary to extraordinary requires understanding exactly two things: the fat ratio in the filling and the temperature at which you work with it.

What Actually Creates the Melt-in-Your-Mouth Texture
Most peanut butter ball recipes rely heavily on powdered sugar for structure — and powdered sugar, while necessary, is also the thing that creates density and a slightly chalky mouthfeel when used in excess.
The melt-in-your-mouth quality comes from a specific balance of three elements working together:
- Softened butter — real butter, generously measured, creates a fat-rich filling that begins to soften at body temperature the moment it hits your tongue
- The right amount of powdered sugar — enough to provide structure and sweetness, not so much that it dominates the texture
- Creamy peanut butter at the correct temperature — room temperature peanut butter blends smoothly; cold peanut butter creates a denser, less yielding mixture that never quite achieves the right texture regardless of how long you work it
The ratio that produces the best result: for every 1 cup of peanut butter, use 4 tablespoons of softened butter and 1½ cups of powdered sugar. This produces a filling that holds its shape when cold but releases almost instantly at mouth temperature.
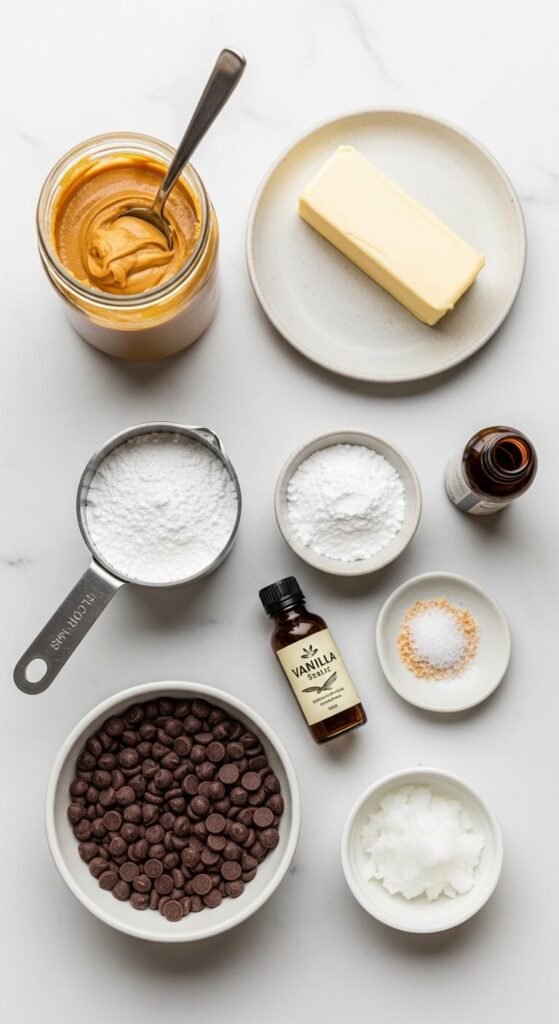
The Ingredients
For the peanut butter filling:
- 1 cup creamy peanut butter — standard shelf-stable, not natural
- 4 tablespoons unsalted butter, softened to room temperature
- 1½ cups powdered sugar, sifted
- 1 teaspoon pure vanilla extract
- ¼ teaspoon salt — even if your peanut butter is already salted
For the chocolate coating:
- 10 oz dark or semi-sweet chocolate chips or chopped chocolate
- 1 tablespoon coconut oil or vegetable shortening
- Flaky sea salt for finishing
On the peanut butter choice: Natural peanut butter with separated oil creates an inconsistent filling — sometimes too greasy, sometimes too dry depending on how well the oil was incorporated before measuring. Standard Jif or Skippy produces a uniform, reliable filling texture every single time.
Make the Filling
The mixing process takes about five minutes and the order genuinely matters.
Step by step:
- Beat the softened butter alone in a large bowl for 1 minute until fluffy and pale. Starting with well-beaten butter creates a base that accepts the peanut butter more smoothly.
- Add the peanut butter, vanilla, and salt and beat on medium speed for another 2 minutes until completely unified and slightly airy.
- Add the sifted powdered sugar in two additions — add half, mix on low until incorporated, add the second half, mix again. Sifted sugar produces a smoother filling; unsifted sugar leaves micro-lumps that contribute to graininess.
- Check the consistency. The filling should be firm enough to roll into a ball without sticking to your hands but soft enough that pressing it between your fingers produces a smooth, yielding surface with no crumbling. If too soft, add 2 tablespoons of powdered sugar. If too stiff, add 1 teaspoon of softened butter.
- Refrigerate for 30 minutes. Cold filling rolls cleanly and holds its shape during the dipping process. Room temperature filling softens too quickly under the warmth of your hands.
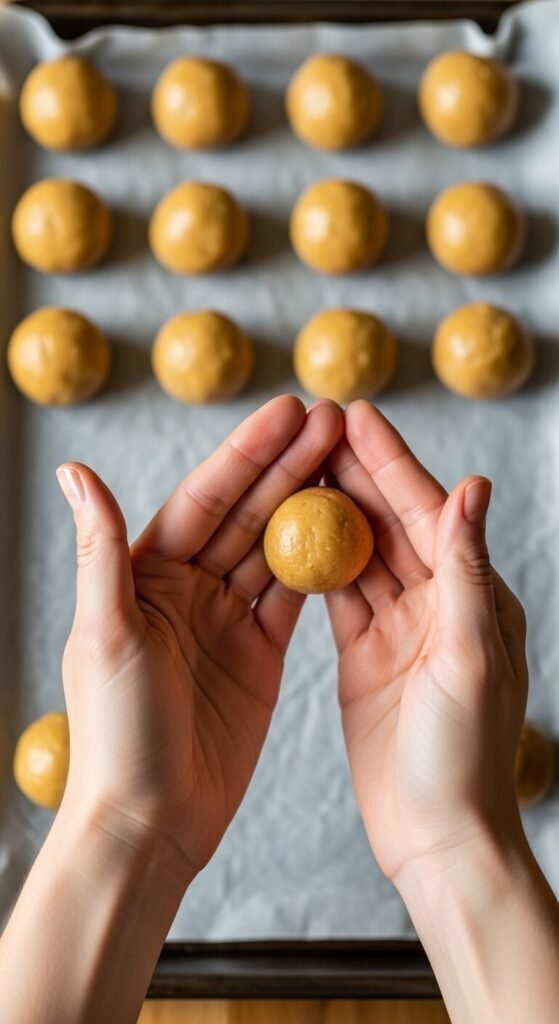
Roll for Consistent Results
Use a tablespoon-sized cookie scoop for uniform portions. Roll each between your palms quickly — the goal is a smooth sphere before the warmth of your hands begins softening the surface.
Tips for the best rolling results:
- Work in batches — scoop all portions before rolling any of them
- If the filling starts sticking to your hands mid-session, refrigerate the unrolled portions for 10 minutes and continue
- Aim for balls slightly smaller than a golf ball — this size produces the ideal filling-to-chocolate ratio in the finished piece
- Place finished balls on a parchment-lined tray without touching each other
Freeze for 20 minutes before dipping. Not refrigerate — freeze. A partially frozen filling ball stays firmly on the dipping fork, sets the chocolate coating almost instantly on contact, and produces a clean, crack-free shell. Refrigerator-cold balls work but frozen balls work significantly better.
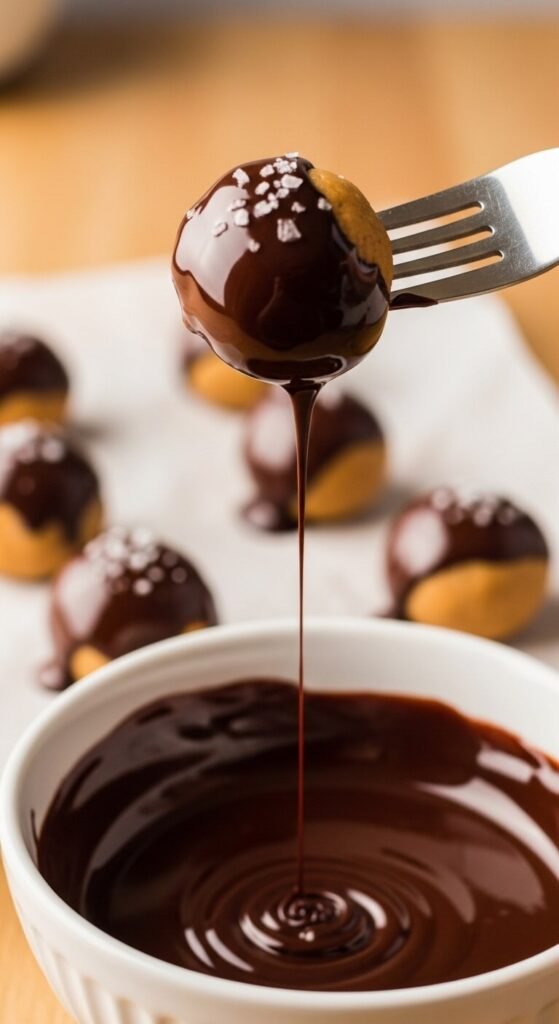
Dip in Chocolate Without Losing the Shell
The chocolate coating is the final step and the one with the most visible margin for error. A few technique details produce professional results consistently.
Melt the chocolate: Combine chocolate chips and coconut oil in a deep, narrow microwave-safe bowl. Microwave in 30-second intervals, stirring between each, until completely smooth. A deep narrow bowl is the most important equipment choice here — it provides the depth needed to submerge a ball completely in one motion.
The dipping process:
- Drop one frozen peanut butter ball into the melted chocolate
- Use a fork to roll it until completely coated on all sides
- Lift with the fork and tap the handle gently against the bowl rim — let excess chocolate drip back into the bowl for 5 to 8 seconds
- Slide the coated ball off the fork onto parchment using a toothpick to push it cleanly from the tines
- Immediately add a pinch of flaky sea salt to the top before the chocolate sets
Work through all the balls in one continuous session. The frozen filling keeps each ball cold and firm throughout the process.
Storage and Serving Notes
- Refrigerator: Store in an airtight container between layers of parchment for up to 2 weeks — the flavor and texture actually improve after the first 24 hours as everything melds together
- Freezer: Freeze in a single layer first, then transfer to a labeled container for up to 3 months — eat directly from frozen for a firmer, candy-bar-like texture or thaw for 10 minutes for the full melt-in-your-mouth experience
- Serving tip: Remove from the refrigerator 8 to 10 minutes before serving — the filling softens just enough to achieve maximum melt quality at slightly above fridge temperature
Save This Recipe — These Are the Peanut Butter Balls People Remember
The difference between a peanut butter ball that dissolves on your tongue and one that requires chewing comes down to butter ratio, proper mixing technique, and working at the right temperatures throughout. Get those three things right and you produce something that people specifically request at every gathering they attend after tasting them the first time.
Pin this recipe to your no-bake desserts or holiday treats board right now — make your first batch this weekend, and prepare to be asked for the recipe by everyone who tries one.