Few things capture the feeling of the holiday season quite like peppermint bark. That first snap — clean, satisfying, the dark chocolate and white chocolate layers separating perfectly — followed by the cool rush of peppermint and the slow, rich melt of good chocolate. It sounds like something that should be complicated to make at home. It isn’t. But there’s a reason some batches snap beautifully and others bend, crumble, or separate into layers that slide apart the moment you pick them up. The difference is almost entirely technique — and once you understand the two or three things that matter, you’ll make flawless peppermint bark every single time.
Why Homemade Beats the Tin Every Time
The famous department store tins of peppermint bark are a holiday institution — and also a useful benchmark. Taste them carefully and what you’re noticing is a certain waxy quality, a sweetness that crowds out the peppermint, and layers that slide apart before you’ve even gotten the piece to your mouth.
Homemade peppermint bark, made with real chocolate, solves all three problems at once. Real chocolate has a cleaner snap, a deeper flavor, and — with the right technique — layers that bond completely and hold together through every break and bite.
The investment is minimal. The return is extraordinary.
What You’ll Need
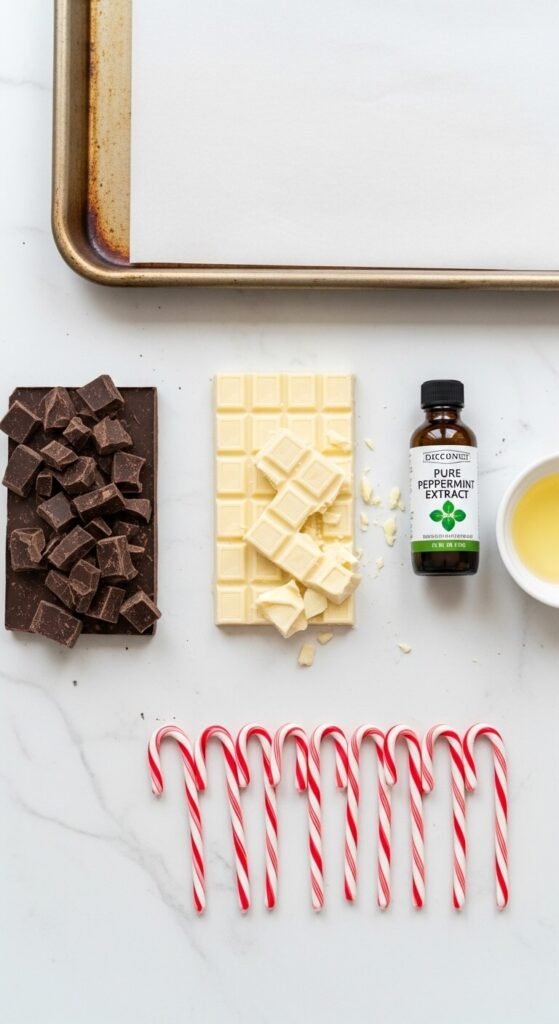
Ingredients (makes one 10×15 inch sheet, about 30 pieces):
- 12 oz (340g) good quality dark chocolate — 60–70% cacao, chopped from bars or using high-quality chips
- 12 oz (340g) good quality white chocolate — real white chocolate containing cocoa butter, not white chocolate-flavored chips. Check the label: cocoa butter should be listed.
- 1 teaspoon peppermint extract — pure, not imitation. Start with ¾ teaspoon if you’re sensitive to peppermint intensity.
- ½ teaspoon vegetable oil or coconut oil — added to each chocolate layer for smoothness and a slightly more flexible set
- 8–10 regular candy canes or ⅓ cup crushed peppermint candies
On the chocolate: This is the single most important ingredient decision. Grocery store baking chips work, but chocolate bars chopped by hand melt more smoothly and produce a cleaner snap in the finished bark. Ghirardelli, Guittard, or Lindt bars are all excellent choices at an accessible price point.
On the white chocolate: Read the label carefully. Real white chocolate contains cocoa butter and behaves completely differently from the cheap “white baking chips” that contain palm oil instead. The cheap version won’t snap — it’ll bend and taste waxy. Cocoa butter is the ingredient that matters.
Crush the Candy Canes First
Before any chocolate gets melted, prepare your candy cane topping. This sounds trivial and it isn’t — having the crushed candy ready before you start means you can work quickly once the white chocolate is poured.
How to crush candy canes cleanly:
- Place unwrapped candy canes in a zip-lock bag and seal, pressing out the air
- Use a rolling pin or the bottom of a heavy pan to crush into pieces — aim for a mix of small shards and slightly coarser chunks for visual interest
- Sort out any very fine powder if you prefer a cleaner look, or leave it for a more rustic result
The pieces should range from roughly ¼ inch to ½ inch — large enough to see clearly against the white chocolate, small enough to not fight the chocolate when you bite through.
Melt and Layer the Dark Chocolate
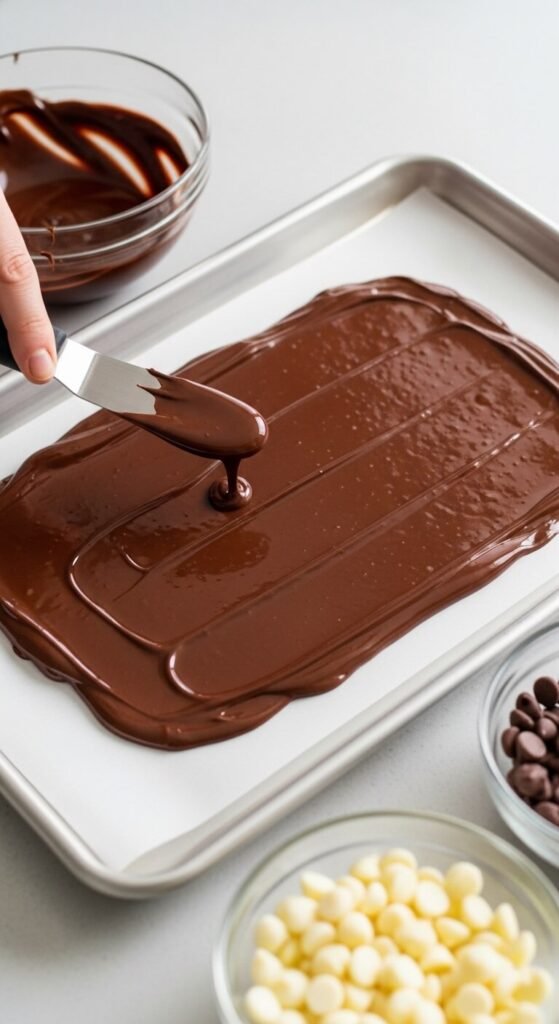
Line a rimmed baking sheet (approximately 10×15 inches) with parchment paper. Smooth edges and no bubbles — parchment that wrinkles under the chocolate creates uneven thickness in the finished bark.
Melt the dark chocolate:
- Combine the chopped dark chocolate with ½ teaspoon of oil in a microwave-safe bowl
- Microwave in 30-second intervals, stirring after each, until just melted and smooth — usually 2 to 3 rounds. Stop when there are still a few unmelted pieces and stir them in with the residual heat.
- Stir in ½ teaspoon of peppermint extract
Pour the melted dark chocolate onto the prepared parchment and spread immediately to an even layer about ¼ inch thick using an offset spatula or the back of a large spoon.
Refrigerate for exactly 15 minutes — until the dark chocolate is set but not ice cold. This is the critical timing detail. Set but not frozen means the two layers will bond; frozen means the white chocolate will shock against it and the layers will separate cleanly when you pick them up — which looks lovely in the pan and terrible when you try to eat it.
Add the White Chocolate Layer
Melt the white chocolate:
- Same process as the dark — 30-second microwave intervals, stirring between each
- White chocolate is more heat-sensitive than dark and can seize quickly if overheated. Stop microwaving the moment it’s mostly melted and stir the remainder until smooth.
- Stir in the remaining ½ teaspoon of peppermint extract and the remaining oil
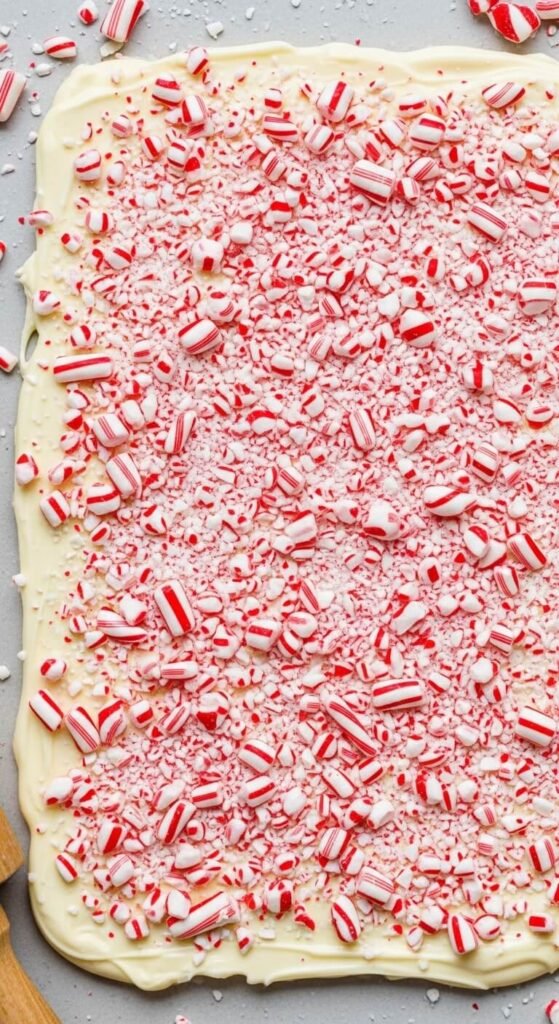
Remove the dark chocolate layer from the refrigerator. Working quickly, pour the white chocolate over the dark layer and spread gently to the edges. The goal is an even layer of roughly the same thickness as the dark chocolate beneath it.
The one thing that causes layer separation: Pouring white chocolate that’s too hot onto dark chocolate that’s too cold. Both should be at a moderate temperature — white chocolate just melted and slightly cooled, dark chocolate just set and still slightly cool, not frozen. When both are at compatible temperatures, they bond at the interface and become essentially inseparable.
Top, Set, and Break
Immediately scatter the crushed candy canes generously over the white chocolate surface while it’s still completely liquid. Press the pieces in very gently with your fingertips — just enough to anchor them, not enough to push them through to the dark layer.
Refrigerate for 1 full hour until completely solid throughout — both layers, all the way through.
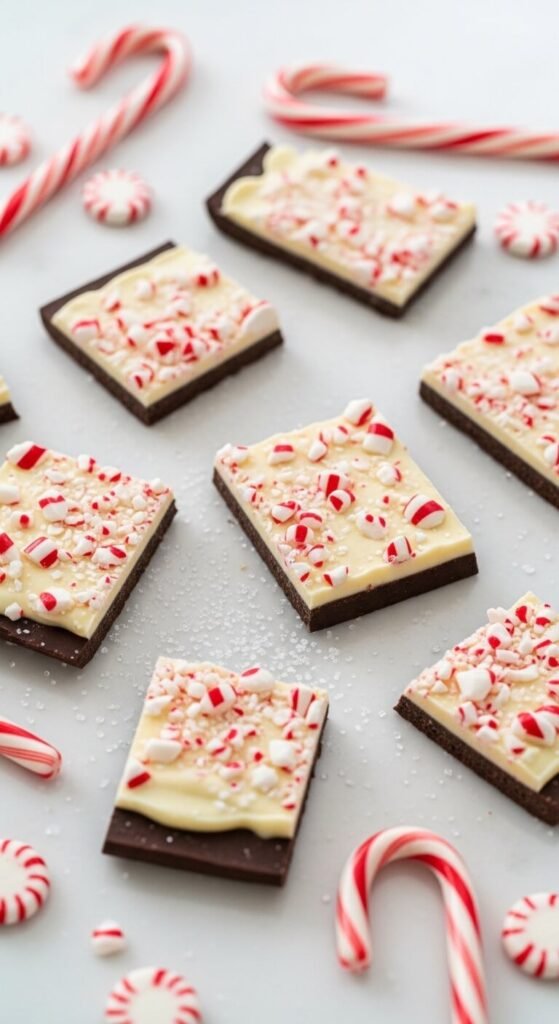
To break the bark:
- Lift the parchment sheet off the pan and place on a flat surface
- Use your hands to break into irregular pieces — start with a few clean breaks down the center, then work outward
- For cleaner pieces, use a sharp chef’s knife to score lines before breaking
- Embrace the irregular shapes — imperfect shards are part of peppermint bark’s considerable charm
Storage and Gifting
Store in an airtight container in a cool, dry place — or in the refrigerator if your home runs warm. Properly made peppermint bark keeps for up to 3 weeks.
For gifting, stack pieces in clear cellophane bags tied with ribbon, layer them in a tin between parchment sheets, or pile them in a small gift box. A simple label listing the ingredients adds a lovely personal touch.
The Takeaway
Perfect peppermint bark comes down to three things: real chocolate with cocoa butter in both layers, the right timing between pours, and patience while it sets completely. Get those right and everything else is just snapping and gifting.
Save this recipe before the holiday season begins — make a double batch on a free afternoon, break it into beautiful pieces, and have the most impressive homemade gift ready before December has barely started. 🍬✨